

beamoflight
-
Posts
185 -
Joined
-
Last visited
Content Type
Profiles
Forums
Blogs
Events
Downloads
Gallery
Store
Posts posted by beamoflight
-
-
<p>YouTube is a great resource of instructional videos on Large Format photography, for example see also this hilarious and enticing video about LF photography by Jason Brunner, a trailer for his upcoming but still in production DVD "Intro to Large Format Photography":</p>
<p>http://www.youtube.com/watch?v=a64iG-A-cRI</p>
<p>APUG (the Analog Photography Users Group - http://www.apug.org) should also be in your bookmarks list...</p>
<p>Marco</p>
-
<p>Hmm, well, it seems there is already something almost equivalent to a 4x5 inch LF digital sensor, and this one does have resolution...:</p>
<p>http://www.fairchildimaging.com/products/fpa/ccd/area/ccd_595.htm</p>
<ul>
<li><strong>9216 x 9216</strong>(!) full frame CCD array</li>
<li>8.75µm x 8.75µm pixels</li>
<li><strong>80.64mm x 80.64mm</strong> image area</li>
<li>100% fill factor</li>
<li>Non multi-pinned phase (MPP) operation</li>
<li>8 outputs (4 on each side)</li>
<li>Readout noise less than 30 e- at 100MHz (25MHz x 4)</li>
</ul>
<p>That's about 85 Mpixel, not bad... Aerial camera product though at this moment made by Fairchild Imaging.</p>
<ul>
</ul>
-
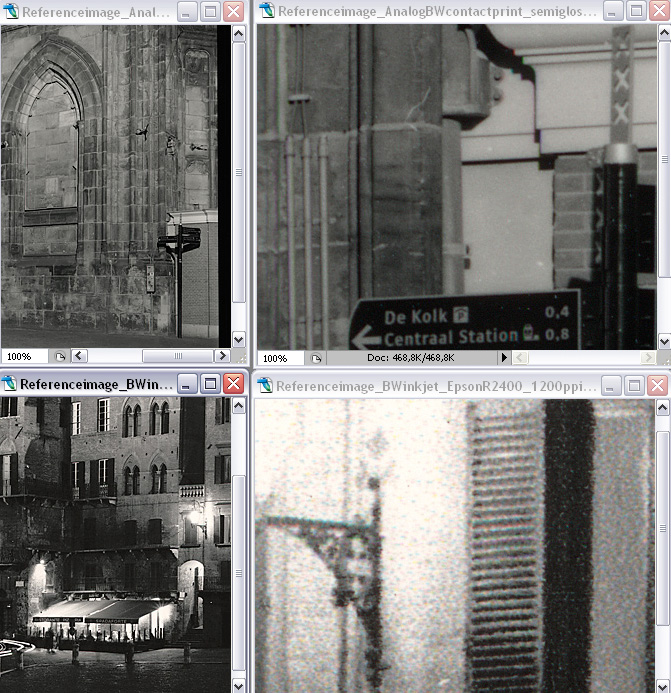
<p>Sorry, here are the scans I wanted to include.</p>
<p>Top two images are the analog contact print scans at 100 ppi and 1200 ppi. Again, the 100 ppi scan about represents real world size on most computer monitors, the 1200 ppi scan an 8-12x enlargement. Bottom two images Epson R2400 scans at the same resolution.<br /> I now noticed, after insertion, that Photo.Net automatically downsizes to fit allowable page width and doesn't allow you to see the full resolution.... Grrr! Be aware of it, it is displayed at slightly below 100%</p>
<p>Still, I think you can see the difference in quality easily.</p>
<p><img src="http://www.boeringa.demon.nl/forum/photo_net/print_resolution_of_photography_books_and_8X10_LF/Print_resolution_4x5contact_vs_EpsonR2400.jpg" alt="" /></p>
-
<p>Well, since there is not much difference between offset printed matter and digital prints from for example my Epson R2400, maybe these two images will show you the difference in quality between what a large format negative (in this case a contact print of a 4x5 400 ISO negative) can display, and the quality of a digital print on the R2400.</p>
<p>The scans were made at 1200 ppi (pixels per inch), and since most modern computer monitors run at about 100-150 ppi, looking at these images is like viewing them through about an 8 or 12 times enlarging loupe. So this is how you would see these images while looking through such a loupe.</p>
<p>Please note the Epson print was on Harman fibre based <strong><em>matte </em></strong>paper, and hence does not have a very high maximum black. In addition, I could probably have it adjusted a bit more in PS.</p>
<p>Yes, the difference is REALLY that shocking. But in reality, when viewed at non-enlarged conditions, the Epson print looks great. To show you this, the overview images are scans at 100 ppi. This means that when you view them on screen, they are about the "real-world" size...</p>
<p>The line pattern is an offset print scan at 1200 ppi, just as a last reference.</p>
<p> </p>
-
<p>Well, always funny how reality can overtake you:<br>
<br /> http://www.dpreview.com/news/1008/10083101canonlargestsensor.asp<br>
<br /> 8x8 inch(!) digital one-shot CMOS sensor developed by Canon... That is almost 8x10 Large Format, although the current wafers don't allow the full 8x10, but of course, 4x5 no problem...<br /> Also a similar discussion about LF digital sensors in this Photo.Net thread:<br>
<br /> http://www.photo.net/large-format-photography-forum/00X7Qd?start=0<br>
<br /> Still, price will be as phenomenal as the sensor I guess, if it ever makes it to a commercial product for the professional photographer. Also wonder about the cooling of the thing... as I already pointed out some MF size sensors use / need active cooling.</p>
-
<blockquote>
<p>Correction(1): Many LF digital 4x5 scan backs are NOT MF scan backs. I am not sure why you got that idea from. Chip type backs are even tiny. MF ones are often sub MF in size too.</p>
</blockquote>
<p>Kelly,</p>
<p>I think you misunderstood me. I fully agree with you that LF digital scan backs are no "MF scan backs". In fact, although they may have existed at some point in time, I have never seen images of a "MF scan back".</p>
<p>What I was referring to is that, except for the existence of LF scan backs, there is no equivalent of a full frame MF digital "one-shot" back, a digital back the size of a 4x5 inch negative with a similar sized sensor that can take a photo in one ago, without a slow scanning action.</p>
<p>Again, that would require a huge 4x5 inch sensor... Considering some MF backs (and maybe all?), already need active sensor cooling using a build in fan, I guess a 4x5 sensors cooling fan would be the size of a WWII Spitfire propellor... ;-)</p>
<blockquote>
<p>Correction(2): NO LF scan backs ever made even came close to covering 4x5; they are all truncated in scan/capture area; ie what today folks call "cropped". There are no "almost cover 4x5 LF digital backs"; except in Hogwarts! :).</p>
</blockquote>
<p>I never had a really close look at the scanned area size advertized by the manufacturers of such scan backs, but immediately take your word for it. Actually, this makes the thought of a true "<strong>full frame LF</strong> digital back" appearing anytime in the future, let alone for an affordable price, even more a complete phantom... if even the existing scan backs do not cover it, nor ever did...</p>
<blockquote>
<p>To All; when I compare a direct scan with the 50 megapixel back to a scan of a sharp 4x5 scanned with a flatbed; the 50 megapixel direct scan holds more details. This is with a V700, V500, 2450 etc scan. This includes the added area that the full 4x5 has compared to the cropped 4x5 digital ie 7x10cm. Thus here if I shoot a detailed wall with the 4x5 50MP back and with a 4x5 transparency; the flatbed scan picks out less details; even if one lets the map fill the entire 4x5 frame.</p>
</blockquote>
<p>Might well be, a flatbed is not the equivalent of an Imacon or drum scan. 50 MP from a high end scan back or MF digital back, is a lot for sure, although a 100 ISO film scanned on a drum scanner might squeeze out a little more... but not much. Than again, how much more does one really need???</p>
<blockquote>
<p>Probaby none of this stuff will ever be inexpensive ever. The market is very tiny.</p>
</blockquote>
<p>Agree!</p>
-
<p>I wasn't commenting on the quality of your work or whether you are a good photographer or not, neither do I pretend to be one myself, and especially not "just because I shoot LF" or so... I leave that to others to judge.<br>
But I was just wondering if you have any idea what these digital backs actually cost... Unless you are doing this completely professional and are already some succesful studio or architectural photographer, or have some extremely well paid job covering the costs of your photo hobby, the prices are just prohibitive.<br>
Sure, I'd like one too, but that's not going to happen anytime soon...</p>
-
<p>Ah well, I see you already have a T/S lens... well, stick with it, or buy a lens-baby for more creativity.</p>
-
<blockquote>
<p>Great replies, thanks a lot!<br /> @Bob Salomon: Unfortunately, I'm not in the USA. What did you expect, reading my terrible English ;-)?<br /> It makes sense why some people choose for large format, instead of a proprietary medium format system. Let's hope digital backs get a bit cheaper, film is not my cup of tea.</p>
</blockquote>
<p>Sorry, but you can wait till you drop dead before true large format digital backs become affordable - <em>they don't even exist at this point of time if we discount the scan backs</em>. Except scanning backs, which almost cover 4x5, the only digital "LF" backs are in fact <strong>NOT</strong> LF backs, but MF backs fitted to LF camera's, and even those cost enough to buy a car!</p>
<blockquote>
<p>film is not my cup of tea</p>
</blockquote>
<p>Well, in my opinion, it should be if you seriously want to get into LF. I have the strong feeling, you don't know what you are getting into... Operating an LF camera can be quite a hassle (but I love doing it - well at least most of the time ;-) ), and setting up and taking a single(!) shot can take anywhere from 10-60 minutes.</p>
<p>Really, if you don't care for film (it is not that difficult, learn develop it yourself, it's fun), than cut the crap and buy a tilt/shift lens for your DSLR. It won't brake your bank, and it will do "more or less" the only thing you really seem interested in.</p>
<p>And if you do consider 4x5 film, an Epson V700/750 at a scanning resolution of 2000 ppi (pixels per inch) should deliver stunning digital files of about 8000x10.000 = 80 Mpixel resolution.</p>
<p>Of course, nothing beats printing analog in your own darkroom... (not that many here will agree, but I don't care, it's my cup of tea ;-) )</p>
-
<p>Hi Elizabeth,</p>
<p>Not exactly what you intend to do, but I do think the work of this artist, Chris Berens, may give you some idea's. There were two good episodes on his special technique of multiple transparent painted ink layers on a kind of transparent material (plastic?, thin paper?, I don't recall) by Hi Fructose art magazine:</p>
<p>Part 1:<br>
<p>Part 2:<br>
<p>And some more examples:<br>
http://hifructose.com/index.php?option=com_content&task=view&id=366</p>
<p>Marco</p>
-
<p>Sorry Art if I was a bit harsh on you yesterday. To be honest, it was not my best day...</p>
<p>We're probably not going to fully agree on the usefulness of the test I did, but that doesn't matter to me. Point is, I have at least made a serious attempt to be thorough and put a lot of work in it, and I don't like to be "dismissed" based on remarks made in "thin air" as quite often happens. Or based on some uncontrollable mythical "expert knowledge" that some people claim to have... Like saying "Oh, I heard two decades ago from a now deceased person at company X that lens Y can reach 200 lp/mm resolution with film Z. They have published it in an internal report that isn't accessible..." Yeh, sure!</p>
<p>Anyway, I would still love to see better documented results if anyone has them. Based on some of the other stuff I have seen passing by, I think my results were quite in line with others.</p>
<blockquote>
<p>1. The Ektar out resolved the Velvia 50 by a slim margin.</p>
</blockquote>
<p>I am not surprised by this. If you look at my results (which is Velvia 100F), the results of Ektar and Velvia are quite close too. I can imagine a flip between them in some cases.</p>
<p>In addition, Velvia 50 and Velvia 100F are two distinct films. I also shot a role of Velvia 50 after I published the test, but didn't include it as I found that the scans results didn't have finer grain than Velvia 100F (the F variants of Fuji films use the latest "grain technology" according to Fuji). In fact, according to the official Fuji film datasheets for Velvia 50 and Velvia 100F, Velvia 100F even has a marginally smaller RMS granularity, indicating a slightly finer grain:</p>
<p>RMS granularity for Velvia 50 (RVP50): 9<br>
http://www.fujifilm.com/products/professional_films/pdf/velvia_50_datasheet.pdf<br>
RMS granularity for Velvia 100f (RVP100F): 8<br>
http://www.fujifilm.com/products/professional_films/pdf/velvia_100f_datasheet.pdf</p>
<p> </p>
<blockquote>
<p>This discussion beggars belief.</p>
</blockquote>
<p>;-), yes, we should all be out shooting film, instead of discussing it till it's dead...</p>
-
<blockquote>
<p>"Kodak Ektar 100 color negative film test ( updated d.d. 15-01-2009)"<br /> This test was shown at a website cited early in this thread. The results that a Sony A900 looks better than either Velvia or Ektar were obvious.<br /> However, the test was flawed. The test target was screen-printed, as shown in some of the downloads. Because neither the lines nor picture were solid, but screened, the fuzzy logic in the rather clever A900 converted them to what it thought the picture should look like. The film, on the other hand, had to deal with those pesky little white spaces in between bits of information on a screened print.<br /> That means to me that no conclusion can be drawn from the test. It neither proves nor disproves Ektar vs. Velvia vs. Sony A900.<br /> It does prove that the A900 provides good looking results, even if they aren't exactly what was photographed."</p>
</blockquote>
<p>I am the maker of that test you are referring too so negatively. To be honest, I have refrained from responding to most of these negative reactions I have seen passing by, since I think it is generally pointless to respond.</p>
<p>I have to say though, that the thing that bugs me, is that most of the people that respond like this, haven't mostly ever done even a half decent test themselves and published it accordingly. In most cases, if anything is shown, it is badly executed, with photos not even taken from tripod... I am not saying my test didn't have some issues, it was a learning experience for me too, and I would definitely do some things differently next time. But to say that "the test has some flaws, and therefore no conclusions can be drawn at all" is just plain stupid. I think I have shown that there is still lots to learn, and from other responses I know quite a number of people agree with me.</p>
<p>Yes, the dot screen printing pattern was an issue, but it was still a magnitude smaller than what the a900 and and films could truly reveal. Only the direct flatbed scan of the test chart, truly revealed it.</p>
<blockquote>
<p>"It does prove that the A900 provides good looking results, even if they aren't exactly what was photographed."</p>
</blockquote>
<p>This remark made me laugh... I hit the release button, light enters the camera to expose the film or digital sensor, and now all of a sudden, the result "isn't what was photographed??!</p>
<p>In what 10th dimension world are you living in that I am not?</p>
<p>Sorry, but this is all about scale. Would you say the same thing if for example you photographed a model. You photograph her from a distance from feet to head up. Now you get in with a different lens, a macro lens, and photograph a small piece of her skin, revealing all the hairs on her arms, and even the skin pores.</p>
<p>Would you now all of a sudden conclude that the first photograph of your lovely model "isn't what was photographed"?????????? because "it doesn't reveal all the hairy and blotchy unevenness" of her skin?</p>
<p>Sorry, but this remark just doesn't make sense. Even if the screen pattern was close to be revealed, it still "is" what is photographed, and still does tell a lot about how all the contenders did in the test. In fact, the mere fact that all of the tested media were capable of revealing so much, is a compliment to all of them! People also don't realize how big the actual test chart was, it is NOT some small post card, but a giant 60x90 cm print.</p>
<p>If you think you can do better, why not do it and publish it properly... after two years, I am still waiting for a real good substitute for my test, not only executed well, but published and documented accordingly up to a level that I did. I haven't seen it...</p>
-
<p>I have never used or seen both of these 8x10 camera's, but I do own the Tachihara 4x5... and if that webpage Markus refered too is correct, I will eat my hat if that Wista camera is not build by the same company that makes the Tachihara's.</p>
<p>About every brasswork and mechanical details is the same as on my Tachihara 4x5!</p>
-
<p>Sorry for the double post, but I got some heavy Photo.NET server errors when trying to submit the post, and it seems to have gone wrong...</p>
-
<p>"(I try to avoid what many do - first purchasing equipment and only later thinking how to adapt it to certain conditions)"</p>
<p>Mike, I seriously think you are turning the world upside down here... Night time photography, which is a bit of a specialization of me (see my galleries: http://www.boeringa.demon.nl), can be done using ANY equipment you like. I have successfully used 35 mm SLR, Large Format and even a Large Format F138(!) 4x5 pinhole with great success for night shots...</p>
<p>Use the gear you have, and learn to use it, instead of wasting money on the next gizmo!</p>
<p>In terms of advices: if you want to try BW night photography, get Kodak TMax400. I have tested it in a controlled fashion against Kodak 320TXP, Ilford HP5 and even the low reciprocity failure Fuji Neopan Acros 100, with exposures up to 8 hours. But even the latter film, does not beat TMax 400, which has relatively good reciprocity characteristics as well. The two stops extra of TMax 400 make the difference, and cause it to beat even Acros 100.</p>
<p>As Gerard said, use fast lenses as much as possible (2.8 for slr, 5.6 for LF) to help manual focussing (forget AF, even if it works, you probably still want to adjust), and get a flash light. I also found it useful to have small LED lights with me, that I can put down on the point I want to focus on. Of course, this only works for subjects that can be reached, otherwise the flash light method is better.</p>
<p>In general, I can get away with F5.6 or F8 with focal lengths of 28-40 mm wide angle (35mm SLR).</p>
<p>And get yourself an MP3 player for the really long exposures (some of my Amsterdam night time pinhole photos required 45 minutes even on TMax 400, but the results were worth it, yes, you need to suffer sometimes in order for the best shot! ;-))</p>
-
<p>Howard,</p>
<p>Thank you so much for pointing out that site of Keith!</p>
<p>These are some of the most useful test images for BW I have seen up to now. Both Keiths with the images and test patterns, as well as Gareths with the circular gradients.</p>
<p>By the way, and this is an important question (<strong><em>please answer if you can!</em> </strong> - because Keith didn't document this):</p>
<p><em>Am I right to assume that under ideal conditions (a good paper profile matching the paper and printer), the <strong>K=50%</strong> bar on Keith image is supposed to match and Kodak 18% grey card, both in tonal value (no color cast), as well in luminance / grey tone???</em></p>
<p>If so, I have an number of important conclusion that I can draw.</p>
<p>I have an Epson R2400 printer and Photoshop CS2 under Windows XP2 with a properly calibrated monitor (Spyder 2). In addition, I have a more or less controlled daylight source in my house, using fluorescent tubes that are supposed to match "daylight". I also downloaded and installed ICC paper profiles from the respective manufacturers sites when I bought these papers:</p>
<p>- Epson Premium Glossy Photo Paper. Epson recently released a number of new and supposedly better ICC profiles for their papers, as part of their v6.5dAs printer driver for the R2400. I installed these ICC profiles<br /> - Harman Gloss FB Al. Downloaded profile from Harman site<br /> - Olmec Satin paper. Olmec seems to have been taken over or renamed to Innova, as Olmec profiles are downloadable from the Innova website. I don't know if paper under the Olmec name is no longer made.<br /> - Ilford Gold Fibre Silk. I no longer have this in stock, need to buy a new package, but I have the ICC profile installed from Ilford.</p>
<p>Please note I have done the following tests:</p>
<p>- Downloaded both test files<br /> - Opened them up in Photoshop<br /> - Went to print menu<br /> - Set appropriate media settings for paper: Premium Glossy Photo Paper for both the Epson and Harman paper according to instructions that came with the papers, Premium Semigloss Photo Paper for the Olmec.<br /> - Set the colormanagement options ("Let Photoshop determine colors, proper ICC profile depending on paper type, and "Perceptual" as rendering intent, colormanagement turned OFF in the printer driver)<br /> - Hit the print button</p>
<p>RESULTS:<br /> * HARMAN<br /> Harman prints show a clear blocking up of the very darkest shadows in image showing the Indian ruines. If I had to rank the shadow peformance of the profiles / papers, it would go like this:<br /> - Olmec best, Epson, Harman worst<br /> The Harman cirular gradients on Gareths test chart clearly showed a discontinuity near the deepest blacks (9-10 values). The midtones were to light, and the K=50% did NOT match the Kodak 18% grey card I have. It was clearly to light, and probably a bit to "yellowish", but not much.</p>
<p>* OLMEC<br /> Although the Olmec print clearly showed the most shadow detail, there was another huge problem with this profile: the print had a very clear magenta / cyan cast all over. It looked to "cool". Non neutral. In addition, although the circular gradients were reasonable, there did seem to be a non-linearity in the highlights (about 1 on Gareths scale).</p>
<p>* EPSON<br /> Better circular gradient than the Harman paper, but less than the Olmec. Although EPSON claims these new profiles to be better, there was a clear issue with this one, as the circular gradients revealed a very slight but visible pinkish / magenta cast round about the 2-3 grey values.</p>
<p>Since I now began to wonder if the issues described were caused by the papers, or the profiles, I also "mixed" the combinations:</p>
<p>* Printed the Olmec paper with the Harman profile. RESULT: No color cast, so the Olmec profile sucks.</p>
<p>* Printed the Harman paper with the Ilford Gold Fibre Silk profile. RESULT: Much better gradient, no longer the discontinuity as visible for the darkest parts. Overall gradient looking smoother, with darker midtones (as they should be!). As a consequence, the K=50% grey bar on Keiths test image, now very closely matched the Kodak 18% grey card, both in terms of grey value, as color tone. It was the best of all prints.</p>
<p>MY FINAL CONCLUSION:<br /> I have the strong feeling that the best profile for printing with my Harman Gloss FB Al is ironically the Ilford Gold Fibre Silk profile, with media setting "Premium Glossy Photo Paper" as per instruction Harman datasheet, and Perceptual as rendering intend. Although these papers are different, it seems the Ilford profile closely matches the Harman paper, and actually will result in better prints. The Ilford profile seems to be more accurate both in tonal value (color casts) and grey scale over the entire grey scale range with the Harman paper. Well, at least for B&W images, or images close to neutral like my lightly sepia toned images. I don't know about color accuracy, because that can not be tested with these test images.</p>
<p>I still would like to get a pack of Ilford Gold Fibre Silk again, to test that one as well.</p>
<p>Marco</p>
-
<p>Thanks Ian and Howard for these very useful links.<br>
<br /> To comment on your posts. Ian, I know what you mean, but the problem, although I probably did not describe it so well, is actually not so much a total loss of shadow detail (clipping due to hitting the limits of the printer gamut), but more in the fact that Howard is referencing, that I have the feeling that at least the "perceived" darkness or luminance of the print is distinctly non-linear with this paper. At least more so, than with other papers which I have used up to now, requiring much more and awkward adjustments to give satisfactory results.<br>
<br /> I will try and run that test image of Keith through my printer, and compare it with some other papers.</p>
-
<p>Hi all,</p>
<p>I recently bought a pack of Harman Gloss FB Al paper to try out. I have used Ilford Gold Fibre Silk and Harman Matt FB Warmtone before, the latter two I have been satisfied with.</p>
<p>Now when printing on Harman Gloss FB Al, I noticed that the blacks and dark greys, really seem to be "eating light". The light enters the paper, but doesn't come back, causing blacks and dark greys to look very dark and blocked up, even though looking good on screen and when proofed in Photoshop. What doesn't help either, is the higher gloss finish than Gold Fibre Silk, meaning reflections are more obvious.</p>
<p>But my main problem remains the "black-hole" effect. For example, I made some significant changes to the contrast and darkness of the dark parts in a BW sepia toned image, that when proofed in Photoshop, do show a significant change, but when I print it, there hardly seems to be a change. It is as if there is a magic line in luminence, that when passed, causes the print to block up. Below that, with light tones, the image looks fine, passing the "horizon", you are lost in the "black-hole" ;-)</p>
<p>Light and midtones do look OK on the paper, it's just the dark regions I am struggling with.</p>
<p>Is there anyone else that found it difficult to print dark, high contrast images on this paper? Or is it just my personal struggle...</p>
<p>Marco</p>
<p> </p>
-
<p>Aaaargh!</p>
<p>Guys, sorry to have bothered you with this thread... I have to appologize. This is so stupid.</p>
<p>It now turns out, that my ENTIRE magenta cartridge was knocked out! Except one tiny nozzle out of maybe 200! No, the inkt cartridge was almost full.</p>
<p>Since all other nozzles of all other cartridges were OK, there was absolutely NO VISIBLE BANDING, and since I was printing images close to neutral colors anyway, the lack of the entire magenta cartridge just wasn't obvious! And no banding to indicate nozzle trouble, as is usually the case, just hadn't made me suspect a nozzle issue. I have never seen something similar happen before, especially with all other cartridges being fully OK.</p>
<p>So stupid, I am finally getting decent colors again, almost without the green cast in shadows...</p>
<p>Sorry to have bothered you all, but I have learned some important new things through all of your comments, that are good to know anyway. For example the difference in max black that Alan now confirms, and the fact that even Advanced B&W mode uses colored inks.</p>
<p>Thanks for the responses.</p>
<p>Marco</p>
-
<p>Robert and Steve:<br /> <br /> I am not doing BW printing, I am doing color printing which just happens to be close to neutral, see the example images based on scans of sepia toned fibre based prints.<br>
<br /> <em>But is it really true that even in Advanced B&W mode, the printer still uses colored inks?</em> This is news to me...<br>
<br /> OK, I did a quick verification using my 10x loupe, and now saw what appeared to be cyan ink dots in the light colored 240 number on the test chart that WAS SUPPOSED TO BE B&W inks only (well, as I initially thought), because it was printed in Advanced B&W mode... so your remarks are probably true.<br /> But even if Advanced B&W mode uses colored inks, this is not the real problem, because, as I wrote, the Advanced B&W mode gave neutral colors anyway.<br>
<br /> My point is than:<br /> Why don't the Advanced B&W mode and color printing, based on a fully neutral image, NOT produce THE SAME RESULT, neutrality, as is clearly achievable??? They should, IMHO...</p>
-
<p>Quote by Andrew "Sounds like the canned profiles for those papers kind of suck. You have any Epson paper and tried their profiles?"<br>
<br /> That's something I have been contemplating, but really, would big manufacturers of digital photopapers still haven't understood it? What could they or I do better than use the big name colormanagement tools and make the best out if it? Why would any paper manufacturer risk his name by providing less than optimal ICC profiles nowadays?<br /> A few years back, it was all still a mess, but by now people should have gotten it, and tools and software are readily available.<br /> I still have the feeling that there is a deeper issue with EPSONs (and other manufacturers) printer drivers themselves, that do not make optimum use of the lighter black inks for creating subtle "off-neutral" colors in color mode printing.</p>
-
<p>Hi all,<br /> <br /> I recently started to explore the possibilities of reproducing my analog printed sepia toned prints digitally by first scanning them, adjusting in Photoshop, and than try proper color managed printing from Photoshop.<br /> <br /> I am using:<br /> <br /> - Windows XP SP3<br /> - Photoshop CS2<br /> - Epson R2400 running the latest printer driver available<br /> - I have my monitor calibrated (Spyder 2) and have installed all ICC profiles for the papers I have or had, downloaded from the manufacturers sites (e.g. Ilford Gold Fibre Silk, and now recently having tried Innova and Harman gloss fibre based papers)<br /> <br /> Now I have had some great results printing BW using the Epson printer drivers settings for Advanced B&W mode that only uses the BW inks. Good neutrality and depth.<br /> <br /> I also have seen beautiful color prints from my 2400. <br /> <br /> But here is the catch: I now tried to print some of my scans of sepia toned images on both Innova Fibaprint Gloss, and Harman Gloss FB Al. These images have only a very mild sepia tone, as they were only partially bleached back. This is a very subtle color, that is however properly rendered on screen. After scanning and some small adjustments, it looks very much like the original darkroom fibre print when viewed on screen.<br /> <br /> Printing these however, resulted in an utter disappointment. Much to my surprise, while the light and midtones were OK, and showed the proper color, the blacks and very dark greys (very mild sepia tone to almost neutral) came out with an ugly green color cast. It is a subtle, but fatal shift in color that ruins the print. Almost like a split toned image. For an example of a image causing trouble, see these:<br /> <br /> http://www.boeringa.demon.nl/haarlem_by_night/slides/DN1_0239_30A.html<br /> http://www.boeringa.demon.nl/haarlem_by_night/slides/DN1_0240_19.html<br /> <br /> Please note I made some minor adjustments to these images (changing the color balance to a tiny bit warmer / red) after I posted these to my website, but even that did not yet fully solve the issue. The greenish areas were around the bikes in the first link, and the top of the church arches in the second link.<br /> <br /> To figure out what was wrong, I first went back to Photoshop and checked the affected areas using the Color Sampler tool, both in Point Sample and 5x5 Average mode, to be absolutely sure I didn't have a false color cast in the images, that wasn't properly displayed by my monitor. Both came out clear, in fact, values tended to be RED dominant, as might be expected from the sepia tone, or close to neutral.<br /> <br /> E.g. RGB 18, 16,16<br /> <br /> Now why-oh-why do I get greenish blacks and dark greys? :confused: <br /> <br /> Of course, I have read all the stories about "bronzing" or "metamerization" causing color casts and the fact that printers without multiple black cartridges can not print true black. But my scans aren't true black, so I can not rely on the Advanced BW mode of the driver, and NO, using the modifications (e.g. sepia tone setting) in the Advanced BW mode, is NOT a direct substitute for the sepia scan results.<br /> <br /> I also read that in color (ICM) mode, the printer driver still uses color inks, even if it has to print a pure neutral color (e.g. RGB value 15,15,15). Nothing new maybe, but I hadn't expected this outcome on a mild sepia toned image.<br /> <br /> To investigate this issue further, I used a good test file from this website:<br /> <br /> http://www.pbase.com/petolino/image/55994572<br /> <br /> It contains an image that consist of two area's: a completely white (RGB 0,0,0) and black (RGB 255,255,255) area. Both contain numbers, the value of which actually represent the RGB values of the grey value that constitutes the fonts color. All RGB values are thus completely neutral, and in an ideal world, should print as such.<br /> <br /> That may sound all bit difficult, but the purpose of this small test chart is to test highlight and shadow performance of your printing system. See the text below the image on the webpage for details on how to use it.<br /> <br /> <strong> However, I than did three things:</strong> <br /> <br /> 1) - Print this image from Photoshop with color management in Photoshop set to "Let printer determine colors". In the printer driver "Advanced B&W mode" chosen with "neutral". <br /> <br /> RESULT: <br /> As expected, a completely neutral print was the result, with good deep black.<br /> <br /> 2) - Print this image from Photoshop with color management in Photoshop set to "Let Photoshop determine colors". Rendering intent "perceptual". Colormanagement in printer driver set to ICM and subsequently turned OFF, so as not to interfere with Photoshop.<br /> <br /> RESULT: <br /> Ugly greenish numbers, that should be neutral. Using a 10x loupe and looking closely at the print, actually showed me with certainty, that the printer was indeed laying down significant amounts of colored ink droplets, especially visible yellow, in what should be a neutral grey area.<br /> Holding the black part against the black of the Advance B&W mode print, resulted in another shock: BLACK WAS NOT BLACK, even with values of 0,0,0, the print had significantly less deep black, than the print from the Advanced B&W mode. So you just don't get the full possible gamut from your printer, and prints are never going to be as deep and dark as they actually could be, had they be printable in Advanced B&W mode, even though the pixel values are the lowest 0,0,0<br /> <br /> 3) - Print this image from Photoshop with color management in Photoshop set to "Let printer determine colors". In the printer driver "Color Control" with default settings, no further adjustment.<br /> <br /> RESULT: <br /> Again ugly greenish numbers, that should be neutral. Holding the black part against the black of the Advanced B&W mode print, again resulted in a disappointing black, the Advanced B&W mode print had again clearly deeper black, instead of muddled slight greenish black.<br /> <br /> Actually, looking at the result, I do wonder if the theories about "reflections" or "light interference" causing the "bronzing" color cast on glossy papers, are in fact false? In my opinion, any color cast seems directly related to the printer driver simply putting down WAY TO MUCH COLOR INK in neutral areas! With yellow and cyan, in case of the greenish casts, as the main culprits. <br /> To sum it all up:<br /> <br /> THE FATAL FLAW OF DIGITAL PRINTING:<br /> Printer drivers, IMHO, even when not in Advanced B&W mode, should NOT use colored ink if pixel values are fully neutral (e.g. RGB value 15,15,15). If they are slightly off, like my sepia tone, they again should only use colored ink to drop down a mild color cast, ON TOP of a perfectly neutral image using the BW inks only. And not mix in large amounts of color ink, in an attempt to, yes, to do what actually?? What is the function of mixing in so much color ink in almost neutral or neutral areas in a print???<br /> <br /> I can't think of any good reason, except wasting valuable ink! (well, I am almost beginning to suspect a conspiracy here ;-), to rob us of as much money as possible by making a crappy printer driver)<br /> The result is a incomplete usage of the full color gamut of the printer (no true black in your color prints), and high risk or certainty of color casts.<br /> <br /> But what do you all do, besides the unwanted modification of forcefully reducing the green channel using color balancing tools in Photoshop, making the image way more "magenta" or "red" in the darkest parts in an effort to combat the casts?<br /> <br /> Will we ever get a really decent printer driver from EPSON, that DOES manage to create neutral colors from neutral pixels values, even when not in Advanced B&W mode?</p>
-
<p>Hi all,<br /> <br /> Does anyone happen to have the electronic circuit diagram of the Ilford <em><strong>500C</strong> </em> controller, whether in paper or digital form? <br /> <br /> Please note, I am <strong>NOT</strong> (!) looking for the circuit diagram of the later <em><strong>500CPM</strong> </em> controller, which is a different version, and for which the circuit diagram can be downloaded from Ilford's website (here: <a href="http://www.ilfordphoto.com/products/page.asp?n=161" target="_blank">http://www.ilfordphoto.com/products/page.asp?n=161</a> )<br /> <br /> I have contacted Ilford / Harman Technology directly about this via e-mail, stating there are different versions of the 500 multigrade system, and asked them if they were able to make available all manuals and electronic diagrams of all versions for repair purposes. However, as it stands now, they probably aren't based on their answer. They just don't seem to have it any more. If they come across something accidentally though, they may update the list of available documentation.<br /> <br /> But that doesn't help me. Is there possibly someone who in the past has received such a circuit diagram of the 500H multigrade system with the <em><strong>500C</strong> </em> controller from Ilford??<br /> <br /> Marco</p>
I have a dream (digital LF)
in Large Format
Posted
<blockquote>
<p>I have a dream....... that someday - hopefully soon - we can slot something that looks like an Amazon Kindle into the back of our LF cameras and capture glorious hi-res digital images.</p>
</blockquote>
<p>This part of the dream is already reality in some sense. Canon has prototyped something almost the size of an 8x10 LF CMOS sensor, but just 1.6 MPixel, and Fairchild (a military / aerial photography company), actually has a working sensor for sale at the almost 4x5 size, well, OK, fair, <em>just 3.2x3.2 <strong>inch</strong>...</em> ;) (<strong>9216 x 9216 pixels!!!,</strong> 80.64mmx80.64mm = about 3,2x3,2 inch)</p>
<p>Canon sensor:<br /> http://techon.nikkeibp.co.jp/english/NEWS_EN/20100902/185407/<br /> Fairchild sensor:<br /> http://www.fairchildimaging.com/products/fpa/ccd/area/ccd_595.htm</p>
<blockquote>
<p>Far fetched and pure fantasy? Well, I don't know. A CMOS or CCD sensor of that size is probably unfeasible</p>
</blockquote>
<p>It is feasible, see above.</p>
<blockquote>
<p>I've lost touch with all my contacts in the semiconductor industry these days, so can't say if anyone's actually working along those lines (and I'd probably need to speak Japanese, Korean or Chinese to get such information anyway). So what d'you think? Will we ever see such a device?</p>
</blockquote>
<p>Again: it has already been done... the question if there will ever be a viable market, and a feasible price point, is another story. But technically, yes.</p>
<p>See this Photo.Net thread, where I had to correct myself based on initial similar assumptions to yours, after finding out there are huge sensors:<br /> http://www.photo.net/large-format-photography-forum/00XFfc?start=20</p>
<p>Marco</p>