

pam_r
-
Posts
195 -
Joined
-
Last visited
Content Type
Profiles
Forums
Blogs
Events
Downloads
Gallery
Store
Posts posted by pam_r
-
-
@ Michael -
<p><i>"Pam, your images are password protected."</i></p>
<p>Thank you for the heads up, Michael :-) Should be working now.</p>
-
<p>Just darken everything but the important parts. It's mostly just some very heavy vignetting. A little more
controlled than that, but you get the idea.</p>
<p>Basically, it's darken the image overall, then brush "light" back in again by using a black brush on the layer
mask.</p>
<p>Here are a couple of examples I've done:</p>
<p><a href="http://upload.pbase.com/image/104536986/original"><u>Dramatic portrait example</u></a></p>
<p><a href="http://upload.pbase.com/image/104536987/original"><u>Original image - before processing</u></a></p>
<p><a href="http://www.pbase.com/image/91637856/original"><u>Dramatic processing example - Lioness</u></a></p>
<p><a href="http://www.pbase.com/image/91637675/original"><u>Lioness original image - before processing</u></a></p>
<p>Here's how I start. I used a curves adjustment layer and lowered the highlight point (play around with
mid-point also if you'd like):</p>
<p><img src="http://www.pbase.com/image/91980210.jpg"></p>
<p>After you've done that, it's just a matter of dodging and burning (dodging=lighten, burning=darken). You can use
the dodge and burn tools in PS (very low opacities, maybe 3-5% to start), or open a new layer, set the blend mode
to soft light (or overlay for a stronger effect), then use a white brush (to dodge/lighten) or a black brush (to
burn/darken) to paint light or shadow onto that layer. Use with low brush opacities, try 5-10% to start.</p>
-
<p>Since you only have a short amount of time, captive wildlife may be your best bet. Parrot Jungle is not far
from South Beach:</p>
<p><a href="http://www.parrotjungle.com/park_info.php"><u>Parrot Jungle in Miami</u></a></p>
<p>Likewise for Art Deco buildings. There are many great examples all over Miami, but the most concentrated
group is on Ocean Drive in South Beach. Since you're already there, save some time :-)</p>
<p>Also on South Beach, check out Lincoln Road (between Lenox Ave and Washington Ave). It's a pedestrian mall (no
auto traffic), and it has some nice shopping, dining, people watching...and architecture.</p>
<p>Also in the Gables, one of the best hidden treasures of Miami is Venetian Pool. They just closed in Sept
for 8 months of renovations, but if you get back there, check it out. It was built in 1924, out of a limestone
rock quarry. It's gorgeous:</p>
<p><a href="http://www.venetianpool.com/VenetianPoolHome.html"><u>Venetian Pool in Coral Gables</u></a></p>
-
<p>I completely agree with Patrick, smart sharpen is excellent, but "checking it will make this amazing filter
act like the less amazing USM". Do not check the "more accurate box"!</p>
<p>I just wanted to add that sometimes, when you have very nice graphic forms in an image, removing the color
will make those forms stand out even more. You have some nice s-curves in this shot...</p>
<img src="http://upload.pbase.com/image/104525435/original.jpg">
-
<p>Digital negatives combined with traditional processing brings together the best of both worlds. Here's a
couple of links to get you started. The main site, <a href="http://www.alternativephotography.com"><u>Alternative
Photography,</u></a> has a ton of info on alternative processes. Once you make your digital negative, the
possibilities are endless.</p>
<p>As far as using an enlarger (as in putting the neg in the carrier), I think you'd be better off making
contact prints (large negative on top of paper, using the enlarger as light source, not enlarger). It makes no
sense to shrink a high rez digital image down to 35mm in order to project it onto an 8" x 10" piece of paper.
Unless you have an 8 x 10 enlarger, of course.</p>
<p><a href="http://www.alternativephotography.com/articles/art088.html"><u>Digital hybrids: a new twist on an old
process</u></a></p>
<p><a href="http://www.alternativephotography.com/articles/art026.html"><u>How to make digital negatives</u></a></p>
<p><a href="http://www.alternativephotography.com/articles/art051.html"><u>Photoshop curves for digital
negatives</u></a></p>
<p><a href="http://www.alternativephotography.com/articles/art073.html"><u>Digital Cyanotypes, complete with Tea
toning recipe</u></a></p>
-
<p>It sounds like you are using the wrong tool for the job. Use the lasso tool instead of the marquee tool. This
lets you draw a free form selection around the specific area you want to copy. The marquee tool just draws a
shape (see example below).</p>
<p>Also, having a mask on a layer only affects those layers <i><b>beneath</b></i> the masked layer. It does not
change
the layer to which it's attached. So having a mask attached to the layer you want to copy will have no effect on
what you are copying.</p>
<img src="http://upload.pbase.com/image/104521438/original.jpg">
-
<p>@Ian...</p>
<p>Maybe your friend thought the Speed Graphic lens looked like a Lensbaby:</p>
<p><a
Burnett with Speed Graphic at Beijing Olympics Track and Field</u></a></p>
<p>"I have been trying to continue shooting in the manner I started in 2004 in Athens.. slanting my lens focus to
create a somewhat mildly surreal looking effect, to which it is my intention to help the reader to look at those
elements in the picture which I think or wish my viewer to see." --- David Burnett</p>
<p><a href="http://2.bp.blogspot.com/_89a-CWRrSyg/SJ1Fvs480WI/AAAAAAAABF4/uXHiNyufSrI/s1600-h/P1020905.jpg"><u>David
Burnett setting up his Speed Graphic at the Beijing Opening Ceremony</u></a></p>
<p>"This year, again I have schlepped my Speed Graphic to the Olympics along with my small “Velbon Chaser” tripod
(a great little gadget) along with my Canons, and a Holga or two (if you have to ask, you can’t afford one!) For
me the issue then becomes, how do I use which camera to say which thing, in which way? Do I have a thematic view
that runs thru all the Games? (Hmmm if I do I forgot to write it down.) Is there something amazing in either the
spectators or the athletes that at each venue (there are dozens of sites, new and old, around the city where
things are happening) which draw me to them with a picture in mind? In the end, I struggle at each place." ---
David Burnett</p>
<p><a
Holga in position</u></a></p>
-
<p>Thank you for that, Ellis! But the link didn't work for me. Here's the new one:</p>
<p><a
Sam Abell And The Life Of A Photograph</a></p>
-
<p>David Burnett shot most of the Katrina images with his Speed Graphic and 7"Aero Ektar lens. He also uses an
Ernostar 125mm. I think the creamy smooth bokeh of the lens helps contribute to the overall effect.</p>
<p>Here's an article he wrote for The Digital Journalist:</p>
<p><a href="http://digitaljournalist.org./issue0402/dis_burnett.html">Dispatch: Life on the Road with Holders and
a Speed by David Burnett</a></p>
<p>He also shoots with Holgas.</p>
-
<p><i>"I would like to know how to make my pictures look like paintings.A lot of photographers here make
this."</i></p>
<p>What is your idea of "looking like paintings? There are a TON of looks or styles out there that involve
various techniques. If you could point out an example or 2 we could narrow the choice of technique and maybe get
you closer to your goal. :-)</p>
-
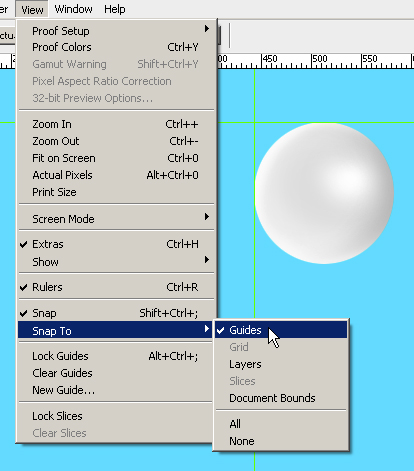
<p><i>"In Photo Shop CS3 the use of guide lines to make a template is very useful, but is there a way to make
them printable?"</i></p>
<p>Not that I know. If you want to see printed lines, just create some lines on a layer using the pencil or line
tool set to a contrasting color. Move them into place using snap-to-guides. Or, you could do a screen grab with
the guides visible.</p>
<p><i>"Is there a way to create a line and have snap to a guide line? I've tried using a single row selection,
but couldn't get this to work either."</i></p>
<p>Create a line on a new layer using the line tool or the pencil tool. Go to View>Snap to>guides. Move your
lines near the guides and they will snap into place. For example, I have a ball shape on a layer (surrounded by
transparency). I can move the ball and it will snap into place once it nears the guides, as in the following
image:</p>
<p><img src="http://upload.pbase.com/image/103984020/original.jpg"></p>
-
@ Michael...
<p><i>"...and then used the history brush on the stuffed dog to color it..."</i></p>
<p>The problem with using the history brush is that once you close the file, the deed is done. The history is
cleared out and you have no way of going back to make adjustments/improvements.</p>
<p>Using a layer mask as Patrick explains allows you to return to the image and keep working on your adjustment
layers (provided you save as a PSD file). It also allows you to re-use the mask you create with other adjustment
layers, giving you complete freedom to play, adjust, and experiment.</p>
<p>The history brush is a one shot adjustment. Using layers allows for unlimited adjustments.</p>
-
<p>It looks like Photo.net squished that one. Let me try it again...</p>
<img src="http://upload.pbase.com/image/103810462/original.jpg">
-
<p>I started by duping the layer and setting the blend mode to "Screen". From there, I ran the shadow/highlight
filter, then started adding contrast back into the image piece by piece (there seemed to be some flare present).
I also ran a sharpening action, and reworked the background. It's pretty tough to work on small images like
this...</p>
<img src="http://upload.pbase.com/image/103809058/original.jpg">
-
<p>You won't need color correcting or contrast filters when shooting digital. That's easier to do in PP. If you get into HDR you won't need graduated neutral density filters either. What you will need is a polarizer...that can't be replicated digitally. You'll also need neutral density filters if you want to shoot with large apertures in bright light or if you want to blur motion using slower shutter speeds (waterfalls, etc.).</p>
<p><i>"Is using photoshop easier than filters when using the DSLR?"</i></p>
<p>It's a bit of a learning process, just like everything in photography. But it's not hard. And the advantage is...almost unlimited.</p>
-
How about delivering a custom printed flash drive along with their DVD. Include some info stating your "best practices" recommendation of how to archive copies of their important day in case of fire, hurricane, etc. That would be an appreciated added value.
-
<p>There are several models, some for rectangular filters, some for circular. Any good photo supply place should have at least one:</p>
<p><a href="http://www.bhphotovideo.com/bnh/controller/home?ci=0&shs=filter+holder+pouch&sb=ps&pn=1&sq=desc&InitialSearch=yes&O=jsp%2Fcatalog.jsp&A=search&Q=*&bhs=t&Go.x=0&Go.y=0&Go=submit"><u>B&H Photo filter holder selection</u></a></p>
-
<p>Only you know what you like. And you probably won't know until you see it :-)</p>
<p>To that end, Inkjet Art has some <a
href="http://www.inkjetart.com/cart/media-sample-packs-c-1_805.html"><u>sample packs</u></a> you might want to
try. They also have a great selection of inkjet <a
href="http://www.inkjetart.com/cart/media-photo-papers-c-1_753.html"><u>photo</u></a> and <a
href="http://www.inkjetart.com/cart/media-papers-c-1_6.html"><u>fine art</u></a> photographic papers.</p>
-
<p>I agree with all of the above. I've been wanting to buy one but they don't seem ready yet.</p>
<p>Why doesn't someone just cobble together a decent LCD monitor, power supply, and disk reader or hard drive?
Would that be difficult? I personally don't care if it's not portable.</p>
<p>My Macbook set to slideshow does fine. Now if I could rip off the keyboard, plug a power supply cord directly
into the monitor, and create a wireless connection to my desktop, I could have a really nice photo frame to hang on
the wall :-)</p>
-
<p>I've never heard that one. I have a Sekonic 608 that has the spot meter built-in. No parallax problems.</p>
<p>Hmmm. Ask him if you could test it in the store and see for yourself. Bring an 8x10 card that's half
black/half white, or find something similar in the store. Set the card at a distance, then take a meter reading
on the white portion through the spot. Take another on the black portion. If the black/white areas are small
enough (without being too small), you should quickly know if there is a parallax problem.</p>
-
<p>I think you have your foreground/background colors reversed. Before you run the Diffuse Glow filter, hit the D key. This will set the fg/bg colors to the default of black/white. Now run the filter. Highlights should now be diffused.</p>
-
<p>Proper storage is key. Out of direct light, in moderate temperatures and humidity. Do not store them in your
car. More guidelines are listed at the end of this post.</p>
<p>Use good cases for maximum protection. This archival case is inert (no outgassing), flexible (won't crack),
has a floating hub that keeps the disc suspended, and the disc is easily popped out without bending or flexing of
the disc which can cause loss of data:</p>
<p><a href="http://www.archivalmethods.com/Product.cfm?categoryid=0&Productid=171"><u>Archival Jewel Case for
CD/DVD storage</u></a></p>
<p>Use only "write-once" CD-R, DVD-R, or DVD+R discs. RW discs are not considered archival. If you have to, write
only on the hub.</p>
<p>Buy quality DVD's from a trusted source. There are a lot fakes out there. Taiyo Yudens are generally considered
the best. Here are a couple of good online sources:</p>
<p><a href="http://www.supermediastore.com/"><u>Supermediastore.com</u></a></p>
<p><a href="http://www.rima.com/Merchant2/merchant.mvc"><u>Rima.com</u></a></p>
<p><a href="http://www.allmediaoutlet.com/allmedia/index.jsp"><u>Allmedia Outlet</u></a></p>
<p>For more information about blank media quality, including information on fakes, <a
href="http://club.cdfreaks.com/f33/"><u>this is a great
source</u></a>. Here are their <a href="http://club.cdfreaks.com/f33/media-faq-61943/"><u>Media FAQ's.</u></a></p>
<br>
<p>Here are CD/DVD Storage and Handling Guidelines from the National
Institute of Standards and Technology. More information <a
href="http://www.clir.org/pubs/reports/pub121/contents.html"><u>can be found here.</u></a></p>
<img src="http://upload.pbase.com/image/103467264/original.jpg">
-
<p>I think that's a good, workable solution. You have at least 3 copies, with at least one off-site. As for DVD's,
using high quality disks, along with proper storage and handling is key:</p>
<p>- Write on the hub using special markers. Don't use labels.<br>
- Store vertically. Ideally, store in slim jewel boxes. Remove paper from the boxes as they can attract
moisture.<br>
- Store at proper temperatures (i.e., not in your car)<br></p>
<p><a href="http://www.itl.nist.gov/iad/894.05/docs/disccare.html"><u>CD and DVD Archiving
Quick Reference Guide for Care and Handling</u></a></p>
<p><a href="http://club.cdfreaks.com/f33/"><u>More info about CD/DVD media than you'll ever want to know
- CD Freaks blank media forum</u></a></p>
<p>A couple of good online DVD suppliers. These are trusted sources, there are a lot of quality DVD fakes out
there...beware:</p>
<p><a href="http://www.supermediastore.com/"><u>Supermedia store</u></a></p>
<p>
<p><a href="http://www.allmediaoutlet.com/allmedia/index.jsp><u>Allmedia outlet</u></a></p>
<p><a href="http://www.rima.com/Merchant2/merchant.mvc><u>Rima.com</u></a></p>
-
<p>Here is some info on online backup solutions. Mozy and Carbonite are the leaders of the pack. However, you
might want
to be careful using the online services. I've read of many problems, particularly when it come time to restore
files. For me, it just doesn't seem like the answer to everyone's dreams....yet. Maybe it's not quite ready for
prime time?</p>
<p>I personally use Acronis True Image, backing up from the computer HD to 2 externals in enclosures. From there,
it's onto Taiyo Yuden DVD's. However, many people are now using hard drives in place of CD/DVD's. I just don't
want to put all my eggs into mechanical baskets ;-)</p>
<p>Here's what I found while researching online storage solutions:</p>
<p><a href="http://lifehacker.com/398229/five-best-windows-backup-tools"><u>Lifehacker's "5 Best Windows Backup
Tools"</u></a> - As always with Lifehacker, it pays to cruise the comments sections. There are golden nuggets of
info in there
:-)</p>
<p><a
Backup
Final Round, Mozy vs Carbonite"</u></a></p>
<p><a href="http://arstechnica.com/reviews/other/online-backup-solutions-a-review.ars/1"><u>"Online backup
solutions: a review"</u></a></p>
<p><a href="http://sanity.blog-city.com/mozy_versus_carbonite_automated_backup_services.htm"><u>"Mozy vs
Carbonite"</u></a></p>
<p><a href="http://news.cnet.com/8301-10784_3-9752330-7.html"><u>"Everbody like Mozy except me, Part 1 - Michael
Horowitz"</u></a></p>
<p><a href="http://wonko.com/post/it_turns_out_mozy_isnt_so_hot_after_all"><u>"Turns out Mozy isn't so hot after
all - a user review"</u></a></p>
<p><a href="http://www.amazon.com/review/product/B000HX9K2E"><u>"Carbonite reviews at Amazon"</u></a></p>
how does this amazing photographer do this!?
in The Digital Darkroom: Process, Technique & Printing
Posted
@ Tim -
<p>I don't see any evidence of HDR on those images, or highlight/shadow. Those moves open up shadows and darken
highlights. On the contrary, in the OP's examples, the photog has intensified the shadows for a more dramatic
image.</p>
<p>I do agree on the sharpening. Some of them show a strong local/micro contrast sharpening. Or, at the very
least, some heavy-handed sharpening. But I don't see HDR on those at all. Just darkening everything but where
he/she wants to focal point to be. It doesn't have to be a super darkening. Here's another example:</p>
<p><a href="http://upload.pbase.com/image/104540001/original"><u>Sharpen and darken</u></a></p>
<p><a href="http://upload.pbase.com/image/104540004/original"><u>Sharpen and darken original image</u></a></p>