

john_cogburn
-
Posts
185 -
Joined
-
Last visited
Content Type
Profiles
Forums
Blogs
Events
Downloads
Gallery
Store
Posts posted by john_cogburn
-
-
I've been able to separate the front (focusing) cell housings from the middle element housings several times by heating the elements in an oven for at least 30 minutes at around 250 degrees F. It still took a bit of muscle to unscrew the front element. If you use heat, it's important to try to unscrew the front element ASAP while it is still hot. Grasp with mitts/potholders/towels, etc. Soaking the elements a couple of days in denatured alcohol first might ease the separation.
-
For minor bellow holes and cracks, I've gotten good results with black fabric paint that I bought at the craft store. It doesn't seem to add any bulk or sticky-ness, or make the bellows hard to fold and unfold. Even the cheaper Ansco/Agfa bellows have a fabric inner liner, and the fabric absorbs the paint. The paint I bought is water soluble, so I thinned it with a little water, thinking that would make it more likely to saturate the fabric, rather than just sit on top of it. I put on several coats with a bent paintbrush.
-
I have seen photos and descriptions of a Toyoca (Japanese) TLR camera, square format on 35mm film. Haven't seen one in real life-- a very rare collectible, I'm sure. Odd thing is that they had a body shaped more/less like other cheaper Japanese 35mm viewfinder cameras of the day (mid 1950s), but the viewing and taking lenses were side-by-side, not the typical TLR design.
-
Samoca / Tower 57?
-
<p >Just screw the middle element casing back snugly as far as it will go into the shutter-- just needs to be tight enough so that focusing the lens wont loosen it. No grease is needed on those threads. </p>
<p > </p>
<p >For the focusing threads on the front element casing, I wipe a very, very small amount of clear silicone grease on the male threads—just enough so that you won't feel any friction.</p>
<p > </p>
<p >I use so-called di-electric grease that auto parts stores sell. Probably vaseline would work OK.</p>
<p > </p>
<p >Once the focusing lens is in, then you'll want to set the focus (set the knurled distance ring at the proper position on the front element casing). You don't need any special tools, besides a cable release with a locking mechanism (to hold the shutter open on "B"). It does help to have a loupe or at least a large magnifying glass in order to check the image at the focal plane. The task is a bit easier if you have a tripod to mount the camera on.</p>
-
<p>If you really want to be able to enjoy using the camera, there's really no avoiding some disassembly. That's because you need to actually remove the old, stiff grease and replace it with new grease.</p>
<p>Even if you're able to soften the grease without disassembly by dripping in alcohol, you're still left with old, stiff grease. You can try that, and it might work for you. However, if you have to use undue force to focus the camera (due to the stiff grease), there's the risk that you will shift the position of the knurled ring on the front element casing, which means you'll be unable to properly focus the camera.</p>
<p>The Agnar is a three element lens which you focus by threading the front element in and out of the middle element. The front lens casing is thus threaded into the middle lens casing. Those threads are where the old, stiff grease is.</p>
<p>The solution involving the least disassembly requires un-screwing the middle element casing (which has the front lens element casing stuck in it) from the shutter. Then your task is to separate these two parts using heat, alcohol, etc., clean the old grease out of the threads, apply new grease, re-assemble and calibrate the focus.</p>
<p>1. <br />Loosen the three tiny set-screws just enough to remove the knurled ring with the distance markings.</p>
<p>2. <br />Find a way to grasp the brass lens casing and un-screw it counter-clockwise (these are normal, right-handed threads). There is no grease on these threads. DON'T use pliers. Try gripping it with a thin piece of rubber, or try duct tape plus hose clamp, etc. When you are using twisting force here, hold the camera by the shutter or lens standard (mount).</p>
<p>With this twisting, you may succeed in removing the front element from the middle element casing. In this case, you can proceed with cleaning the threads, re-grease and re-assemble. But what usually happens is that the twisting removes the middle element with the front element still stuck inside it.</p>
<p>3. <br />If you have removed the middle element with the front element still stuck inside it, you can try putting it in the oven at 200 degrees F for 20 minutes, or submerge it in strong alcohol for a couple of days. If you try heat, twist them apart while the pieces are still hot.</p>
-
<p>Might check to make sure the shutter assembly is fully seated onto the standard plate. Often there is a sort of pilot pin or stop, and the shutter must be twisted a degree or two in order to seat all the way.</p>
-
<p>I'll confer with the advice to get the best quality USB cable. Not sure why, but low quality cables can prevent the software from even recognizing the scanner.</p>
<p>I use an Epson 3170. When I had to get a new computer a couple of years ago, it came with a newer version of Windows OS. Then the Epson software would no longer operate the scanner.</p>
<p>I tried re-installing the driver, tried Vuescan, nothing worked... until I found instructions on how to re-write a few lines of code in the firmware for a newer scanner (4870) so that it would operate the 3170 scanner normally.</p>
-
<p>Really enjoyed these images!<br /><br /> "lovingly crafted", "over-engineered"... both are great descriptions.<br /> <br />Why did camera designers try so hard in the late 1950s and early 1960s to over-engineer everything? Did they think it looked modern and 'clean' to put the advance levers and rewind cranks on the bottom? Did the Japanese designers want to prove that they could over-engineer as much as the Germans at Balda, Werra, and Agfa?<br /> <br />Oh, sure, grasping a knurled ring around the lens barrel to adjust aperture, shutter speed and focus was alright scientifically for the primitive early 50s. But by 1959 it was the space age, and all this had to be done by means of a thumb wheel or concentric dials on the back, and the process would preferably be complicated by a confusing auto-exposure system relying on a selenium cell.<br /> <br />I also had fun figuring out how to use the space age Minolta Wide and the rare earth lens.... and wondering about those engineers :)</p>
-
<p>A couple of years ago I got a 100-foot roll of Eastman 7231 Plus-X (black and white) 16mm movie film on the auction site and shot a few 22" rolls in my Minolta 16 (early model) and Kiev 30m cameras.</p>
<p>The film is double perforated. The holes show a bit on the Kiev image frame (see image below), but not on the Minolta image frame.</p>
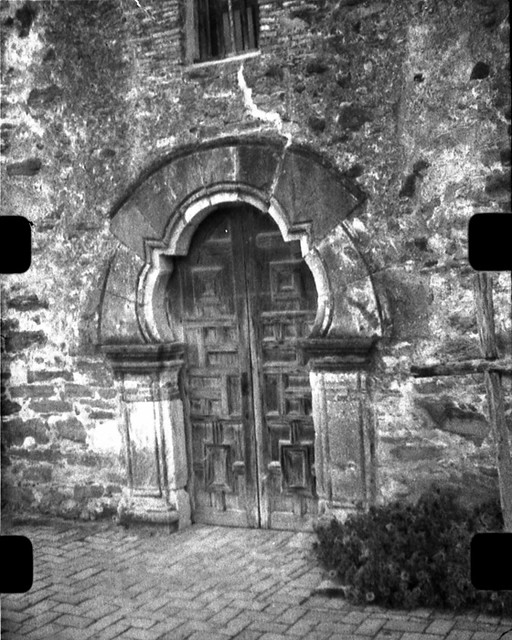
<p>I developed them in Kodak HC-110 in a plastic tank with an adjustable reel that collapses down to 16mm/110 size, and scanned the negs on my old Epson 3200. Spooling the cassettes is a bit tedious, but it was fun to see what kind of results are/were possible with those miniature cameras.<br>
<br /> <strong>Kiev 30M (Mission Espada, San Antonio, Texas)</strong><br /> <a title="3a by Scott, on Flickr" href="
 src="https://c1.staticflickr.com/5/4050/4657476032_b64b33df31_z.jpg" alt="3a" width="512" height="640" /></a></p>
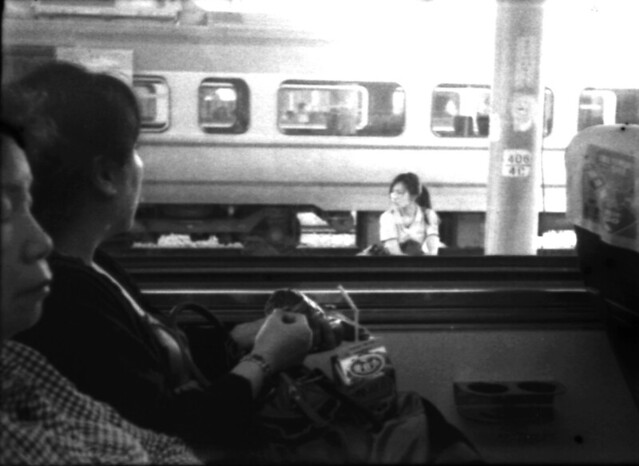
<p><strong>Minolta 16 (Tainan train station, Taiwan)</strong><br /> <a title="16mm by Scott, on Flickr" href="
src="https://c2.staticflickr.com/4/3263/2743751717_eea0f3233a_z.jpg?zz=1" alt="16mm" width="640" height="466" /></a></p> -
<p>I enjoyed reading your post and seeing your Sportsman results. Some of these cheap viewfinder cameras from the 50s and 60s are kind of fun to play with, arent they?</p>
<p>I'm not sure just where the Sportsman was in the price range of cheap cameras back then. I think many of the cameras of the same period and in the same price range as the Sportsman were just junk, but I think it was possible to at least get decent snapshot-size images with the Sportsman/Digna 35. I have also used quite a few of the various lower-end "Tower" (Yamato) 35mm cameras sold by Sears about the same time, and I've gotten a few nice photos even with the ones with triplet lenses.</p>
<p> These Sportsmans must have been very popular for many years, judging by how many are still around. I think the reason I got one was just because I was curious to see what kind of photos one could get back then with these cheap mass-market cameras.</p>
<p> My Sportsman is almost the same as yours, with the same shutter and lens (it appears they changed a few small cosmetic details every couple of years). It's a pretty basic three-element lens, but I did manage to get a few nice images on color negative film (I will try to show one here for reference). The only repair I did was to clean the lens elements and calibrate the lens focus at the film plane.</p>
<p>This roll was developed at the local photo shop, and the negative scanned on my old Epson 3200 flatbed scaner. </p>
<p> Next time, you might try using a clip-on lens shade to get better contrast. I got my best images in late evening, or somewhere without direct bright sunlight.</p>
<p><a title="Taipei " href="
src="https://farm1.staticflickr.com/67/191742795_9aa3faa44e_o.jpg" alt="Taipei " width="464" height="685" /></a><br>Sunday evening in the 文林路 night market, Taipei.<br>
Chicken hearts and duck tongues on a stick, a favorite night-market snack.<br>
Ilford Sportsman, Dacora lens, 400 ASA color negative film</p>
-
<p>In my experience, a fungus-ed lens will flare more in bright light, but can still make very nice images in late afternoon/evening light.</p>
<p>My late 1950s Wirgin (fixed-lens) rangefinder with a fast f/1.9 lens has fungus that completely covers at least one inside glass surface, and I have not taken it apart to remove it. I was surprised at what nice images I got with it --in less contrasty scenes.</p>
<p>What I am uncertain about, is whether dismantling the lens groups to scrub away the fungus would actually result in significantly better images. My hunch is that it would not.</p>
-
<p><a title="Karat by Scott Cog, on Flickr" href=" src="https://farm9.staticflickr.com/8660/16217792471_c9d4470759_o.jpg" alt="Karat" width="500" height="498" /></a></p>
<p >Might not be related, but I will try to upload a photo which helped me, just in case it might help you.</p>
<p > </p>
<p >Your problem reminds me of a repair I did on a Karat 36. I know it's not the same manufacturer, but the Dollina was made in roughly the same period, and may have shared some design similarities.</p>
<p > </p>
<p >In my case, the problem was that the take up spool was not not taking up a full frame at each winding, so there was overlap.</p>
<p > </p>
<p >A friend sent me this photo, a view into the bottom of the Karat 36 take up spool. Looks like brake pads! The pads have to provide just enough friction to advance the flim, while still allowing you to wind film back into the cassette. The tension-adjusting screw can be accessed without disassembly, through a hole. If you see such a screw, you might try unscrewing it 180 degrees at a time, and see if that helps. </p>
<p > <br>
Looks like you would want to avoid oil getting onto those pads, although a drop of solvent probably wouldn't hurt.</p>
-
<p>I say it is a Samoca, or else one of the Tenax models that made square images on 35mm film.</p>
-
<p>Regarding the flare and/or light leaks, one thing to consider is that while the inside of the camera is surely black (between the lens and the film), the inside surface might still be shiny enough to bounce and spread too much of the light, especially on a sunny day. I have a mid 1950s German 6x6 Goldeck (with a collasping lens tube) that shows that kind of reflection flare in sunshine. It makes much better photos in the evening, at night, in low light.</p>
<p>When these types of cameras were made, ASA 100 was considered fast film, so maybe the inside reflection flare was less of an issue?</p>
-
<p>Get some 'hypo clearing agent" of "film washing aid" to use after the fixer. Well worth the cost.</p>
<p>Get a 4 gallon bucket, and a couple of smaller pails. The big one is useful for washing the film after it gets fixed (and after the hypo/washing aid). The smaller ones can be used to cool or warm the developer. Save up a few vodka or PET bottles for measuring and storing chemicals.</p>
<p>I prefer a longer themometer that reads in Celcius. The 15C to 25C is probably the only range you will actually need.</p>
<p>HC-110 is a good developer and easy to mix as a one-shot. For dilution H, you may only need 7 to 8 ml. I use a plastic 10cc/10ml syringe, and get them in packs of 10 on the auction site. It's nearly impossible to accurately measure syrypy liquids in a cyclinder.</p>
<p>Spend a little extra and get a larger changing bag; just makes things easier. Got mine 2nd hand on the auction site.</p>
<p>Yeah... don't squeegee, sponge or touch your negatives. Photo-flo (or similar product) is worth it. If it leaves suds or bubbles on your negatives, then cut it with a little more water, and mix it at a lower concentration next time. freestylephoto is a good place to look for chemicals.</p>
-
<p>I use LR44 batteries in my Sekonic meter and in cameras like my Yashica GSN and Hi-Matic E. Walgreen's still sells them.</p>
<p>Not the same exact voltage, etc. as the old mercury 675, but close enough if you work out the appropriate exposure adjustment. </p>
-
<p>Got a LOT of cool books (& LPs. CDs, DVDs. etc.) from Half Price Books... mostly at the one in the Montrose district of Houston, and the one Broadway in San Antonio. Never been to the original store in Dallas.</p>
-
<p>The casing holding the middle element is screwed down clockwise to the bottom of the threads in the shutter body, and stays there. The casing holding the front element is threaded into the middle element casing, and is screwed in and out for focusing. Those are the only threads where you need grease.</p>
<p>If you've got fluids between the front and middle elements then you need to separate them, clean everything, then re-asselble with new grease, then calibrate by checking the focus at the film plane.</p>
<p>Heat or strong alcohol are your best bets for loosening mid-century Agfa grease. Put the two lens elements in the oven at 300F for 20 min.</p>
<p>These "between-the-lens" shutters should not need oil. In fact, any oil on the blades will cause problems . If you have a rusty, oily shutter, I'd say get another one... unless you want to do a total over-haul.</p>
-
<p>Do you mean you stand develop 3.5 minutes in A and then stand develop 3.5 minutes in B?</p>
<p>I guess I never heard a definitive definition of "stand developing", but I sort of assumed it meant very long times, like a whole hour in diluted developer.</p>
-
<p>Cool slide photo!</p>
<p>I believe the early Minolta 16 series have triplet lenses, and the Minolta 16 II series has 4-element lenses, both are so-called 'fixed focus', so they are sharp at a certan optimum distance (isn't it like 12 feet?). In your photo above, some of the ropes behind the captain appear quite sharp.</p>
<p>The Kiev 30M I have has a triplet lens but can be focused.</p>
-
<p><a title="16mm by Scott Cog, on Flickr" href="
src="http://farm4.staticflickr.com/3263/2743751717_eea0f3233a_z.jpg?zz=1" alt="16mm" width="640" height="466" /></a><br>Tainan Station (southern Taiwan)<br>
Minolta 16 II (Ilford Delta 400, Ilford LC29 developer)<br>
<a title="Untitled by Scott Cog, on Flickr" href="
src="http://farm4.staticflickr.com/3156/2884091776_6b518f84b0_z.jpg?zz=1" alt="Untitled" width="488" height="640" /></a><br>Tainan (outside Confucius Temple)<br>
Minolta 16 II (Ilford Delta 400, Ilford LC29 developer)<br>
The film strip is 16mm wide, but the actual image size is 10mm x 13mm<br>
<a title="3a by Scott Cog, on Flickr" href="
src="http://farm5.staticflickr.com/4050/4657476032_b64b33df31_z.jpg" alt="3a" width="512" height="640" /></a><br>Chapel door at Mission Espada (downriver a ways from San Antonio, TX)<br>
Kiev 30M<br>
Eastman 7231 Plus-X (16mm movie film), Rodinal</p>
-
<p><img src=" alt="" /><br /> Tainan Station (southern Taiwan)<br /> <img src="
alt="" /><br /> Tainan (outside Confucius Temple)<br /> Minolta 16 II<br />Ilford Delta 400, Ilford LC29 developer <br />The film strip is 16mm wide, but the actual image size is 10mm x 13mm<br /> <img src="
alt="" /><br /> Chapel door at Mission Espada (downriver a ways from San Antonio, TX)<br />Kiev 30M<br />Eastman 7231 Plus-X (16mm movie film), Rodinal</p>
-
<p><br>
</p>
<p >I have gotten some nice images with my Baldinette. I believe mine had a Radionar triplet lens. A very basic, but fun camera.</p>
<p > </p>
<p >I've had to fix this problem a few times, so I'll offer some friendly advice.</p>
<p> <br>
First, your statement, "..I want to try lighter fluid in the focus ring but I'm worried about it getting into the lens element..." tells me that you have yet to grasp a pretty basic concept here. The problem is that the front and middle lens element casings are stuck together (by the petrified grease). To make the camera usable, you WILL have to remove both the front and middle lens elements in order to separate them from each other-- which will then, of course, allow you to clean both sides of each of the lenses before re-assembly.</p>
<p><br />I've found that strong alcohol (95% or greater) softens that old German grease much better than lighter fluid (although it still might need to soak a few days). That old grease is almost like hardened wax or lacquer.</p>
<p>For people who are opposed on principle to any dis-assembly, then yes, squirting solvents in the general direction of the perceived problem will likely result in other problems.</p>


Mechanical 35mm Compact
in Classic Manual Film Cameras
Posted