

tim parkin
-
Posts
134 -
Joined
-
Last visited
Content Type
Profiles
Forums
Blogs
Events
Downloads
Gallery
Store
Posts posted by tim parkin
-
-
<p>Hi - it's Tim Parkin here who runs 'cheap drum scanning'. <br>
I get a lot of that "if it's so cheap it must be crap" comments. However, I've been chosen to scan work for various professional photographers for book publishing and fine art (Thames and Hudson, Victoria and Albert museum, Cicerone, Ahmed Ertug, Paul Wakefield, David Chow, etc) with many of these sending test scans out to various labs around the world. <br>
There are a couple of reasons I'm so cheap and also a couple of reasons why the scans I produce are still better than 99% of the people who run drum scanners worldwide. <br>
Why I'm cheap? Drum scanners used to be expensive ($300k for a new Heidelberg Primescan). So anybody that bought at that price needs to pay it back. In the last few years the prices have plummeted and a good drum scanner can be had for $10k. <br>
People who can operate drum scanners are rare. Most companies that have a drum scanner need a professional and then they have to work out what that professional is going to do whilst they're waiting for a drum to finish (a drum full of 35mm at high resolution can take 24hrs+). You're paying for that person, that machine and also for the rent, rates and maintenance on the place they work. <br>
Now I bought my drum scanners at a reasonable price so the purchase cost is pretty irrelevant in a years operating costs. Maintenance is essential, Karl Hudson does as good a job for me as for anybody who he maintains Heidelberg scanners for. <br>
I have a PhD in engineering and a background that includes design and print. My PhD included computer science and so the mechanical, optical and computing side of scanning is something that I'm happy with. There are few people out there who create there own custom profiles from multiple sources using ArgyllCMS. There are also few people who have worked out how to get non-sharpened transparency scans from Newcolor (myself and Derin Korman investigated this and found a solution which we're happily sharing). <br>
So for the costs involved, I only charge for the time taken to clean and mount your film to the drum, set the scans up, unmount and process. <br>
I don't charge for cleaning - there are many people who can do this cheaper than me and I spent the time instead getting clean originals (I've been told my scans are the cleanest most people have seen despite me not spotting them). <br>
So ... which scans are the best? Well that's a tough one. I tested all of the available drum scanners (including Lenny Eiger's services) and my conclusion was that the best balance of shadow recovery, colour rendition, sharpness and consistency came from either the ICG or Heidelberg scanners. The Heidelbergs weren't quite as sharp as the ICG but they were clearer in the shadows. The ICG could get sharper results but not quite as 'rounded' in look. <br>
The bottom line for me was that the ICG's charge a ridiculous price for support - a cost I would have to pass on to customers. <br>
Bottom line is that I'm happy to do a couple of test scans for people if they wish - drumscanning.co.uk</p>
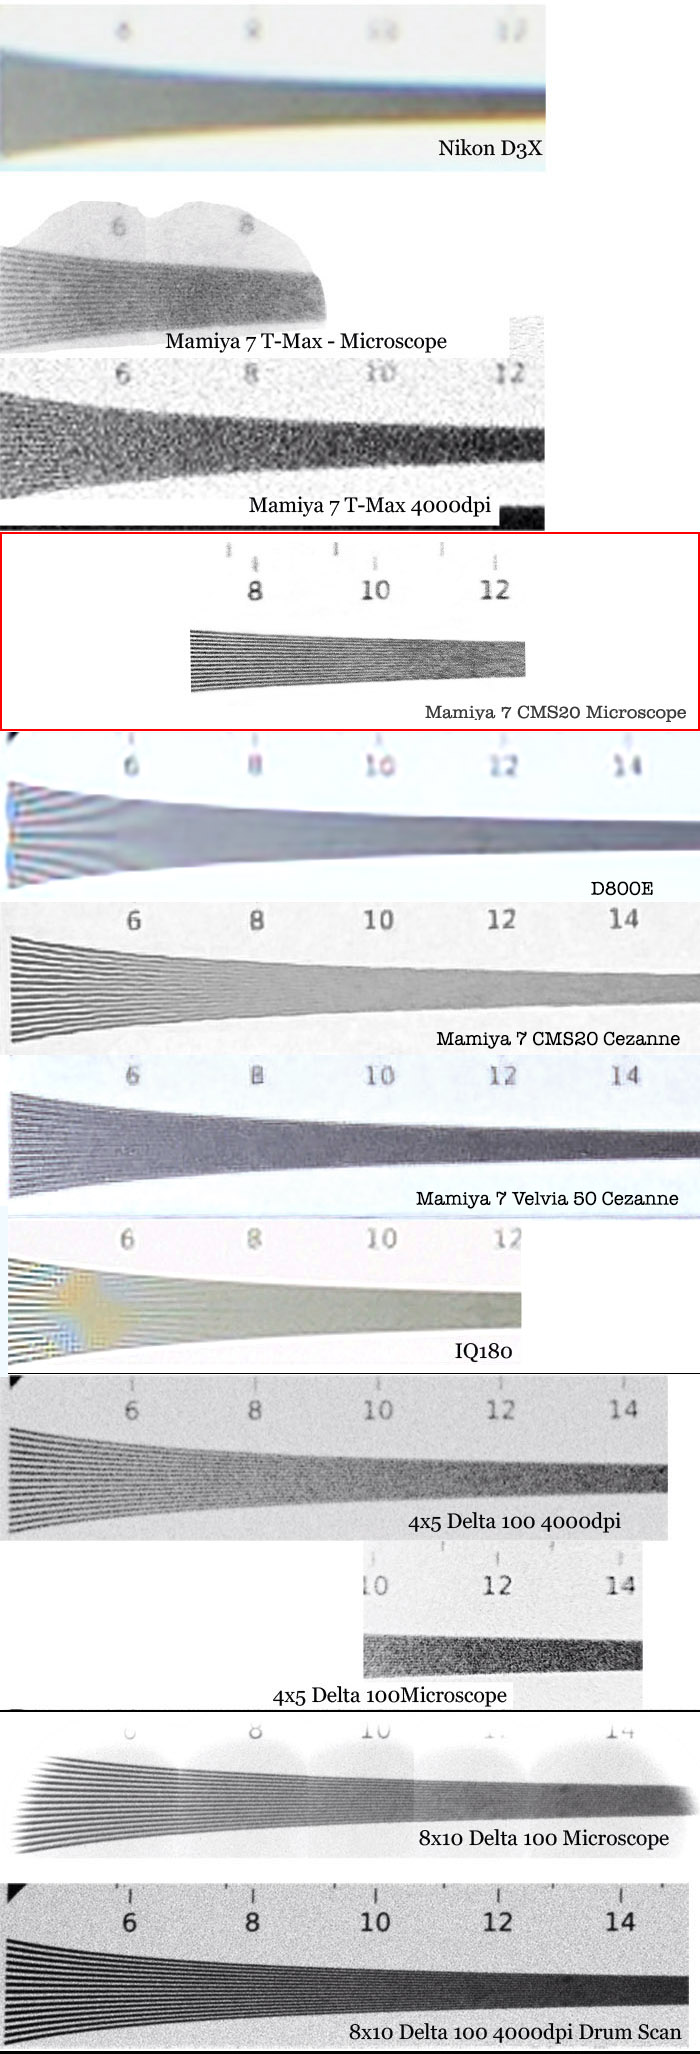
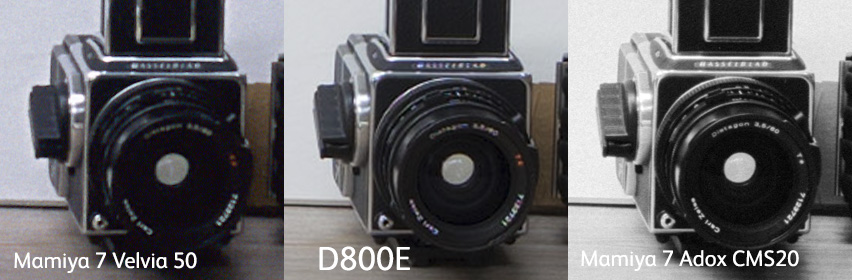
<p>p.s. As for how much detail you can get from a drum scanner. We did a massive comparison of film vs digital and we used high end microscopes to check the results. No scanner available gets all of the detail out of a well exposed film. If you have access to a scanner that gets 5500dpi or higher you can get pretty close though (this seems to be about the break even point for most 'normal' films). If you're shooting T-Max or Adox CMS20 with a Mamiya 7 or good 35mm camera/lens all bets are off though!<br>
For your normal (f/22 or smaller) 4x5 transparencies, 3000dpi is usually enough, 4000dpi is the maximum you'll need. <br>
https://www.onlandscape.co.uk/wp-content/uploads/2011/12/miroscope-700.jpg<br>
https://www.onlandscape.co.uk/2011/12/big-camera-comparison/</p>
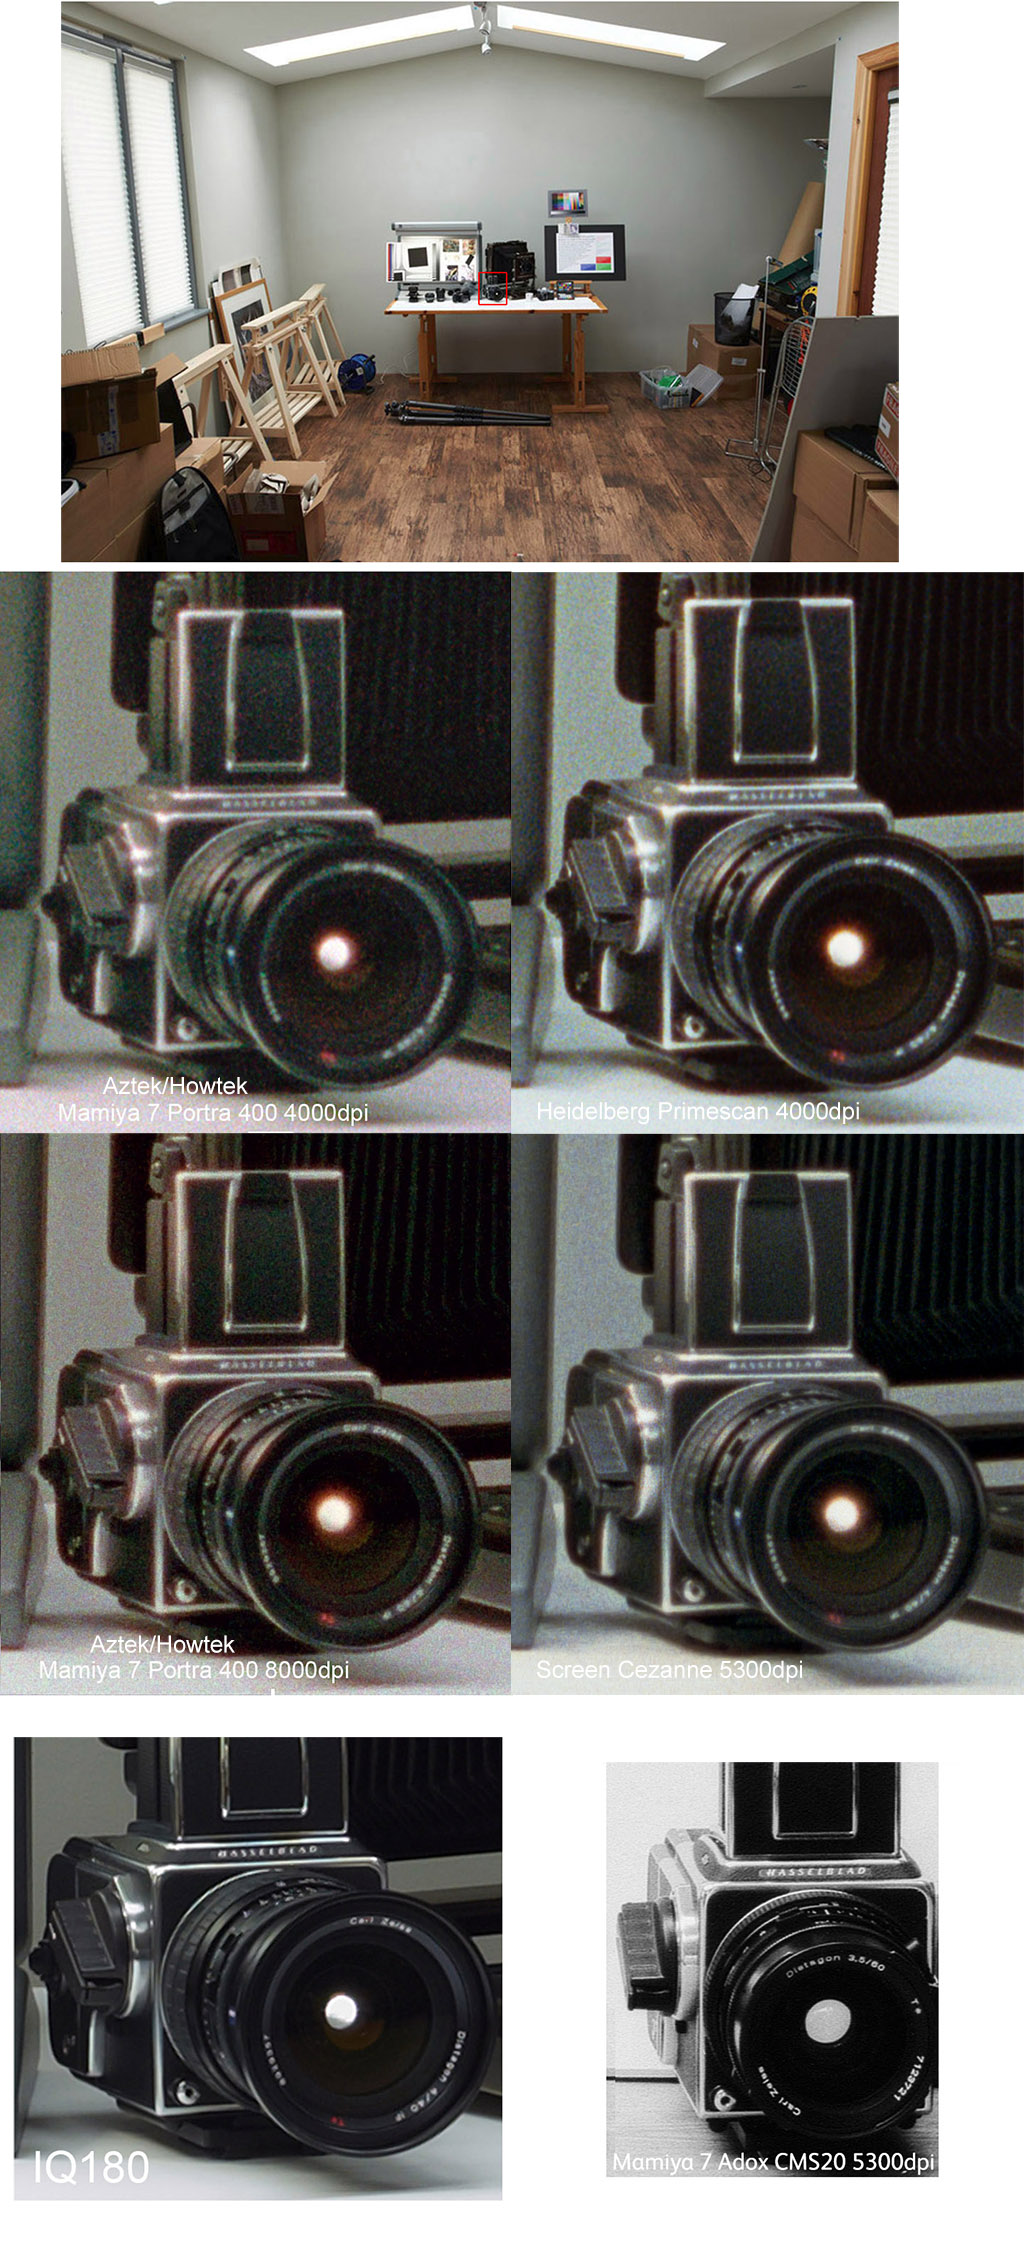
<p>p.p.s. If you've any questions I'm happy to answer them. Oh and one final spanner in the works. The sharpest scans I've ever seen are from an Imacon and a Screen Cezanne flatbed (and also from a macro lens on a 5DSr) these have there own issues though. Here's an example - including an Aztek Premier sample. This one to show that two scans at 4000dpi aren't necessarily the same (and demonstrate the clean scans from the Heidelberg at 4000dpi). <br>
http://www.drumscanning.co.uk/wp-content/uploads/2015/09/portra400-mamiya7-differentscanners.jpg</p>
-
<p>As the last comment pointed out - any noisy file rotated by a small amount will cause these issues. If you want to avoid it you need to scale the image up by a reasonable amount 50% or more, and then rotate and scale back again. </p>
-
This is what you get when you rotate a
noisy file by a small angle. The only
way round it is to upscale, rotate,
downscale...
-
<p>Hi Rodeo Joe, <br>
You might be interested to see a comparison between the D800E + Zeiss 25mm with a Mamiya 7 medium format scanned on a flatbed..<br>
<img src="http://static.timparkin.co.uk/static/tmp/D800E-vs-Mamiya7-including-colour.jpg" alt="" width="1130" height="838" /></p>
-
<p>we did bracket the medium format shots but I haven't tested them for megapixellage :-) I'll have a scan of them when I get a chance. From what I've seen I would expect for smaller apertures we'd see a similar reduction in resolution. We shot our tests at f/8 so I would expect at f/16 we'd be getting 40mp equivalent... I'm intrigued now - back to the scanner!</p>
-
We tested the megapixel equivalents of various systems. 10x8 at f/22 is approx 600 megapixels. Or about 8mp per square inch. Whereas
a good 35mm at f/4 gets about 16mp or 12mp per square inch. Interestingly large format lenses are pretty damned good.
However when you stop down to f/64 to get some depth of field you lose lots of detail and end up with about 120mp or 70mp if you stop
down to f/90.
Also people's tolerance of grain is commonly quite the opposite of what you'd think. I've done tests adding grain to very large digital
enlargements and it has improved the aesthetic reaction (i.e. It was preferred in a blind a/b comparison)
-
<p>erm... not sure I'm with you Alan. Which ones are you looking at? There are multiple formats and multiple film types</p>
-
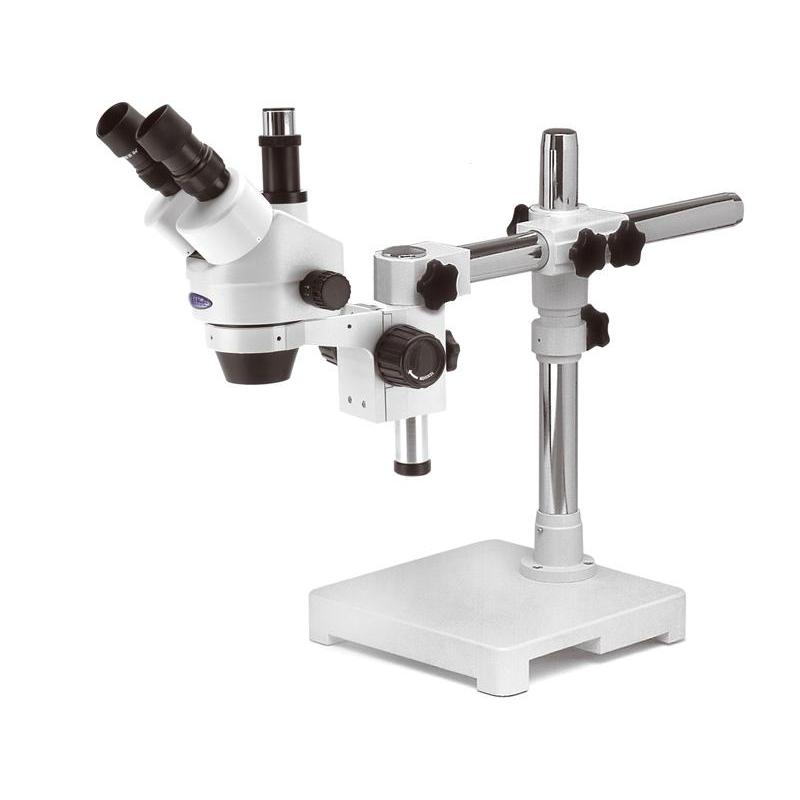
<p>A microscope is what you look through to get very high magnification. It will show you what detail is actually on the film rather than just what the scanner can see. </p>
<p>e.g. here's the microscope that I used.. <br>
<img src="http://nimax-img.de/Produktbilder/zoom/20680_1/Optika-Stereo-microscope-SZM-4-Zoom-trinocular-7x-45x.jpg" alt="" width="800" height="800" /></p>
<p> </p>
-
<p>p.s. Post processig of the D800E was done in Capture One (and I tried other raw converters that offered different trade offs of sharpness). Sharpening was done in Photoshop using deconvolution (smart sharpen). But this is all really just small amounts of trimming. Bascially I was getting about 90% contrast across two adjacent pixels on a high contrast edge (a black peice of plastic card against a lightbox). To give you an idea of what different raw converters did, the contrast changed by a few percentage points. </p>
-
<p>Oh and I've updated my resolution test chart compilation with the scans on the Screen Cezanne.. <br>
http://static.timparkin.co.uk/static/tmp/cms20-vs.jpg<br>
As you can see the Mamiya 7 lens is absolutely stupidly sharp and the Adox CMS20 can resolve ridiculous amounts of detail (about 280 line pairs per mm)</p>
-
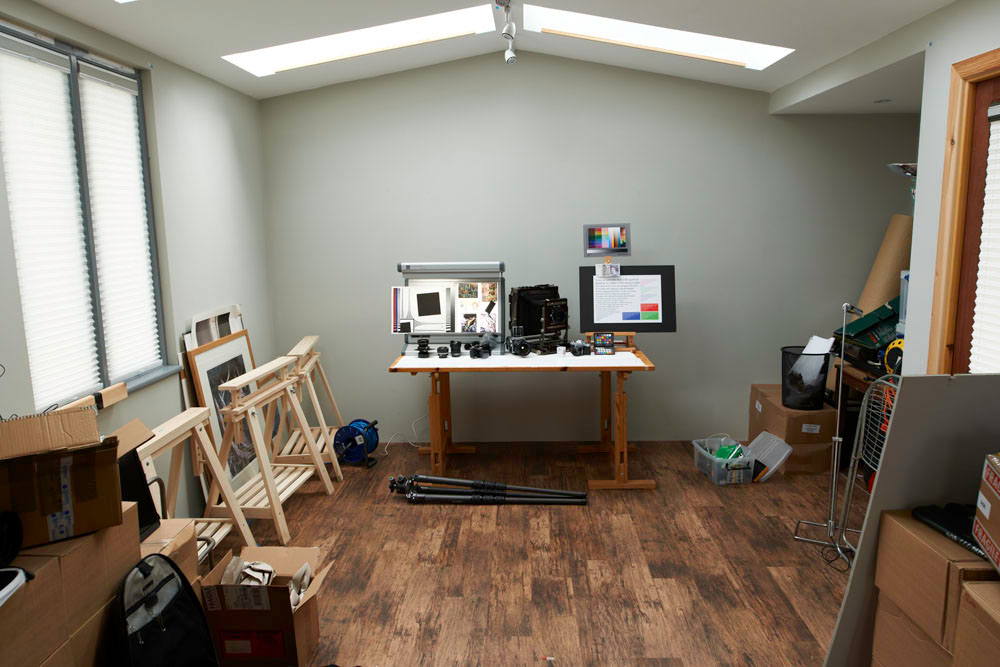
<p>The cameras were approx 10m away from the target. All focal lengths were 24/25mm equivalents. <br>
Here's the full scene</p>
<p><img src="http://www.onlandscape.co.uk/wp-content/uploads/2011/12/studio-wide.jpg" alt="" width="1000" height="667" /><br>
As you can see the camera is fairly small<br>
As for printing sizes, we made multiple prints and showed them to a range of people and everything was pretty even up to about 16"x20". At that point the 24mp DSLR's were judged as looking worse than the other cameras. D800's topped out about 20"x24"<br>
IQ180 topped out above 30x40 and interestingly depending on the viewer was judged better or worse than 5x4 film. <br>
Medium Format film scanned on a drum scanner topped out at just about 25x30 but for typical 'off the shelf' dedicated film scanner I would say medium format film and D800 are pretty much on a par. If you use an Epson Vx00 then expect you MF scans to be just about 20mp camera equivalent. <br>
We tested some colour 35mm film and depending on the subject and viewer the quality was judged at between 10 and 20mp. On average in terms of sharpness it was about 12mp but for some colour subjects with lots of fine detail (i.e. many landscape photos) the quality was seen as a much better - probably around 16-18mp. <br>
Now of course you can print any format as big as you like and I would imagine about 50% bigger than the sizes mentioned would be fine for most purposes so for a D800 you could get an acceptable 30x40 print that wouldn't look too bad at an arts fair.<br>
re: david stephens. I wouldn't bother shooting wildlife with a film camera unless you were pure fine artist and were looking for a differentiating factor (Nick Brandt?) or after some stunning enlargements and can't afford an IQ180 and you really, really know when to press the shutter!</p>
-
<p>OK <br>
Nikon D800E with Zeiss 25mm at f/5.6 - we focus bracketed and aperture bracketed. slight variations in center contrast but not really much perceptible difference in result. Basically we had the D800 running at sharp pixel levels (hence moire - if you know much about digital you'll know you don't get moire on fine detail unless you've got pixel detail). <br>
The test was done at the back end of this comparison. We came back and shot with a D800 and a D800E using a variety of lenses including the Nikon tilt shift and others. <br>
http://www.onlandscape.co.uk/2011/12/big-camera-comparison/<br>
The film was scanned on a Screen Cezanne Elite Pro (I own a Heidelberg Primescan, Fuji Lanovia and a Howtek 4500 and for straight up dpi the Screen Cezanne wins hands down). <br>
As a sample, here's some detail from a hand held shot on an OM2 taken with Fuji Superia 1600 film - the screen just eats grain where drum scanners seem to emphasise it. <br>
http://static.timparkin.co.uk/static/tmp/35mm-OM2-Fuji-Superia-1600-6000dpi.jpg<br>
Just for reference the scanned medium format film was approx 14,000 by 17,000 pixels so you can imagine that the D800 images had to be uprezzed so these are probably around 285%?<br>
I'm happy to supply the original raw files if anybody thinks that their D800E can resolve more pixel level detail :-)<br>
Oh and if you think that the IQ180 will beat medium format film here you go!!<br>
http://static.timparkin.co.uk/static/tmp/iq180-mamiya7-adoxcms20.jpg<br>
The hasselblad in the mamiya test was the same distance away but with a difference angle. The results are still interesting, if not as scientific... </p>
<p> </p>
-
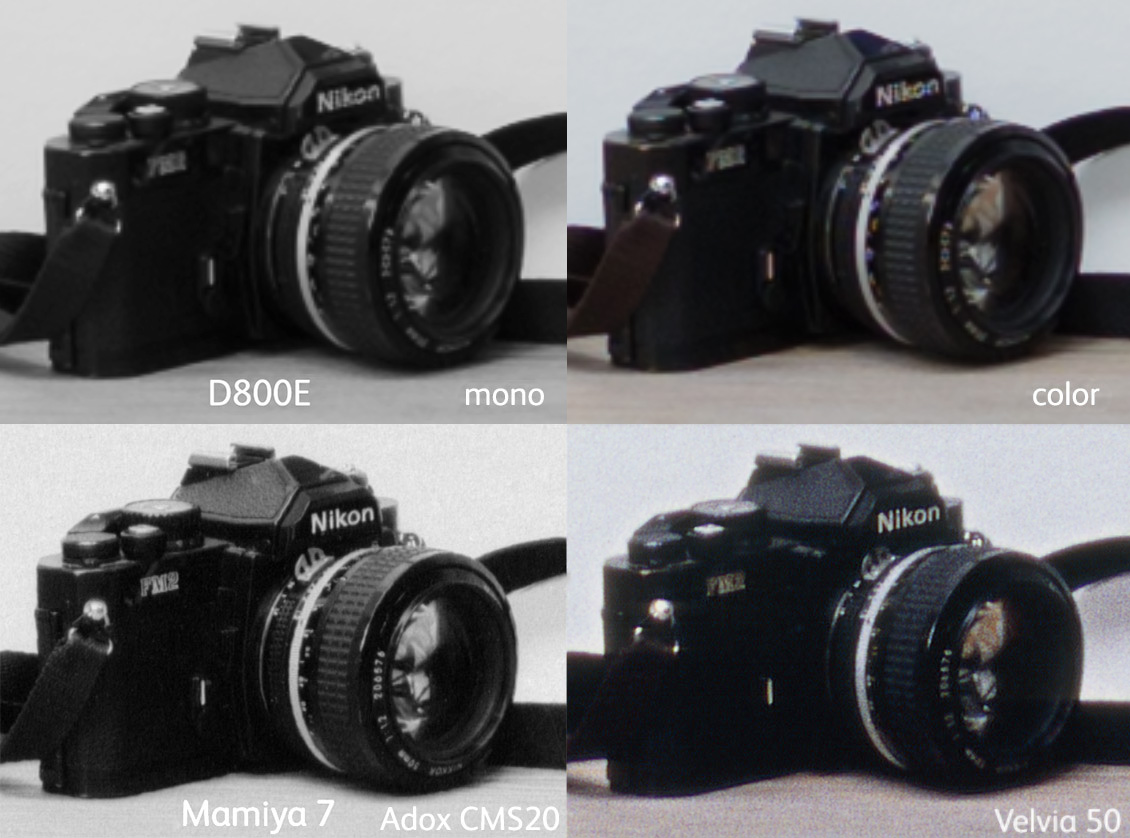
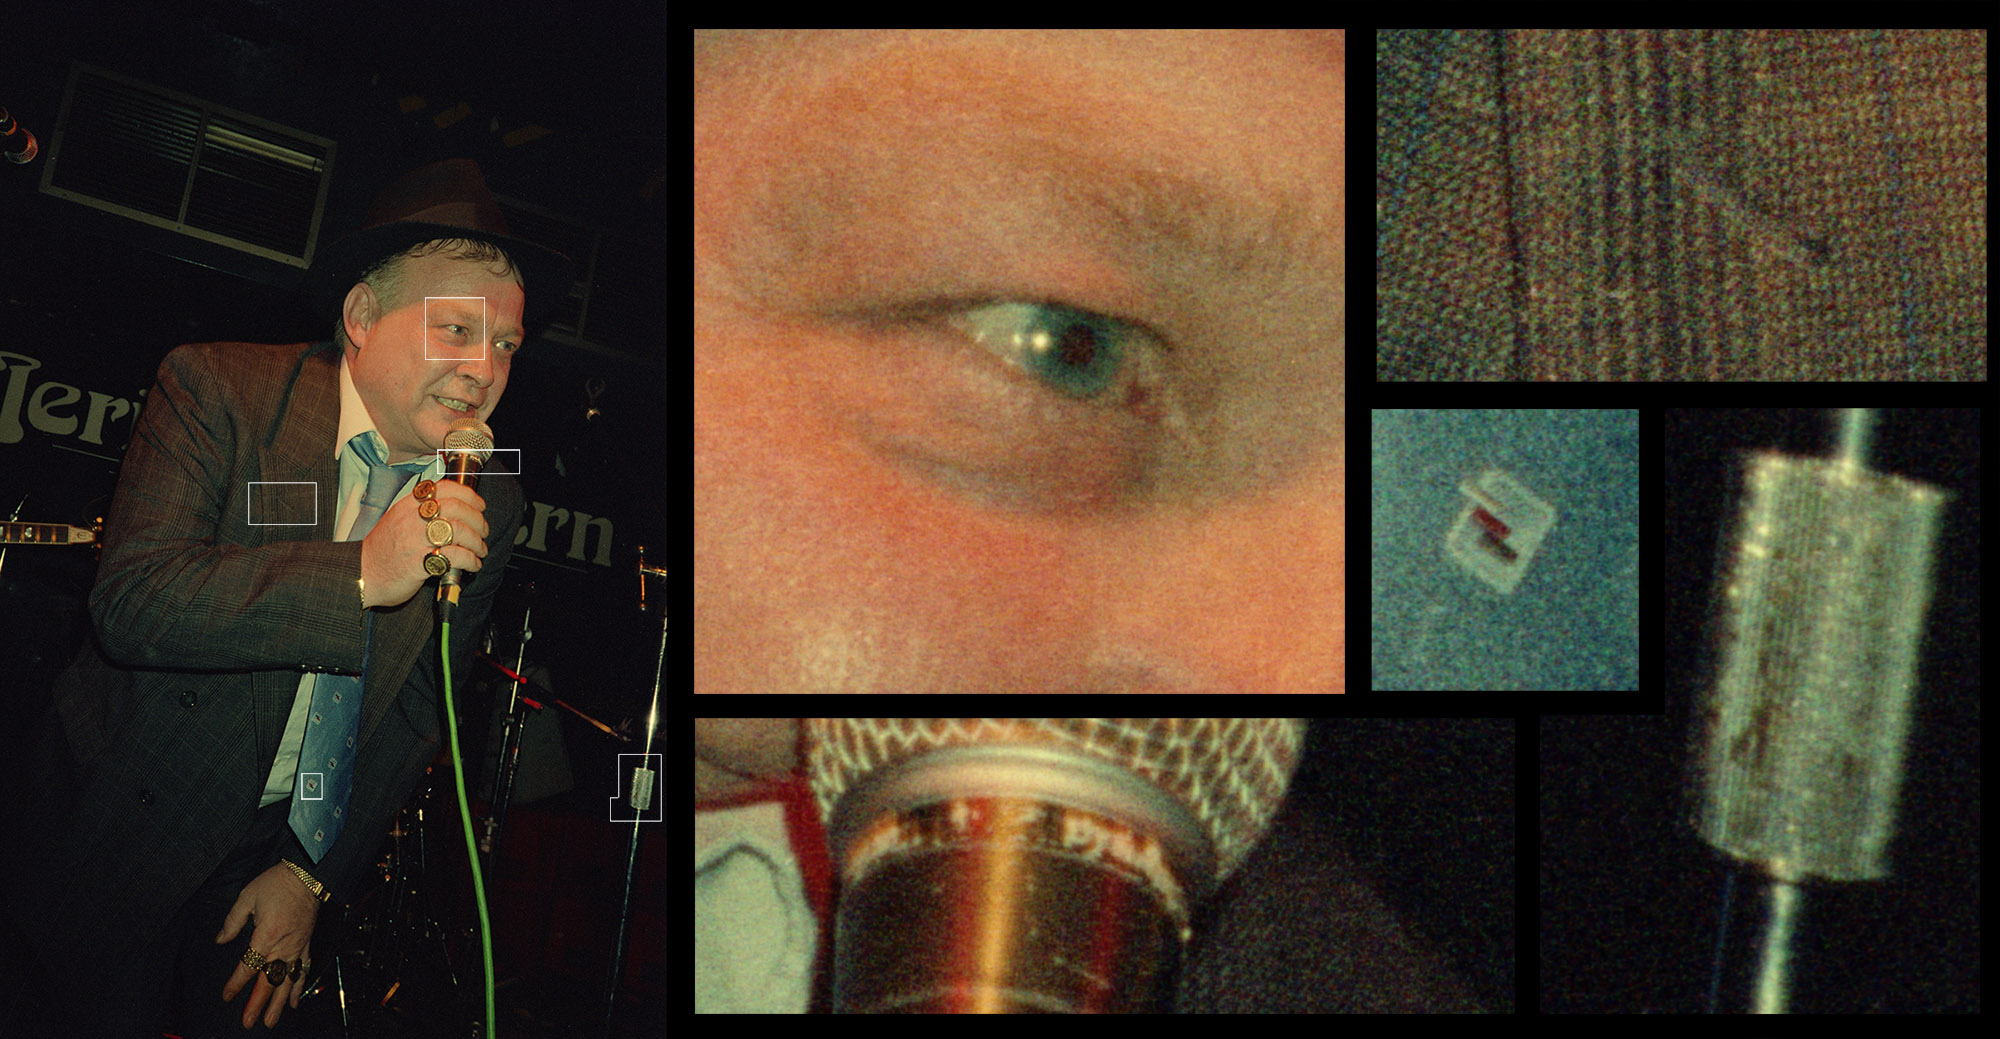
<p>I thought I'd throw in a comparison from somebody who has tested a Nikon D800E vs a Mamiya 7 medium format camera with both Fuji Velvia and some black and white film. I also happen to own a decent scanner (as I do scanning for part of my living). <br>
http://static.timparkin.co.uk/static/tmp/D800E-vs-Mamiya7-including-colour.jpg<br>
<img src="http://static.timparkin.co.uk/static/tmp/D800E-vs-Mamiya7-including-colour.jpg" alt="" width="1130" height="838" /><br>
So perhaps things in digital land aren't always better than film. If we go to 4x5 then we can beat most medium format digital backs and it's a pretty even match with the IQ180</p>
-
<p>Hi Jose : Yes, development is inhibited by wettting and hence this ensures that the initial 'dump' of developer has time to wash across the whole film before penetrating. More importantly, if you have any moisture in the film already from any source, it negates any unevenness. <br>
I'm sure if your film is absolutely dry and the developer hits quickly there shouldn't be any issues. In reality you carry a big risk hoping for this which is ameliorated by pre-wetting. </p>
-
<p>Here's a sample result from the new Opticfilm 120 scanner shooting a test target. This is at 10,600 dpi (well, it's only really 5300dpi of detail uprezzed but you get the gist). Mamiya 7 I using the 50mm lens at f/8... And if you check the film under a microscope the resolution goes all the way up to 11 (well - only ten really but it sounds better if you say 11 - more rock'n'roll). <br>
http://static.timparkin.co.uk/static/tmp/opticfilm-wet-wide.jpg<br>
Colleagues who test lenses have said that it's as sharp as any 35mm lens and with results like this I have to believe them. This means the lenses is resolving at a pixel size of approx 3 micron over a 6x6cm area - quite remarkable really. <br>
If you want to see what that looks like compared with an 80Mp IQ180 using top of the line Rodenstock digital lenses, here's a sample. <br>
http://static.timparkin.co.uk/static/tmp/portra400_cms_06mic_8000-vs-4000.jpg<br>
Considering the scanner is only getting about 70% of the full resolution it's pretty impressive. <br>
Tim</p>
-
<p>It's processing that is causing the blue box colouration - flow around the edge changes denisities. I'd be more worried about the massive density change around the clip marks. This is caused by turbulence around the clips when developing.<br>
You should develop yourself using a Jobo Expert Drum so you don't get these issues - they are one of the main reasons I hate dip and dunk developers. <br>
Tim</p>
-
<p>Almost definitely a lack of pre-wash is causing the issue. If you have any water at all in your system before the developer goes in then you are inhibiting the initial reaction of the dev. Once I started using a pre-wash it fixed all my streaky problems with C41 (I use 2500, 3010 and 3005). <br /> From what I gather you need to pre-wash for quite a while too - I do 5 minutes to be on the safe side (but I'm using an automated ATL2500)</p>
<p>p.s. if you think it's drying then change the way you dry and see if the streaks change... What direction are your's in?</p>
-
<p>Go to here.. <br>
http://static.timparkin.co.uk/static/tmp/cameratest-2/800px.html<br>
Scroll down to 'Studio Hasselblad' - choose 4x5 Provia Denoised on the left hand side and Mamiya 7 Portra 160 on the right hand side. <br>
A good quality magazine double page spread from is till a challenge for many DSLRs (and historically probably all of them) and a good MF shot drum scanned is on a par with a D800E.. <br>
http://static.timparkin.co.uk/static/tmp/velvia50-mamiya7-cms20-d800e.jpg<br>
Tim<br>
p.s. Results came from testing in http://www.onlandscape.co.uk/2011/12/big-camera-comparison/</p>
<p> </p>
-
<p>The new Portra can look grainy depending on how it is scanned. I've had some scanned to 8000 dpi and it looked beautifully smooth. <br>
http://www.getdpi.com/forum/medium-format-systems-digital-backs/35981-mamiya-7-iq180-colour.html<br>
If you want to see what Portra 160 and 400 can do in landscape take a look at my Portra Flickr set. <br>
http://www.flickr.com/photos/timparkin/sets/72157633194994119/detail/</p>
-
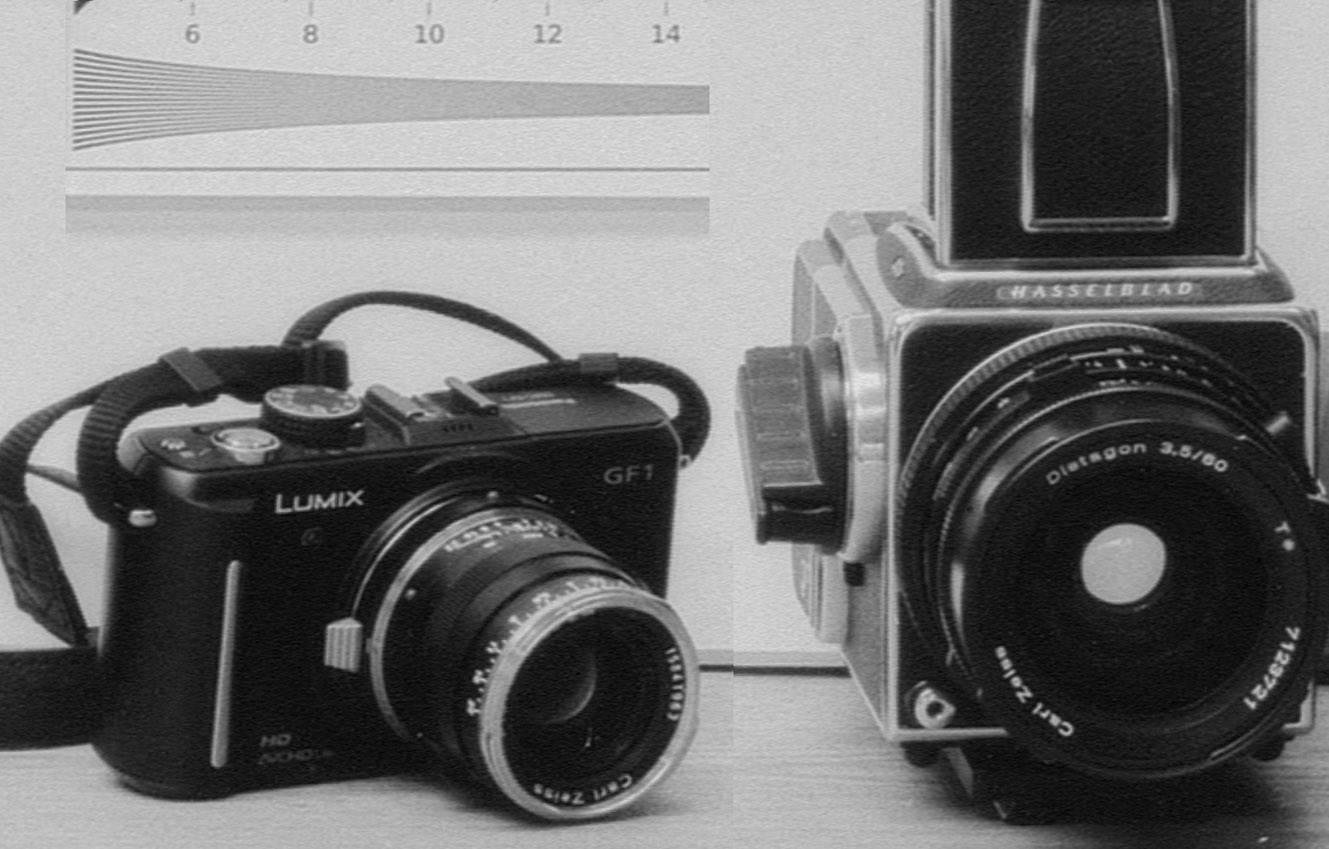
<p>The biggest obersvable difference in resolution between your 10Mp DSLR and LF will be down to lens rendering, especially with wide angle lenses. Quite a few lenses smear two or even three pixels which can reduce the perceived resolution in corners by 75% or more. i.e. it's visible in a 800px by 600px thumbnail. LF is pixel perfect in the corners at 100% for most lenses and at 10% you can't differentiate. <br>
However, I think a lot of the difference may be down to sharpening differences (resizing algorithm changes). <br>
p.s. there is no way a D800 at 60x40 would look indistinguishable from an IQ180 file. Here's a picture of a target taken by both at the same distance - the shots were taken on different days so the hasselblad camera isn't at the same angle. <br>
http://static.timparkin.co.uk/static/tmp/iq180-d800.jpg<br>
This image has been scaled to 300dpi at 60"x40"</p><div>
 </div>
 -
<p>Hi - Mr CheapDrumScanning.com here.. I'll be running the service for as long as I'm shooting LF myself as I do my own scanning on the Howtek. I'm hoping to purchase a Heidelberg Primescan at some point which has better results in some respects. <br>
My personal reasons for LF are to do with the film and lens rendering as I haven't seen many DSLR results that have such a 'relaxed' look. The closest I've seen is using a Hasselblad 40mm on a Mirex tilt adapter. The rendering of that lens is absolutely beautiful and 'standard' lenses look awful in comparison (e.g. the Nikon 24PCE). <br>
Anyway - I use both Portra and Velvia 50 for different reasons (and some E100G, Velvia 100&100F, Ektar and Provia) they all have their place (e.g. Provia 100 and Astia for rich sunsets have a much nicer and more natural separation of colour than the Velvia's). <br>
I've used the 47 and 58 and they're both very sharp but the 110mm XL on 8x10 is in a world of it's own. <br>
You'd probably be better starting with a 65 than a 47 - the 47 is pretty extreme!</p>
-
<p>It's great stuff for landscape and you can make it look quite vibrant if you want..<br>
<img src="http://www.timparkin.co.uk/wp-content/uploads/2012/04/421a-560x700.jpg" alt="" width="560" height="700" /></p>
<p><img src="http://www.timparkin.co.uk/wp-content/uploads/2012/04/424b-551x700.jpg" alt="" width="551" height="700" /></p>
<p><img src="http://www.timparkin.co.uk/wp-content/uploads/2012/06/473-551x700.jpg" alt="" width="551" height="700" /></p>
<p><img src="http://www.timparkin.co.uk/wp-content/uploads/2012/06/478-611x313.jpg" alt="" width="611" height="313" /><br>
<a href="http://www.timparkin.co.uk">http://www.timparkin.co.uk</a></p>
-
<p>It's disturbed flow around the clips on the dip and dunk machine (I think) doesn't happen on expert drums.</p>
-
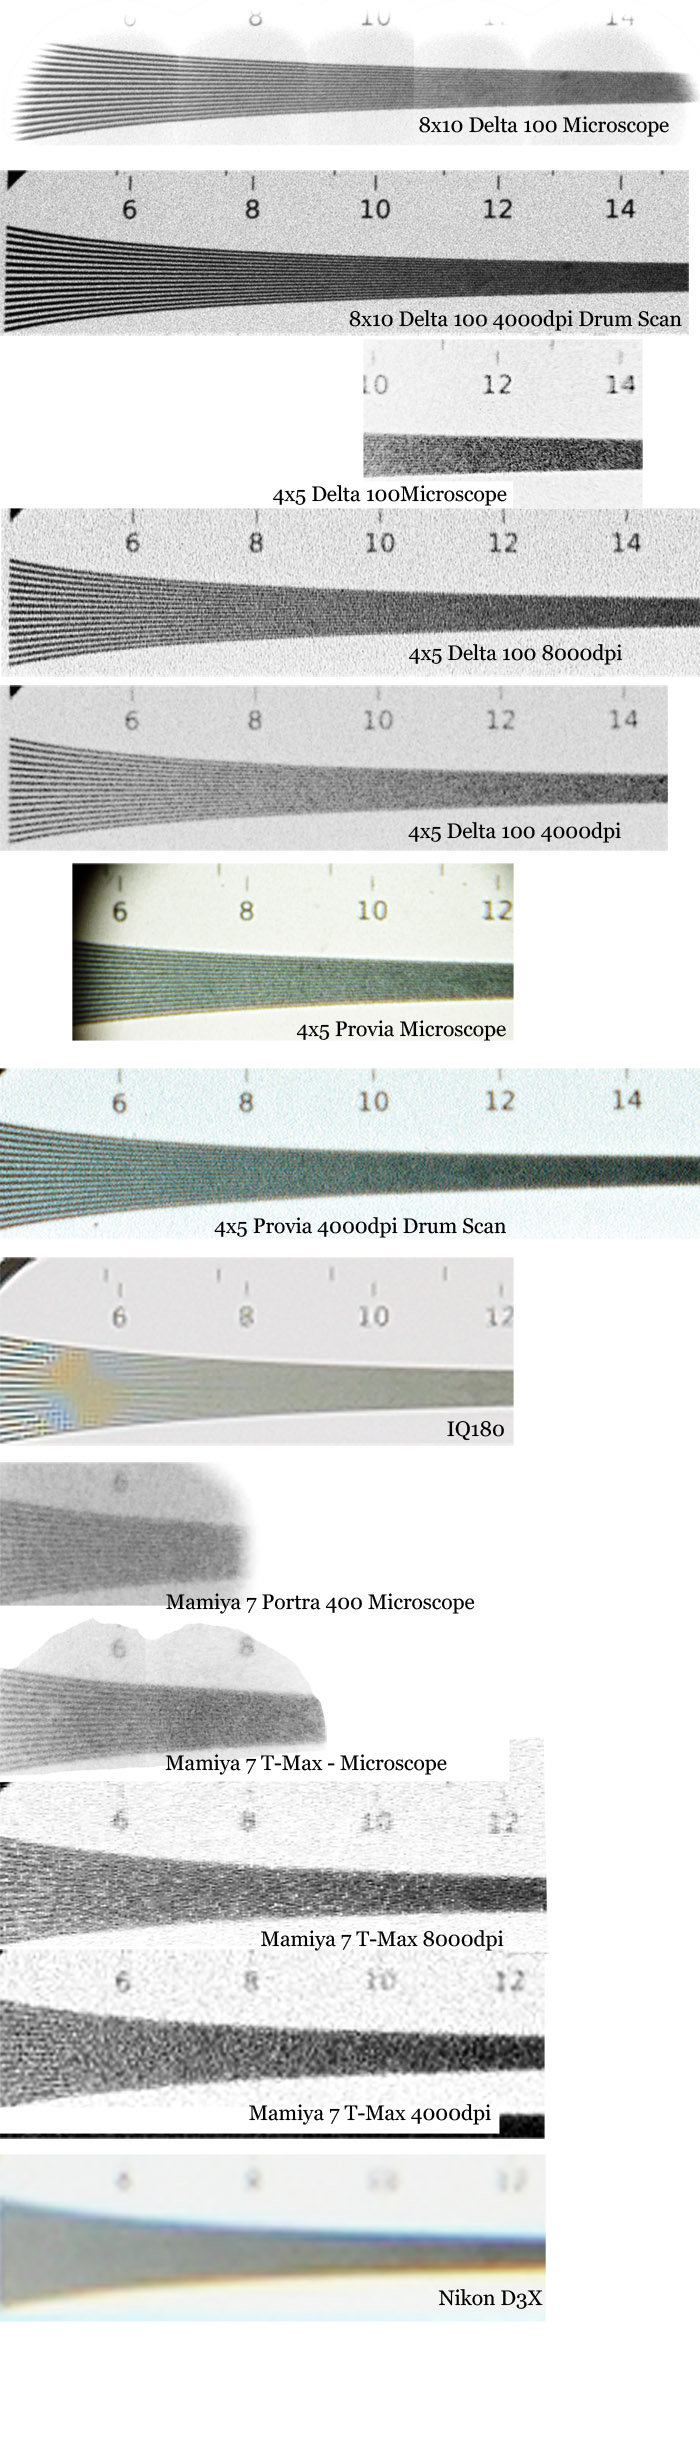
<p>I've done an extensive test of the Mamiya 7 vs various digital - Canon 5Dmk2, Nikon D3X, Phase IQ180 - and the results showed that in terms of clear resolution, the Mamiya 7 resolved more lines than the IQ180 but when you looked at overall rendering it was somewhere between the DSLR's and the IQ180. From this I would estimate that you would need about 40-50 megapixels to emulate T-Max or Velvia 100F and about 30-40 to emulate Portra 160/400.<br>
http://static.timparkin.co.uk/static/tmp/cameratest-2/800px.html<br>
The one thing that came out of this is that digital files can take more sharpening and can look sharper than film but at a certain level of enlargement they start to look wrong (about 240 dpi on close inspection) whereas film has fine detail beyond this. So for large enlargement factors film can look better as long as you don't mind grain. Adding grain to digital helps to a point but it still breaks down at a certain level. We saw this with the IQ180 which looked sharper than 5x4 until you got to 40x50 inch prints at which point 5x4 looked better. <br>
Here's a direct comparison of the IQ180, Portra 160, T-Max and a Nikon D3X<br>

drum scanning black and white negatives are grainier?
in The Digital Darkroom: Process, Technique & Printing
Posted
<p>Quite often the inbuilt sharpening (that some drum scanner operators don't know how to switch off and some drum scanner software doesn't let you) can cause huge problems. Also, inbuilt software inversion is typically 'shite' to use a British term. The best auto-neg inversions I have seen come from a Fuji Lanovia which uses Colorkit (the same software in Fuji Frontiers). <br>
Also, after lots and lost of testing, setting the black and white point in the scanner software doesn't produce better results than making a raw scan and setting the black and white point in Photoshop (tested on ICG, Fuji Celsis, Aztek Premier, Screen 8060 and Heidelberg scanners). The high bit depth of the scans and the 'dither' inherent in film means no visible data loss using this method. <br>
On top of this, Photoshop allows you to set the black and white point perfectly and then you can 'compress' the highlights and shadows, instead of clipping some of the 'grain' (which can make things noisier). <br>
Finally, the other test we ran on all of these scanners was to see how effective the aperture was at reducing grain/noise. The answer is 'fairly' but on further testing we realised that you get a better result using a film grain friendly noise reduction plugin (in our research Imagnomic Noiseware was the best). Larger apertures reduced detail at the same time as grain, noise reduction could be targeted to keep detail but reduce the prominence of grain in a way visually similar to aperture changes. <br>
we (http://www.drumscanning.co.uk/about/colour-negatives/) recently won a tender to scan a major fashion photographers images which was judged on visual quality alone. These were done using Photoshop inversion techniques we developed in-house (just ask if you want a quick guide) and noise reduction software instead of aperture control. </p>