

peter
-
Posts
819 -
Joined
-
Last visited
Content Type
Profiles
Forums
Blogs
Events
Downloads
Gallery
Store
Posts posted by peter
-
-
<p>I have found that Zoner Panorama Maker works well. I do not think it is available as a PS plugin, but it is sometimes available free on the internet as a stand alone. (e.g. I think I have downloaded it from Giveaway of the day.com on a free to use basis.) It is also readily available as a 30 day trial and the full software license costs a very reasonable ten bucks. I like the way it seems able to match images quite accurately, allow for different focal lengths and seems to adjust contrast and color of the photos to match each other. All in all I have been happy with it.</p>
-
<p>The 55mm f2.8 AF Micro Nikkor..........This lens came out in the early AF livery - a kind of shiny hard black plastic and narrow manual focussing ring that many, at the time hated - no doubt they did look a little tacky to anyone who was brought up on the Nikon MF gems that preceeded them.<br>
But this lens is a beauty in the performance department. It is as sharp as a razor both close up and at a distance (and in this respect is better than the 60mm micro nikkor that took its place.) Some find it so flexible that they are happy to use it as a standard lens. And in retrospect its really not quite so tacky to look at after all. And to top it all of you can use it in AF mode all the way from infinity back down to 1:1 reproduction. Another of Nikons greats - although in this case, a little unsung! I thnk I paid around $225 US for mine on eBay so it is soemthing like half the price of the 60mm micro from the same source.<br>
I particularly like the lenses of the early to mid 1990s. The ones that came after the above model I mean. They were built strongly and I now own a few of them. Although most are not claimed to be up to the standard of the famous 35-70 f2.8 there are several that are pretty darn good.<br>
Of these the best (at a level of optical quality slightly below the 35-70) is the 28-85mm f3.5-4.5 AF.<br>
This lens needs stopping down a tad to be at its best, and is prone to flaring if shot into the light. But it is a sharp lens with not a lot to complain about other wise. Often when I look back on photos I have taken on my D200 over the past year or so, and pick the sharpest and nicest photos - they were taken with this lens. Best of all you can pick it up for around $100-4150 US on eBay as its just not in demand.</p>
-
<p>I have not tried both but the reports / reviews I have read suggest that LR 2 is the better / more complete product.</p>
<p>Having tried this latter product myself I can say its pretty darn good.</p>
<p>However, I do not think that LR alone can do <em>everything</em> needed for many photos. Its great for applying global changes but of course not so great applying changes locally - although you can of course now brush edits on (and thats good) I still like to be able to select a larger area (eg a sky) so I can differentially apply some edits. Its particularlygreat for editing in RAW - especially to recover blown highlights and shadows. In this department it is much better than Photoshop or anything lese I have tried.</p>
<p>With this in mind I can say that I lespecially appreciate LRs ability to open a photo for editing, <em> with LR changes intact,</em> in another image editor like Photoshop. That really completes the package. I am now tempted to buy a full copy of LR</p>
-
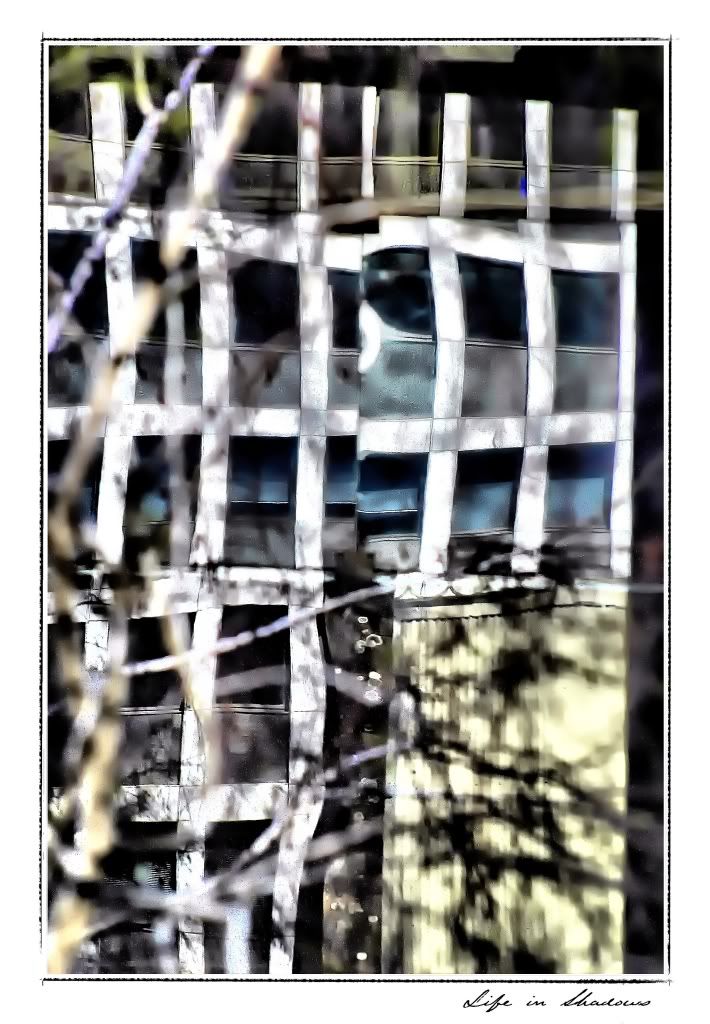
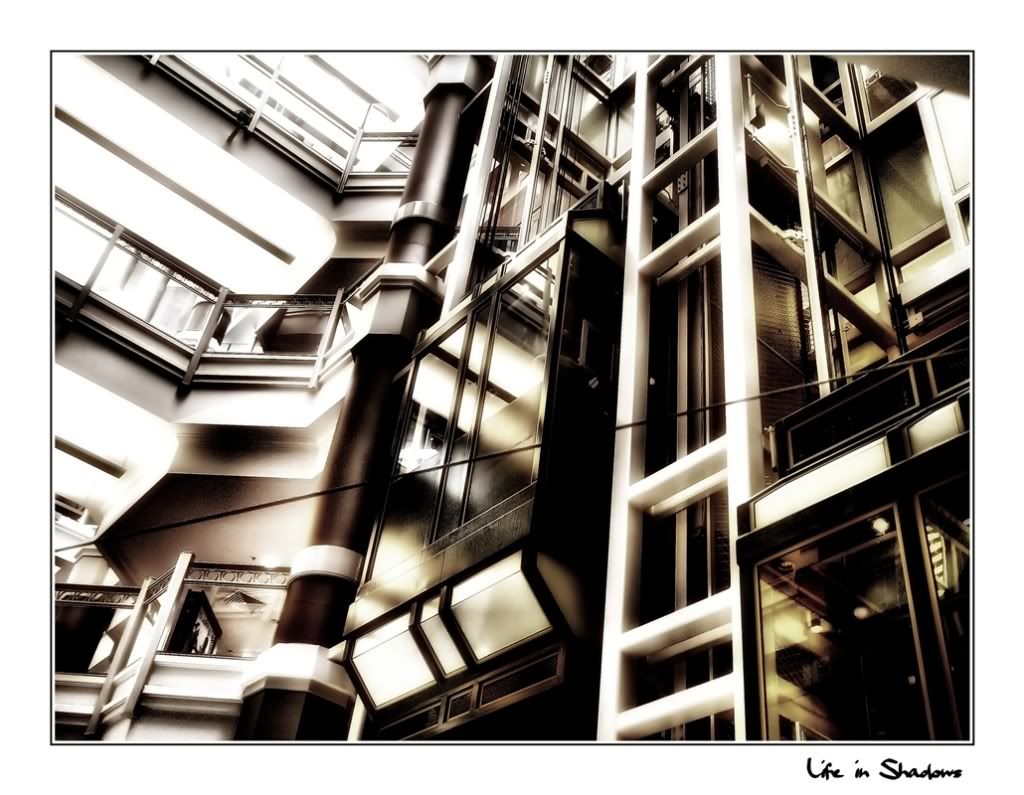
<p>Phil thanks. I quite like urban / architectural shots and have a lot of this kind of shot at Flickr - mainly shot in monochrome. I don't actually use Photobucket all that much - except for hosting individual images I want to link to on forum sites etc.<br /> I too like the repetitious form that creates a kind of pattern of light and dark. But , I am building a more diverse portfolio slowly but surely, branching into more color work more recently and also recently I have been rapidly getting more abstract and less pictorial in style although that is less evident in the Flickr shots.<br /> http://www.flickr.com/photos/80702381@N00/sets/72157610362797162/</p>
-
<p>For what its worth, here are a couple of mine that are quite abstract - examples where the final product has more or less emerged from the original with only the most general of ideas of where each might end up.<br>
<p >I realise these are an entirely different type of photography - being based on street scenes rather than contrived studio shots (which in some ways are much more sophisticated) but I like the way that quite mundane photos can be used as a basis for much more interesting imagery.<br>
I especially like my first image which looks to me very like some abstract painting - I forget the specific artist's name though.</p>
<br>
-
<p>Phil I actually agree with your comments. <br>
I do not denigrate his art at all (or for that matter, almost any art) - after all my form of photography may not be his cup of tea either. As I say it is a matter of personal preference. I certainly admire the skill and technique however. As Primoz asks about the technique I cansay I find this an interesting question too. I like the low contrast pastel look in photos.<br>
My photography has a certain aesthetic that comes out of me more or less unbidden. Often when i start working an image in PS, I have no idea where it will end up - until I get there. Maybe its the same for this artist although I doubt it - the work likes highly planned. Interestingly there is something about this that makes me think of some of Jeff Koons' work, although he specialised more often in sculpture.</p>
-
<p>Art is a personal thing. His technique is ineteresting but I am not taken by the highly posed and stylised subjects. Its just not my cup of tea I suppose.</p>
-
<p>I have not had time to watch your video yet but thank you. I will watch it with interest when I get a moment as I am always looking for new ideas. But here is a way that I have used with success. It may or may not be similar. And it may give an alternative for those who want another way.</p>
<p>There are many great sites on the internet where you can download fonts. For this purpose I favour "<strong>grunge fonts"</strong> or more especially <strong>Grunge script fonts.</strong> Here is one such link - there are many as I say. So if none of these suit you, Google those words and you will get lots of choices.<br /><a href="http://www.outlawdesignblog.com/2008/63-must-have-grunge-fonts/">http://www.outlawdesignblog.com/2008/63-must-have-grunge-fonts/</a><br />The other thing you need is a <strong>screen capture utility</strong>. I like Faststone Capture which is payware but is available on a 30 day free trial. There are other freeware ones including MWsnap and all are available at the normal download sites like tuwcows, snapfiles etc - just Google these words and I promise you will find lots of prospects. As long as the capture tool can capture and save as a jpg, bmp or tiff thats just fine.</p>
<p>Now load your fonts into Windows - check your Windows help page if you do not know how but its easy.</p>
<p>Then using MS Word or whatever text editor you choose, type your signature / logo on a blank white page using the font of choice. (Actually I have about 10 pages of experimental signatures using different fonts. This is how I decided on which one I liked best.) I almost always use either 48 or 72 sized font for maximum resolution (when you finish you will be able to resize the resulting signature in PS by clicking and dragging so whatever works for you is fine) But truthfully this is a case where bigger is better. Incidentally while you may be able to type the script directly into your image editor I favour the use fo a text editor for this phase as its a bit more flexible.)</p>
<p>You now need an <strong>image</strong> of the script you have typed so you can edit and use it in PS/PSE or whatever. This is where the screen capture utility comes in. Capture the signature you have just made using the screen capture tool you have downloaded and then save the image of the signature somewhere accessible on your PC as a BMP or JPG or TIFF. Then open it with your image editor of choice. (I use Paint Shop Pro Photo x2 but PS or PSE is fine of course.)</p>
<p>You now need to select the script and cut it out from its background. The easiest way to achieve this is to select the background first, using the magic wand tool and then invert the selection (ctrl/shift/i - remember!) This means the scipt itself is now selected. I usually click "save as new image" (not sure what the comparable PS command is) and then then save it to disk for future use. Remeber save it as a PSD file as you will need the transparency info.</p>
<p>Thats about it! You now have your script signature which has been cut out from its background and saved as PSD file on disk. Whenever you wish to use it, you can just open it and import it into the image you wish to use it on. You can recolor it if you wish using the recoloring tool or flood fill tool in your image editor and you can also resize it by clicking and dragging. Just position it where you wish to put it and place it on your main image as a new layer (in PSPPX2 its called a selection and can be moved anywhere on screen till you double click - which "freezes" it in position. While I am sure PS is a bit different its the same in principle.)</p>
<p>For normal use, I have actually incorporated mine into both black and white borders (also called frames) that I cna place around an image. So I seldom place the signature catually on the image itselff, which preserves it. The choice is yours.</p>
<p>Here is a link to one of my photos where I have done this using a frame and embedding my own personal logo - "Life in Shadows" which I now use for all my photos.<br /><a href="http://i122.photobucket.com/albums/o251/peterm1_bucket/_1000460zzz1a.jpg">http://i122.photobucket.com/albums/o251/peterm1_bucket/_1000460zzz1a.jpg</a></p>
<p>The above sounds complicated but every step is easy and certainly anyone who can use PS or PSPPx2 can do it with their eyes closed.</p>
<p> </p>
-
<p>While I love the build quality of my D200 and its ability to meter with MF lenses I could not say its image quality is better than the D70s (which I can speak for as I still have one) in terms of either noise or in dynamic range. Although some rave about the D300, I think in reality you might have to go allow the way to the D700 to get major improvements in these departments, noise particularly. As I shoot a lot of urban landscapes (buildings - lots of background sky etc) I also hate the constant blown highlights I struggle with in digital cameras. But I would not blame my D70s or D200 specifically. They all do it.<br>
As a result, I have been experimenting lately with improving hi-contrast shots in post processing by using a <em>contrast mask</em> and believe that this does help reduce excess noise in dark areas a bit - it still leaves enough to need good anti-noise software for the final clean up. Also it does not solve the dynamic range issue by any means but it seems to help tone down the noise enough to make it a bit easier to deal with. You may consider trying something like this as an alternative. Contrast masks are dead easy to try. (Plenty of stuff on the i'net so I wont bother describing it here given that is not the purpose of your post.)<br>
I have also experimented with a few different anti noise suites. The best free one is Noiseware CE but you need to learn "drive" it a bit yourself to get the best result. Noise Nija is the best payware one I have tried in terms of ability to get rid of objectionable noise and Nik D'fine is the best for its automatic image profiling and processing as it seems to be able to automatically clean "ordinary" very noise well, but I think if handles really bad noise a bit less well than NN.<br>
The other thing to consider in dealing with noise in post processing is the need to make selections and or mask areas as you go - for example you can be as agressive as hell when dealing with noise in areas of sky (in fact I often use Gaussian blur in addition as this gets rid of noise in areas where details font have to be protected) but then have to be more careful in dealing with the same level as noise when there are lots of image details . This is not technically hard to do, just a pain in the butt as it means slowing down the entire process while you fiddle about with selections. In geenral it will work pretty well though and MUCH better than just relying on global anti noise settings.</p>
-
<p><em>"Too bad this so called plug-in, like every plug-in for both LR and Aperture don't do anything different than what you'd get in Photoshop"</em><br>
With respect, its also too bad that so many PS afficionados are dismissive of anything that makes photo editing easier, usually on the same grounds as stated above. Sorry if that sounds a bit harsh but I keep hearing that objection raised to just about any plug in you can name on these forums. "Why bother, if you have skill you can do it in PS anyway" - That sort of thing! Well its true but why would you want too. If youa re a mathematician you can also work out integral calculus from first principles on a piece of paper - or you can use a PC and software to do it for you.<br>
On the other side of the aregument, I have heard PS being described as "insanely difficult to learn and use." Maybe thats a bit of an overstatement but there is an element of truth in it. For many of us who only use PS intermittently, have never been formally trained and have not been using it for years there are easier ways offered by plugins like Silver Efex. (Which incidentally also speeds workflow immensely as well as the learning curve.) And for most of us who do not do this (photo editing) as a business, the full PS is very expensive so we have to settle for something like PS Elements with its cut down suite of tools - I have absolutely no criticism of any plugin that makes my life easier. Although admittedly this one is expensive. I have tried it and one day will no doubt buy it. But I certainly would not criticise it on these grounds.</p>
-
<p>I think I would take it to a techo too. This sounds like a fast and cheap fix for an experienced technician with the right tools and skills. A lens spanner helps but may not be the end of the story. e.g.Lenses need collimating don't they - to ensure thay are mounted squarely in their mount? Do you have a collimator?<br>
But if you really want to remove the lens yourself, one common trick for unscrewing threaded rings is to go to the hardware store and find a rubber hose of the same diameter. The end of this is used as a "gripper" by pressing against the ring and rotating. As its a hose and therefore hollow it "should" not scratch or damage anything. A spanner for this job can slip - with nasty cosmetic, if not optical consequences. <br /><br />Sorry for my gratuitous comments, but while I am a lens fidler too, I have not tacked this one so cannot answer your specific questions. Cheers and good luck</p>
-
<p>Having tried most of the software by downloading trial versions or having seen it on other machines, I can vouch for its worth. It improves workflow markedly and gives wonderful results to boot. (eg The upoint technology is great - it saves creating time consuming masks and speeds things up exponentially.<br>
I suppose they are pricing at this price point for that reason - pros may like it because their time is money. Or so Nik thinks. But I suspect that this is a wrong strategy. Pros, in my experience, generally adopt the attitude that they are happy to use basic PS functionality and keep their dollars in their pockets. They claim this produces more controllable results. It certainly is cheaper in terms of cash flow, if not in terms of the use of their time - although most pros who are experienced in post processing cna also do stuff much more quickly than me. But when you are a struggling photographer, time may be one thing you have and the majority do not earn enough to throw their hard earned bucks around.<br>
Advanced users like you and me should be the prime market. As other software houses have found - the real money is to be made off the back of mass markets - not by charging big bucks in small niche markets - which is what they are doing right now. This would mean dropping price to a reasonable and affordable level or maybe even by including the software - or cut down versions of it as OEM versions with more hardware - as indeed I think they do with Color Efex Pro and some high end tablets.<br>
Having said all of this, I certainly cannot fault what I have seen of this software and would love to buy it myself as I am not a stickler for doing things from first principles in PS if there is an easier and faster way.</p>
-
<p>I still have the old Elements 2 on my PC although I have upgraded to newer versions. So its easy for me to give advice, as I know its exact capabilities. Incidentally later versions of PSE would require similar steps to what is below and PSE 2 can handle the job fine so you should not be bothered about having an older copy. I used my copy of PSE2 till a few months back when I upgraded - to Paint Shop Pro Photo X2 as its more powerful and easier fro novices to get the hang of.</p>
<p>As to the first chore, its not too hard at all. Use the<em> rectangular marquee tool</em> to create a rectangle around the inside edge of the photo where you want the border to be. Be sure you set the feathering to have a large number of pixels - say 50-80 depending on the size of the image. This is what causes the "fade" effect. You will have to experiment to find something you like.<br /> When you use the marquee tool the corners of the rectangle will look rounded due to the large feather setting. Do not worry its not noticeable in the final image.</p>
<p>Then <em>click control-shift-i.</em> This inverts the selection so that the border is now selected instead of the central part of the image.</p>
<p>You can then use the adjust <em>brightness / contrast filter </em> - found under the <em>Enhance Tab </em> of the software. Adjust the brightness slider to very bright - all the way to the right side, more or less, and slide the contrast slider to the left somewhat. Again experiment with effect. If it is not white enough at the edges, for what you wish to achieve complete applying the filter and then apply it once more with whatever setting you need to get the final result required.</p>
<p>Dead easy when you know how. You can do something the same using Layers and purists would insist it be done that way but the above is simplest.</p>
<p>I have not tried it but you should be able to do something similar if you wish the fade to follow an object. In this case, instead of using the rectangular marquee tool, use the lasoo tool or the selection brush tool to select the object you want to keep and then follow the above steps once you have made the selection of the object. I am certain that would work with a little experimenting.</p>
<p>Incidentally if you do not know, all of the selection tools are found in the tools pallette which in my Elements 2 set up is a kind of "floating" rectangular box with icons for every tool available.</p>
-
<p>PaintShop Pro Photo X2 also has it and it works wonderfully to increase apparent sharpness and the overall clarity (hence the name) of the image. It often looks like you have removed a kind of grimy veil from the photo. Although as with most flters care is needed not to overdo it. I have begun to see it and similar (eg local contrast filter) pop up in a few different pieces of image processing software.</p>
-
<p>True. Its a pro lens and quite big. I suppose I was taking Poetic licence :^)</p>
-
<p>When I upgraded from a D70s to a D200 I really noticed the difference. (eg shutter sound as you mentioned is very soft) and overall it exuded a feel of greater build quality. I can imagine that going backwards from a D700 would be traumatic though if the jump from d70s - D200 is similar to the size of the jump from D200 to D700. Never the less the D200 is a fine camera and I am very happy with mine - although if I were not married and therefore accountable to someone else I am sure I would be in the market for a D700. I have noticed after picking up my old F801s the other day that the D200 viewfinder is miniscule by comparison - smae in fact for any dx camera.</p>
-
<p>From memory, you also have to change a setting in the relevant menu to "fire shutter without lens attached" or similar wording. As the lens you are using is a non AF lens, and does not have a computer chip, the camera thinks it has not got a lens attached and will not fire when that menu setting has not been applied.<br>
As I recall it the 25-50 f4 is a top class little lens. I have the 35-70 f3.5 and can vouch for that on my D200.</p>
-
<p>Although some contributors who advise getting the image right "in camera" are no doubt correct - this is the basis for every good photo, I must add that I have <em>never </em>ever seen a digital photo that does not benefit from some photoshopping. All of my photos that make the cut, get processed at least for contrast, saturation, noise reduction and sharpness. Only then can you say a photo has begun to fulfil its potential. I regard these as foundation measures. All photos get these adjustments even though a photo that is well exposed in camera will need smaller adjustments to contrast and color, they still can benefit from some. After taking these steps I then save this version and keep it in case I want a ready to use jpg to use as the basis for future versions. (Strictly speaking as I shoot RAW this is not necessary as I already have a "digital negative" but I find it saves time later should I ever want to produce a new version fo the photo.)<br>
I can no more imagine taking a photo straight from my camera and printing it and selling it or publishing it, than a pro photographer using film would countenance sending his roll of film to a main street mini lab then selling that. The difference is that they use a darkroom, lenses, light, dodging, burning and similar techniques to produce their final results - and we use a PC.<br>
In a digital world, every worthwhile photo requires basic preparations of the above sort. This is partly dictated by the constraints of the digital technology which for example, has poor dynamic range compared with film and and has a tendancy to produce noise, even when the image is well exposed.<br>
After taking the above steps, only THEN will the photo, which will almost always be better - sometimes <em>much</em> better, than the original straight from the camera, be ready for other "special processing" of whatever sort you think necessary. I have already mentioned vignetting etc which often help portraits. There are many others.<br>
Robert Goldstein mentions NIK color efex pro. I second his advice. It is pricey but brilliant in terms of all of its capabilities - and there are many. You can download a trial version and try out the glamour glow and other features. I can only suggest following this advice but it is addictive and I am seriously thinking of buying it, having tried it because it has capabilities like none other I have tried and which most mere mortals cannot reproduce in Photoshop. (Some may be able to but I certainly cannot.)<br>
Wonderful software and it you are a pro it could be worth its weight in gold.</p>
-
<p>What do you mean by "glow" in this context ?<br>
There is a free plug-in by Richard Rosenman called "diffuse glow" but am not sure if this will do what you are looking for. It does pretty well what its name suggests - produces a kind of flaring effect in bright spots which can look good in portraits by giving a kind of ethereal look to those angelic little rug-rat faces. But it can also need experimenting. I haev found that you need to be subtle or it produces a poor result.<br>
For contrast I often advise people to use a simple trick in PS involving creating a new duplicate or adjustment layer - then changing its blending mode to "multiply." This instantly increases color depth and contrast of the image. Usually too much in fact - which however can then be corrected by using the opacity slider on the layer to lower the layer's opacity till you get a good outcome. This usually gives a very good result if contrast and color are a bit thin.<br>
I am also a fan of using a vignette surrounding portraits - it focuses the attention on the subject and not on the background. Google the words vignette and Photoshop and you will find tutorials. There are also commercial plugins that will produce this effect but a better option than either of these if you have full PS (not Elements) is to find, download and run an "Action" designed to do this for you. While on the subject there are some Actions here that look as if they may produce nice effects for portraiture. Give them a go, they are free.<br>
I cannot think of other plugins without more information about what you want. (Glow and contrast are slightly vague.)</p>
-
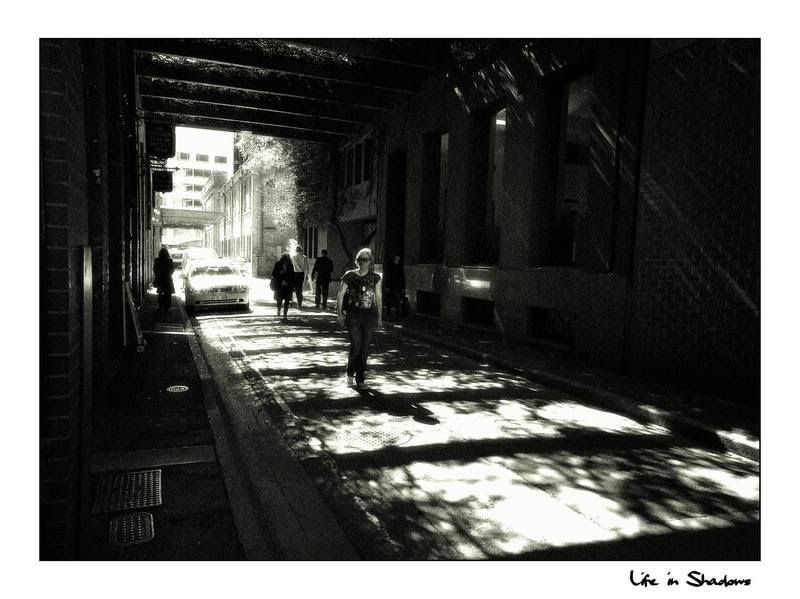
<p>A couple of my Alley shots<br>
sorry links not working I will have to put it on backburner till I work out why.</p>
-
<p>There are quite a few batch file renamers available as both payware, shareware and freeware. Go here to search their freeware section as I have found this site to be very good for reliable free software downloads. I am betting they will have something suitable. The better ones all allow options like adding a prefix or suffix or changing the name / number series totally.<br>
<a href="http://www.snapfiles.com/freeware/">http://www.snapfiles.com/freeware/</a></p>
-
<p>I have checked my hard drive and I have many of these plus others I found on the site I posted and elsewhere including some examples that do not appear on the page I linked that have places for several photos and that look like just contact sheets. Some may need a little more work for your purpose (eg are in tiff format and will require the "blank" spaces for the photos inserted but this takes about 5 minutes in PS) You are welcome to them if you drop me an email. I am lucky as I am using Paint Shop Pro X2 and it has an automatic borders and frames function. Although the frames that came with the software are pretty naf, I found that I could import my own by placing the files in the relevant system folder. The big advantage is that the PSPP software automatically resizes the frame to match the size and fomat (portrait/landscape) of the image being framed. This means I can frame any of my images at the click of a button. I therefore went on a mission a few months back to find suitable candidates on the net.</p>
-
<p>You may have to open to edit in PS to do this well. I recall you can do this in Lightroom.<br>
A couple of PS tricks to try.<br>
I am using Paint Shop Pro Photo x2 and it has a couple of automated healing tools - a spot remover and a salt and pepper filter to name two that come to mind. Often I try both and that gets rid of a lot of smaller junk (I dont like setting it too agressive as it can reduce sharpness and what one misses the other gets.) I think some versions of PS and PSE have some similar tools??? Its been a while and I cannot recall precisely but that is my distinct impression. The point is that these tools help when there are a lot of small faults and should not be ignored as part of a package of fixes. <br>
Second with skies and other areas of smooth, common color/tone, it helps tremendously to select the area using the magic wand tool (or whatever its called in PS and when you are happy with the selection, then apply a Gaussian blur experimenting wiht 2 pixels and working up to perhaps 4 or even 6. As its a sky and skies should not have sharp edegs it does nto matter if you use a fairly large blur factor in most cases. This gets rid of a lot of junk too, by smooshing it out across a larger area and making it less obvious.<br>
The healing brush in PS is great because it helps select pixels that are as similar as possible to the ones surrounding the flaw. (I often struggle with cloning as even when colors look the same they often vary enough to cause problems when you over write a spot) In skies when you do this, because skies often go from darkish at the top to lighter near the horizon it pays when cloning to set the area selected where the pixels are from to be at the same "height" above the horizon to the area you have to cover and as near as practical to that spot. Otherwise you have to set the opacity to low and go over it multiple times to get a result that is not an obvious fix.<br>
There are some specialised filters for this too. I think one has been published as freeware by Polaroid. Sorry I do not have details to hand. But I recall it works pretty good.<br>
But I do have a link - see the bottom of this page.<br>
<a href="http://alphatracks.com/archives/134">http://alphatracks.com/archives/134</a></p>
-
<p>This thread has gotten me interested in the idea of finding some myself. Here are some I discovered in a quick search on DeviantArt. Not sure if they are what you want tho'</p>
New micro lenses better than old?
in Nikon
Posted