

luis-a-guevara
-
Posts
222 -
Joined
-
Last visited
Content Type
Profiles
Forums
Blogs
Events
Downloads
Gallery
Store
Posts posted by luis-a-guevara
-
-
Just show your images.
-
By the way , Where are your images?
-
Cheaper than a free Program? Doubt it.
Frans .You are clearly in denial . You don't seem to take the time to digest what you read and , therefore you are stuck
in old technology . As one that knows what it feels to have the fingers wet in Pinacryptol ,developing film negatives by visual
inspection , in search for those elusive tones in the highlights , I welcome the technical advantage of doing that very
same thing with my "Digital Negatives" in both a quest for , both , improve my images , and second and inseparably
from the first one, express myself.
Too bad that you are not listening.
-
Please dont blame me for your failure to apply this process properly . The instructions , quoted here from my tutorial
posted earlier in this Thread , and from the first video , clearly say:
"SO , WHAT IS THIS LINEAR PROCESSING AGAIN?
Simple. I am sure that you will agree that is simple. Linear processing is avoiding the introduction of this Inverse
Gamma at the point where it hurts the most ,to reintroduce later, where it hurts the least ,as one of the last steps of the
Image Optimization , rather than at the Image Creation. A big substantial Difference.
Of course we must reintroduce it , to achieve again the necessary overall System Gamma of 1.0. If we don't , we will
end up with an image that possess the same Gamma as the display does , that is G2.2 , which for most people is VERY
DARK AND CONTRASTY and TOTALLY UNUSABLE. ( Please take a mental note of this , because when you process
Lineal Images and you forget to reintroduce the compensating Gamma of 0.45 , your image will be like that , dark and
concentrated at the lower tones.)"
If you dont get get it , nobody can take care of your inability . It might look like like a "new toy syndrome"..... for you ,
that are clearly disconected from what is going on , but Linear Processing has been around since the early 2000 ,
Canon has it ,as part of its RAW processing options , and so does Adobe in Lightroom and Camera RAW Converter. They might have a
good reason to be spending time and money in extra lines of code.
Linear processing is all over the place . Jonathan Wienke , in 2004 posted an excellent article on Hibrid Linear
processing, at Luminous Landscape here: http://www.luminous-landscape.com/tutorials/hybrid-conversion.shtml, there is many others ,if
you care to do some Google research.
"When you point to the moon with your finger , the fool looks at the finger.. " Old saying.
-
<p>This seems to be the root cause of so much disension . I hope it helps because I cannot keep up reacting individually to everybodys
posts:</p>
<p>Gamma by definition is the slope of a curve.The problem is that Curves , unlike Straight Lines ,do not have ONE Gamma Value that
defines them , they have an infinite number of them . One for each point along the curve , so to define a Gamma value for a CURVE the
Gamma of the Midpoint is used , because ,in the case of human vision we have better vision at the Mid Tones than we do at Highlights or
Shadows.</p>
<p>Because of this, Color Balance is also done at the Mid point , which ,on an image that has been Gamma Encoded ,corresponds
roughly
with its average midpoint in the Histogram .consequently COLOR BALANCE BECOMES OPTIMUM AT THE MID TONES AND
DETERIORATES TOWARDS THE WHITE AND BLACK POINTs . Dont confuse this whith White point , which is just the neutrality of the
whites.</p>
<p>For the same reason Tone Separation in GAMMA ENCODED images is LARGEST around THE MIDPOINT AND COMPRESSES
TOWARDS THE END POINTS. This gives posterization of the Highlights and Shadows .</p>
<p>LINEAR GAMMA , instead , is defined by a Straight Line of uniform, constant slope , so it does not introduce any compression of
tones , but leaves the tone distribution at the mercy of Binary numbers , that are strongly compressed at low Bits values and very spread
apart at the high bit values . The end result is excellent separation of the high tones with possible posterization of the low tones.</p>
<p>Neither of this processes is better per se , they are just tools in the toolbox of the resourceful artist . If your image has delicate
Highlights that you want to preserve or enhance ,then Linear processing will be your best tool , but if it is a dramatic low key image with
abundance of low tones , definitely Gamma encoded RAW processing is called for .</p>
<p>If your image has Both (HDR)Delicate , expresive highlights and interesting detail in the Shadows, then Double Processing ,
combining Linearly generated images to non linear ones is what it needs to be done.</p>
<p><img src="http://www.sigmacumlaude.com/6548803-md.jpg" width="679" height="354" /></p><BR><P>LUIS A GUEVARA</P>
-
<p>OK Franz lets try this other movie just for you :</p>
<p><img src="http://www.sigmacumlaude.com/video.gif" width="70" height="70" /><a
href="http://www.sigmacumlaude.com/Franz1.mov">Color Matching the 2 images , intro</a></p>
<p> </p>
-
Excellent work Roger . Lightroom is my software of choice for managing my files and it does an excellent work indeed ,
but don't get confused , it is not Lightroom being better or ACR being worse , because Lightroom is based on ACR just
like Photoshop is. The difference is that you seem to know how to use it well. Your non lineal image is closer to my
Lineal one than what I got in Lightroom myself. Congratulations!
By the way your Liza and Adam's Wedding Gallery is the MOST PERFECTLY NEUTRAL COLOR BALANCED IMAGES
I HAVE EVER SEEN.!
Please don't miss the video I posted a bit earlier . Luis
-
Not that I know Mike . It is weird that each platform have advantages over the other one. The windows version has a lot
more control through all those Parameters , but the Mac version offers a more practical PSD output.
-
Franz , watch the movie please. Maybe the answers are already there.Luis
-
<p>Hi Tim ,Mike and everybody . I did create a small Quick Time Movie , that I hope you will be able to see directly here
:</p>
<p>Please excuse all the deficiencies of it , but I am very tired.Here it goes:</p>
<p> </p>
<p><img src="http://www.sigmacumlaude.com/video.gif" width="70" height="70" /><a
href="http://www.sigmacumlaude.com/Lineal%20process.mov">Lineal processing Video</a></p>
<p> </p>
<p>Hope you like it and that it helps.Luis</p>
-
<p>Hi Mike. It seems that you missed a link to an image showing the output preferences , here it goes again:</p><BR>
<img src="http://static.photo.net/attachments/bboard/00R/00RKiq-83869784.jpg">
<BR><p>Welcome to this discussion . Luis</p>
-
You have two dialog boxes shown in there . The bottom one is telling you that you have not selected a folder to receive the
output. That is strange because DCRAW-x will retain the last one used . the other dialog box is because this is an
application that originated as a Window /Lunix and in its Mac incarnation ,requires you to Drag the RAW File into the
specified place in the dialog box. It will not work by dragging a file on top of the application and that message will pop up.
Tim , I will try to make a Quick Time video showing the process from the beginning to the end.You are right about the
sRGB Gamma 2.2 . Typo.
-
<P><i>...........Raw Developer is applying the default color profile because changing from it's default ICC version to
Extended Gamut slightly changed the preview even with Disable Processing checked which is suppose to turn off all color
management.................
..........Computer platforms and display calibration doesn't have anything to do with this since there was no physical editing
by eye of your image.........
.........But now that you indicated you've been using a Window's version with an "abundance of processing options" this is the
rub I've been looking for in this discussion...........</P></i>
<BR>
<P>Tim , you are not making sense. You got confused somewhere. I do not use RAW DEVELOPER and I am not familiar
with its options. I use DCRAW-X that is, as its X in the name indicates , a Mac OSX only application that I use on my Mac
on OSX Leopard as I indicated previously. It is not sufficient to select a wider gamut profile , you have to CHANGE ITS
GAMA TO 1.0 as indicated at the beginning. If you dont , you'll remain at Gamma 1.8.<BR>
The "abundance of processing options of Windows version of DCRAW" (notice the absence of "X" ) was only posted for your
benefit, since you are interested on its inner workings, and is a screen shot picked up from the internet .<BR> I am more
interested in its PRACTICAL working and that will not work if you don't follow the recipe; first you do a lineal conversion to
16 Bit PSD in DCRAW-X , then in Photoshop you change the color settings for the file to a CUSTOM PROFILE OF GAMMA
1.0, then you do whatever you think is needed in terms of reinstating some of the things that the Linear Converter removed ,such as
SHARPENING etc., then Convert the file to sRGB ,and save it as JPG with an embedded sRGB profile.
<BR><P>Make sure that your Monitor is calibrated to sRGB standard of Gamma 1.8 ,White point D65.<P><div>
 </div>
 -
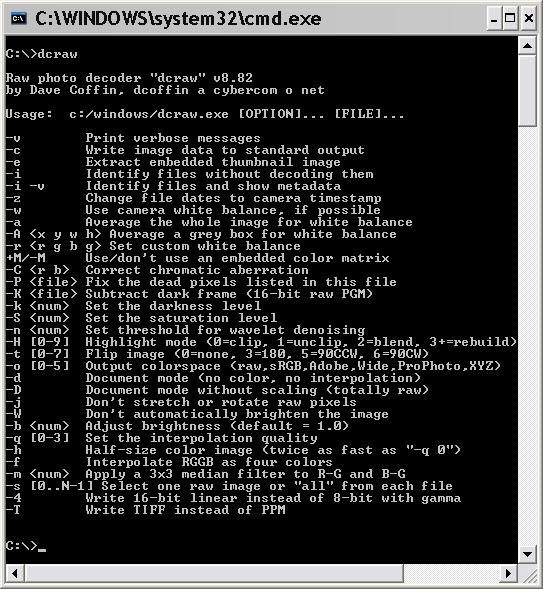
<P>Tim , I dont know the inner workings of the Mac version of DCRAW , that is very elemental as interfaces go
,however the Windows version provides abundant processing options and information.</P><BR>
<P>In case it helps you figure out the answer to your questions here is some info:</P><BR>
<img src="http://www.guillermoluijk.com/tutorial/dcraw/dcraw8.82.gif"><BR>
<P> I have not been able to reach the developer of DCRAW-X , perhaps you have more luck and I have plenty of my
own questions for him , if you do.</P>
<BR> I like the way you work. Very methodical and keeping good records. Your results are very interesting and look
close to my image , but they do look flatter , with less detail and tonality in the highlights and shadows </P><BR>
<P> Your image :</P>
<img src="http://static.photo.net/attachments/bboard/00R/00RKJe-83705684.jpg"><BR>
<P>My Image:</P>
<img src="http://www.sigmacumlaude.com/for%20forum/IMG30989FinalCropped%20W%20logo%20.jpg"><BR>
Again , it is very hard to compare images processed in different computers with different Displays and Display profiles. It is even harder ,
and perhaps futile to attempt to do so across the internet. My monitor is calibrated using Pantone Colorvision Spider hardware calibrator.
<BR><P>I have the original Profile and the Color Vision generated profiles and if I switch between them , I do see a difference, and I will
provide a link for a Q.T.Video that I made to illustrate this point. Luis
-
Luis version with no curves applied ( But converted to sRGB for Internet display)
-
<p><em>Roger Smith , Oct 28, 2008; 09:24 p.m.<br />
The image 30989.x3f looks like a very different image than the one you posted in this thread. Is that intentional? It also
appears to be somewhat blown out. I don't see this image anywhere in your photo.net or pbase or deviantart gallery to
compare your processing with mine.<br />
Am I missing something?<br />
Your images are very strong, by the way.<br />
I'd really love the raw version of the image at the top of this thread to compare.</em></p>
<p>Roger like I said that image is already in my Fine Art Gallery so I decided to give everybody a chance to work on a
new image , before I presented you with my own rendering of it.</p>
<p>You are not missing anything , Lineal RAW images will enable you to utilize the FULL DYNAMIC RANGE that you
captured , so that gives you an extra Stop of room over the highlights that you can , and SHOULD capture by adding
extra exposure , unless you wanted them waisted as usual. So all my images have an intentional , lets call it
overexposure , of about 2/3 of a stop , because they are intended for Lineal processing.</p>
<p>From the point of view of Lineal Processing that is PROPER EXPOSURE , but if you process it normal it will look
overexposed because it is HITTING THE LIMITS OF THE CONVENTIONAL PROCESS.<br />
</p>
<blockquote>
<p><em>Frans Waterlander , Oct 29, 2008; 12:21 a.m.<br />
Luis,<br />
I hate to rain on your parade, but something doesn't add up in your story. If as you say "linear processing
workflows compress the shadows and devote the rest of the Color Space to Midtones and highlights" then, if
further processing is applied correctly (meaning the finished image should show no changes in tonality and color as
compared to "normal" processing) ........</em></p>
</blockquote>
<p>DONT WORRY FRANS , YOUR POINTS ARE WELL TAKEN and they are indeed indicating that you are taking my
statements seriously and ,thinking hard </p>
<p>What happens here has to do with the fact that the order of things in the process DOES have an influence on the
outcome . I explain:<br />
</p>
<p>DEMOSAICING , or the creation of the 3 color channels. is done NOT FROM THE ORIGINAL CAPTURED DATA
but from DATA THAT HAS ALREADY BEEN ALTERED by GAMMA . It is from this , somewhat distorted Color
Channels that Color Balance will be determined. more so ALL THE SUBSEQUENT STEPS OF IMAGE CONVERSION
will build on this Gamma encoded Data , incrementing the deviation , since every step is modifying data that was
already modified by the previous step.</p>
<p>All Sensors will go through Interpolation of the 3 Color Channels , Anti Aliasing filtering , and , to counteract it, some
degree of Sharpening , followed by Contrast and Saturation enhancements , before finally compressing the data into the
chosen camera Color Space, as a RAW data file.</p>
<p><br />
If you apply Gamma AFTER the Demosaicing and color balance have taken place you will have a very different result
because all this <br />
additive deviations from the original data,will be acting on pristine data. If you remove Gamma and leave out
Compression and Color Space <br />
you will achieve greater dynamic range with more highlight detail and richer color .</p>
<blockquote>
<p><br />
<em>However, that's not what your examples show; they show dramatic differences in tonality and color; that's NOT
what linear processing should result in. Somewhere along the line you are introducing these dramatic changes in tonality
and colors and either a) that's unintended but needs to be resolved or b) you want that in addition to the linear
processing characteristics but then you would need to make that abundantly clear. As is stands right now, you are
causing changes you don't realize or you are not telling the whole story.</em></p>
</blockquote>
<p>On the contrary . Your statement reflects that you are taking Linearity as something that should be happening
<strong>between the final image and the initial image</strong>, and therefore because the RAW file I provided , as seen
through your processing looks very different to my final image you think it is not lineal ,<strong> however the Linearity I
am interested on is in reference to the original Scene</strong> , the RAW file is just a means to an end. You cannot
possibly know the validity of this , because you never saw the scene. If we were just interested on being
faithfull to the way our RAW files look ,we will not be looking into this or any other process and we will be all happily
busy doing conversions the old way.</p>
<p><br />
The confirmation of the advantages of lineal processing lies in the fact that you CANNOT arrive to the same rendering
of tones I made from that RAW file , unless you process it Linearly and Display it using a Lineal Prophoto Profile of
Gamma 1.0</p>
<p> </p>
<blockquote>
<p><em>....................this would result in less posterization/more detail in the midtones and highlights at the expense
of more posterization/less detail in the shadows. </em></p>
<p> </p>
<p>This is an exellent point and very valid one . A 12 Bit Linear binary file of recorded intensity values will have 2048
levels available for the upper highlight stop , that if you can use it, (And you can if you use Linear processsing) will give
you a lot of tones for very delicate highligts with lots of detail and color nuances, but at the other end of a typical Six
stop Dinamic Range , you will only have 64 Tones to describe your shadows , leading to posterization and loss of detail
in the shadows.</p>
<p> </p>
<p>That is why my opening statement was :</p>
<blockquote>
<p><em>"Some images carry their message in their lower tones and some do it with their midlle tones and
highlights, like this one:<br />
</em></p>
<p><em>Normal RAW processing spreads the image tones evenly across its Dynamic Range , thus , abnormally
,compressing the highlights and expanding the Shadows , something that will not work well with this type of imagery
.</em></p>
<p><em>Linear processing workflows , instead ,compress the shadows and devote the rest of the Color Space to
Midtones and highlights making it the perfect Complement to this type of imagery ,that results from frontal
lighting."</em></p>
<p> </p>
<p><em>Image IMG30989.X3F is another image carrying its message with its upper tones and therfore benfited in an
inimitable way from Lineal Processing:</em></p>
<p><em><img name="" src="http://www.sigmacumlaude.com/for forum/IMG30989FinalCropped W logo .jpg"
width="1180" height="1150" alt="" /></em></p>
</blockquote>
</blockquote>
-
<P><i>You haven't seen these artifacts?</i></P>
<BR>
<P>Sorry those images were not converted using a linear process . But I will make it a point to develop those two in DCraw-X and
present the results a some point.</P>
-
<p>Hi again Tim .</p>
<blockquote>
<p><em>Good work. I take it this was your tutorial you were planning on posting.</em></p>
<p><em>The only raw converter I have where I can actually get this dark linear unprocessed rendering is in Raw Developer (Mac
only). Its core algorithms were built upon DCRAW. I never thought of using RD's Unprocessed setting because I didn't know what
source profile to assign because I was with the understanding that digital sensors have no color space. I'm going to give it a try on one
of my own Pentax PEF's and see what I get.</em></p>
</blockquote>
<p>Thanks . The setting for conversion in ACR is buried as an option for SAVING as DNG ! While you are in the Conversion Screen ,
click <strong>"Save Image..."</strong> at the bottom and the <strong>"Save Options "</strong> will pop up.
Choose Format > Digital Negative andnew options will appear for DNG , that are <strong>"Embed Original
RAW"</strong> ,or <strong>"Convert to Linear Image"</strong>B , as you can see highlited in Yellow here:</p>
<p><img src="http://www.sigmacumlaude.com/for forum/Save as linear.gif" width="642" height="540" /></p>
<p> </p>
<p>Nobody knows exactly what they mean by "Lineal Image" since Adobe is very Cryptic about it. To me Lineal means not
only NO GAMMA , but no Compression , Sharpening ,Denoising , <br />
Antialiasing and no Interpolation, as well as no Vignetting or Chromatic corrections . </p>
<p>This is the only way that our color channels can be made from undisturbed data , meaning that it has been touched the least .
Ideally ,not touched at all. </p>
<p>I can't find a setting in ACR 3.7, the only version I have at the moment which came with CS2 that gives the same dark rendering as
Raw Developer.</p>
<p>Like I said I use DCRAW-X , a free Lineal Converter for MacIntel that does strip Gamma and Color profiles. You can download it for
free at <a href="http://www.frostyplace.com/dcraw/index.html">http://www.frostyplace.com/dcraw/index.html</a></p>
<blockquote>
<p><em>What peaks my interest in your process is the unusual and quite unique and beautiful color renderings in the images here
and in your gallery and was wondering if this is due to the linear process, dcRAW-X or the camera sensor RGB spectral response and
lens combo.</em></p>
</blockquote>
<p>Well , clearly, the image quality of the Foveon sensor ,paired to Leica or other German lenses , is much superior to unmodified
cameras or Bayer sensor, in terms of 3 Dimensionality and richness of color, and that is why I sell Converted cameras and Mount
Replacement kits at <a href="http://www.sigmacumlaude.com"><em>Sigma Cum Laude</em></a> , but as your intuition is telling you
this Synergetic combination only comes alive with Linear processing .</p>
<blockquote>
<p><em>However, what I don't understand about your images is why there are so many posterization artifacts along high contrast
edges and within tonal transitions in out of focus bokeh backgrounds.</em></p>
</blockquote>
<p>I have not seen any of this , but it could be that I am using a Color Managed Browser at a 24 Million Colors depth ,on Mac OSX
Leopard , with a Color calibrated 23inch Apple Cinema Monitor . Some of my images are very large , in the order of 900 mB , and when
compressed as JPEG do suffer a lot . Unfortunately there are no ways around that.However do look at your Display preferences to see
if you are in Millions or only in Southends. Many Mac models use main memory shared with the Monitor , so if you are low on it it might
automatically bring down the Display Resolution.</p>
<p> </p>
<p><img src="http://www.sigmacumlaude.com/for forum/IMG30989FinalCropped W logo .jpg" width="1180" height="1150" /></p>
-
<h2>LINEAL RAW PROCESSING</
©LUIS A GUEVARA luis@sigmacumlaude.com<br />
</h2>
<p>This is one of the most elusive Digital Concepts , because ,when seen globally , all Digital Processing
Systems are Lineal. Otherwise the images we make will not make any sense to us. </p>
<p>We expect a Scene to look the same way whether we look at them through a window , through a Roof mounted
Video camera , at the Computer Screen or in a Print hanged in the wall . This would not be possible if their overall
processing systems did not respect all the tonal relationships of the Scene , such as color balance , Illumination
Dynamic Range , Contrast , Sharpness ,etc. When it does , we say that the system is Lineal and that there are no
distortions introduced by the process itself.</p>
<p>In practice our systems are lineal to a degree that we call "Realistic", and we recognize that some
combinations of Hardware and Software brands produce better "Image Quality" or that there is an
improved "Realism" in their resulting images.</p>
<p>Finally when dealing with this kind of elusive concepts , we can reach another plateau in the Image
Reproduction arena, that is referred to as "Three Dimensionality".</p>
<p>When the image quality achieved is so highly realistic we say that it has achieved "Three
Dimensionality" , that is ,it can fool the eye into believing that is real.</p>
<p>The European <a href="http://en.wikipedia.org/wiki/Renaissance" target="_blank">Renaissance</a> painters
refereed to this concept ,as "<a href="http://en.wikipedia.org/wiki/Trompe_l’oeil" target="_blank">Trompe-l'œil
</a>" (trick the eye")<br />
</p>
<h3><em>So what do we mean by Lineal Processing as opposed to Lineal Systems?</em></h3>
<p>Simple. Although as a whole all the elements of an Imaging System behave Linearly , their individual
Components are mostly Non Lineal , but their non linearity has been compensated at different points to achieve the
final desired overall System Linearity. The tool used to do this is called <strong>Gamma Encoding.</strong></p>
<p>Gamma is nothing but the slope of a function graph that describe the relationship between the input and the
output of a system or a system element. </p>
<p><img src="http://www.sigmacumlaude.com/LINEAL ROOT/gamma.gif" alt="Gamma" width="250" height="234" /
>The image shown is a Monitor Gamma Curve that is definetily non linear and non uniform </p>
<p>Gamma 1.0 , on the other hand ,means that the output divided by the input equals ONE. No transformation
takes place , and we call it LINEAL. The output equals the input. </p>
<p>We certainly want linearity in all our overall systems , be they music amplifiers or Digital Cameras .However in
Digital Imaging this is harder to achieve because our Computer Monitors , Cameras LCD Displays , and all Printing
Devices are <strong>Highly Non Lineal</strong> . Monitors for example have a Gamma of 2.5 and more, but our
Camera Sensors are very Lineal with a Gamma very close to 1.0 , so how do we conciliate this disparity ?</p>
<p>Simple , again , but largely unknown to most people, in spite that this has been with us since the creation of
Video Cameras :</p>
<h4 class="style1"> An artificial Gamma Correction is introduced to the Captured RAW Data that is exactly the
inverse of the Display Gamma so that the overall effect is that they cancel each other out.</h4>
<p>Since today imaging systems operate within Standardized Color Spaces , each one designed with its own
Target Display Gamma , of which the most ubiquitous is the sRGB Color Space that was designed to represent the
Gamma of the Average , Uncalibrated , PC CRT Monitor , of Gamma 2.2 , then <strong>the inverse of this</strong> 1/2.2=0.45 , is applied, as a transformation function, to the RAW data ,DURING ITS CONVERSION from
RAW DATA to Displayable Image File .</p>
<p>This is done in the RAW developer, as a first step , right before before any other necessary processes of the
conversion from <strong>data</strong> to <strong>image </strong>,have taken place.The following graphic
illustrates how the two ,opposite curves combine , mathematically, to produce a Mean Value of 1.0 , the straight
Gray Line you see in between .</p>
<p><img name="" src="http://upload.wikimedia.org/wikipedia/en/5/5a/Gamma06_600.png" width="529" height="479"
alt="" /></p>
<p><a href="http://en..org/wiki/Gamma_wikipediacorrection" target="_blank">http://en.wikipedia.org/wiki/
Gamma_correction</a></p>
<p><strong>That is ,our RAW Data that was Linearly captured ,thanks to the painstaking efforts of the Sensor
Designers , is artificially DISTORTED when and where it hurts the most , right before Color Channels and Color
Balance are created from it. </strong></p>
<p>The RAW file is just a Matrix of Data with no Color Channels , Color Spaces or even Color , for that matter.It is
not an image file. For more on RAW , please see my article "The Raw Story" at: <a href="http://
www.sigmacumlaude.com/The_Raw_Story.aspx" target="_blank">http://www.sigmacumlaude.com/
The_Raw_Story.aspx</a></p>
<h3><em> SO , WHAT IS THIS LINEAR PROCESSING AGAIN? </em></h3>
<p>Simple. I am sure that you will agree that is simple. Linear processing is avoiding the introduction of this Inverse
Gamma at the point where it hurts the most ,to reintroduce later, where it hurts the least ,as one of the last steps of
the <strong>Image Optimization</strong> , rather than at the <strong>Image Creation</strong>. A big substantial
Difference. </p>
<p>Of course we must reintroduce it , to achieve again the necessary overall System Gamma of 1.0. If we don't ,
we will end up with an image that possess the same Gamma as the display does , that is G2.2 , which for most
people is VERY DARK AND CONTRASTY and TOTALLY UNUSABLE. ( Please take a mental note of this ,
because when you process Lineal Images and you forget to reintroduce the compensating Gamma of 0.45 , your
image will be like that , dark and concentrated at the lower tones.)</p>
<p>For example , this is a RAW image , converted into a LINEAL Photoshop file,that was opened without
assigning it a Custom Lineal Profile. As you can see because is missing the Gamma encoding , the image looks
dark , <strong>because nothing is counteracting the Monitor Gamma.</strong></p>
<p><br />
As you can see its color settings are indicating <strong>sRGB</strong> , my preference as a Workspace for
those images that <strong>don't come with a Gamma Tag</strong>. SRGB has a Gamma of 2.2 , so we end up
with 2.2 + 2.2 = 4.4 , instead of the desired Gamma 1.0 . No wonder it looks so dark and Contrasted.</p>
<p><img src="http://www.sigmacumlaude.com/LINEAL ROOT/CUSTOM PROFILE 1 STEP a.jpg" width="1049"
height="694" /></p>
<p> </p>
<p>When I change it to Adobe Prophoto , that has a Gamma of only 1.8 , as seen here , the <strong>Colors</strong> get better , but the<strong>Tones</strong> , although slightly brighter ,are still wrong and harsh .Detail is
poor in the HIGHLIGHTS and barely acceptable in the Mid Tones . But clearly we are moving in the right direction.</
p>
<p> </p>
<p>.<img src="http://www.sigmacumlaude.com/LINEAL ROOT/CUSTOM PROFILE STEP 3.jpg" width="1049"
height="694" /><br />
</p>
<p> </p>
<p>NOW THIS IS THE SAME IMAGE , AFTER CHANGING THE PROFILE TO MY CUSTOM PROFILE , THAT I
HAVE NAMED AS "LINEAR PROPHOTO" As you can see here the Custom Profile is nothing but a
Prophoto RGB profile where<strong> the Gamma was changed to 1.0</strong>:</p>
<p><img src="http://www.sigmacumlaude.com/LINEAL ROOT/CUSTOM PROFILE STEP 4.jpg" width="1049"
height="694" /></p>
<p>This a very impressive Visual difference , that comes from the fact that all instructions that the camera writes
to the Metadata of the RAW file <strong>have been stripped from it</strong> , by my LINEAL CONVERTER OF
CHOICE ,<a href="http://www.frostyplace.com/dcraw/index.html"> "DCRAW-X"</a> </p>
<p>This 16 Bit Photoshop PSD file was created, directly, in Adobe PROPHOTO RGB Color Space , without even
opening the image in a Viewer , so that I could quickly get to open it in Photoshop in the most Pristine condition
possible.</p>
<p>Some people do not believe this , so here you have a screen shot of the RAW file Metadata , as presented by
Photoshop CS4;</p>
<p>This is the Metadata of the Lineal PSD image .It is very short containing mostly creation information Please
notice how both Photoshop and Camera RAW frames are showing the File number IMG30989.psd :</p>
<p><img src="http://www.sigmacumlaude.com/LINEAL ROOT/Pasted Graphic 1.gif" width="850" height="829" /></
p>
<p> </p>
<p>FOR COMPARISON , HERE IS THE EXTENSIVE METADATA FOR THE SAME IMAGE , THIS TIME AFTER
A NON LINEAL , ORDINARY <a href="..">A.C.R</a>. CONVERSION: , <br />
YOU CAN CLEARLY SEE ALL THE EXTRA INSTRUCTIONS , <strong>HIGHLIGHTED IN BOLD</strong>, and
the file number in RED</p>
<?xpacket begin="" id="W5M0MpCehiHzreSzNTczkc9d"?><br />
<x:xmpmeta xmlns:x="adobe:ns:meta/" x:xmptk="Adobe XMP Core 4.2.2-c063 53.352624,
2008/07/30-18:05:41 "><br />
<rdf:RDF xmlns:rdf="http://www.w3.org/1999/02/22-rdf-syntax-ns#"><br />
<rdf:Description rdf:about=""<br />
xmlns:tiff="http://ns.adobe.com/tiff/1.0/"><br />
<tiff:Make>SIGMA</tiff:Make><br />
<ti<p>ff:Model><strong>SIGMA SD9</strong></tiff:Model><br />
<tiff:XResolution>240/1</tiff:XResolution><br />
<tiff:YResolution>240/1</tiff:YResolution><br />
<tiff:ResolutionUnit>2</tiff:ResolutionUnit><br />
</rdf:Description><br />
<rdf:Description rdf:about=""<br />
xmlns:exif="http://ns.adobe.com/exif/1.0/"><br />
<exif:ExifVersion>0221</exif:ExifVersion><br />
<exif:ExposureTime>1/125</exif:ExposureTime><br />
<exif:ShutterSpeedValue>6965784/1000000</exif:ShutterSpeedValue><br />
<exif:FNumber>56/10</exif:FNumber><br />
<exif:ApertureValue>4970854/1000000</exif:ApertureValue><br />
<exif:ExposureProgram>3</exif:ExposureProgram><br />
<exif:DateTimeOriginal>2008-10-02T08:57:58-04:00</exif:DateTimeOriginal><br />
<exif:ExposureBiasValue>0/1</exif:ExposureBiasValue><br />
<exif:MaxApertureValue>0/1</exif:MaxApertureValue><br />
<exif:MeteringMode>5</exif:MeteringMode><br />
<exif:PixelXDimension>4096</exif:PixelXDimension><br />
<exif:PixelYDimension>2731</exif:PixelYDimension><br />
<exif:ISOSpeedRatings><br />
<rdf:Seq><br />
<rdf:li>200</rdf:li><br />
</rdf:Seq><br />
</exif:ISOSpeedRatings><br />
<exif:Flash rdf:parseType="Resource"><br />
<exif:Fired>False</exif:Fired><br />
</exif:Flash><br />
</rdf:Description><br />
<rdf:Description rdf:about=""<br />
xmlns:xmp="http://ns.adobe.com/xap/1.0/"><br />
<xmp:ModifyDate>2008-10-02T12:56:29-04:00</xmp:ModifyDate><br />
<xmp:CreateDate>2008-10-02T08:57:58-04:00</xmp:CreateDate><br />
<xmp:CreatorTool>Adobe Photoshop Lightroom</xmp:CreatorTool><br />
<xmp:Label>Green</xmp:Label><br />
<xmp:Rating>5</xmp:Rating><br />
<xmp:MetadataDate>2008-10-02T12:56:29-04:00</xmp:MetadataDate><br />
</rdf:Description><br />
<rdf:Description rdf:about=""<br />
xmlns:aux="http://ns.adobe.com/exif/1.0/aux/"><br />
<aux:SerialNumber>01007372</aux:SerialNumber><br />
<aux:LensID>0</aux:LensID><br />
<aux:Firmware>1.4.0.1302 Release</aux:Firmware><br />
</rdf:Description><br />
<rdf:Description rdf:about=""<br />
xmlns:xmpRights="http://ns.adobe.com/xap/1.0/rights/"><br />
<xmpRights:Marked>True</xmpRights:Marked><br />
<xmpRights:UsageTerms><br />
<rdf:Alt><br />
<rdf:li xml:lang="x-default"><strong>ALL REPRODUCTION PROHIBITED</strong> </
rdf:li><br />
</rdf:Alt><br />
</xmpRights:UsageTerms><br />
<xmpRights:WebStatement>http://www.sigmacumlaude.com</xmpRights:WebStatement><br />
</rdf:Description><br />
<rdf:Description rdf:about=""<br />
xmlns:dc="http://purl.org/dc/elements/1.1/"><br />
<dc:creator><br />
<rdf:Seq><br />
<rdf:li>LUIS A GUEVARA</rdf:li><br />
</rdf:Seq><br />
</dc:creator><br />
<dc:rights><br />
<rdf:Alt><br />
<rdf:li xml:lang="x-default"><strong>© LUIS A GUEVARA luis@sigmacumlaude.com</strong></rdf:li><br />
</rdf:Alt><br />
</dc:rights><br />
<dc:subject><br />
<rdf:Bag><br />
<rdf:li>Tests of 19 and apo 2x</rdf:li><br />
<rdf:li>photar 25</rdf:li><br />
</rdf:Bag><br />
</dc:subject><br />
<dc:description><br />
<rdf:Alt><br />
<rdf:li xml:lang="x-default"><strong>19 f2.8 ELMARIT</strong></rdf:li><br />
</rdf:Alt><br />
</dc:description><br />
<dc:format>image/tiff</dc:format><br />
</rdf:Description><br />
<rdf:Description rdf:about=""<br />
xmlns:Iptc4xmpCore="http://iptc.org/std/Iptc4xmpCore/1.0/xmlns/"><br />
<Iptc4xmpCore:CreatorContactInfo rdf:parseType="Resource"><br />
<Iptc4xmpCore:CiAdrExtadr>6337 NW 174 TERRACE</Iptc4xmpCore:CiAdrExtadr><br />
<Iptc4xmpCore:CiAdrCity>MIAMI</Iptc4xmpCore:CiAdrCity><br />
<Iptc4xmpCore:CiAdrRegion>FLORIDA </Iptc4xmpCore:CiAdrRegion><br />
<Iptc4xmpCore:CiAdrPcode>33015-4462</Iptc4xmpCore:CiAdrPcode><br />
<Iptc4xmpCore:CiAdrCtry>UNITED STATES</Iptc4xmpCore:CiAdrCtry><br />
<Iptc4xmpCore:CiTelWork>305 8269254</Iptc4xmpCore:CiTelWork><br />
<Iptc4xmpCore:CiEmailWork>luis@sigmacumlaude.com</Iptc4xmpCore:CiEmailWork><br />
<Iptc4xmpCore:CiUrlWork>http://www.sigmacumlaude.com</Iptc4xmpCore:CiUrlWork><br />
</Iptc4xmpCore:CreatorContactInfo><br />
</rdf:Description><br />
<rdf:Description rdf:about=""<br />
xmlns:photoshop="http://ns.adobe.com/photoshop/1.0/"><br />
<photoshop:AuthorsPosition><strong>FINE ART PHOTOGRAPHER</strong></
photoshop:AuthorsPosition><br />
<photoshop:SidecarForExtension><strong>X3F</strong></photoshop:SidecarForExtension><br />
<photoshop:ColorMode>3</photoshop:ColorMode><br />
<photoshop:ICCProfile>ProPhoto RGB</photoshop:ICCProfile><br />
</rdf:Description><br />
<rdf:Description rdf:about=""<br />
xmlns:crs="http://ns.adobe.com/camera-raw-settings/1.0/"><br />
<crs:RawFileName><strong>IMG30989.X3F</strong></crs:RawFileName><br />
<crs:Version>5.0</crs:Version><br />
<crs:WhiteBalance>Custom</crs:WhiteBalance><br />
<crs:Temperature>4700</crs:Temperature><br />
<crs:Tint>-1</crs:Tint><br />
<crs:Exposure>-0.95</crs:Exposure><br />
<crs:Shadows>6</crs:Shadows><br />
<crs:Brightness>+43</crs:Brightness><br />
<crs:Contrast>+25</crs:Contrast><br />
<crs:Saturation>+9</crs:Saturation><br />
<crs:Sharpness>25</crs:Sharpness><br />
<crs:LuminanceSmoothing>0</crs:LuminanceSmoothing><br />
<crs:ColorNoiseReduction>0</crs:ColorNoiseReduction><br />
<crs:ChromaticAberrationR>0</crs:ChromaticAberrationR><br />
<crs:ChromaticAberrationB>0</crs:ChromaticAberrationB><br />
<crs:VignetteAmount>0</crs:VignetteAmount><br />
<crs:ShadowTint>0</crs:ShadowTint><br />
<crs:RedHue>0</crs:RedHue><br />
<crs:RedSaturation>0</crs:RedSaturation><br />
<crs:GreenHue>0</crs:GreenHue><br />
<crs:GreenSaturation>0</crs:GreenSaturation><br />
<crs:BlueHue>0</crs:BlueHue><br />
<crs:BlueSaturation>0</crs:BlueSaturation><br />
<crs:FillLight>0</crs:FillLight><br />
<crs:Vibrance>+35</crs:Vibrance><br />
<crs:HighlightRecovery>89</crs:HighlightRecovery><br />
<crs:Clarity>+57</crs:Clarity><br />
<crs:Defringe>0</crs:Defringe><br />
<crs:HueAdjustmentRed>0</crs:HueAdjustmentRed><br />
<crs:HueAdjustmentOrange>0</crs:HueAdjustmentOrange><br />
<crs:HueAdjustmentYellow>0</crs:HueAdjustmentYellow><br />
<crs:HueAdjustmentGreen>0</crs:HueAdjustmentGreen><br />
<crs:HueAdjustmentAqua>0</crs:HueAdjustmentAqua><br />
<crs:HueAdjustmentBlue>0</crs:HueAdjustmentBlue><br />
<crs:HueAdjustmentPurple>0</crs:HueAdjustmentPurple><br />
<crs:HueAdjustmentMagenta>0</crs:HueAdjustmentMagenta><br />
<crs:SaturationAdjustmentRed>0</crs:SaturationAdjustmentRed><br />
<crs:SaturationAdjustmentOrange>0</crs:SaturationAdjustmentOrange><br />
<crs:SaturationAdjustmentYellow>0</crs:SaturationAdjustmentYellow><br />
<crs:SaturationAdjustmentGreen>0</crs:SaturationAdjustmentGreen><br />
<crs:SaturationAdjustmentAqua>0</crs:SaturationAdjustmentAqua><br />
<crs:SaturationAdjustmentBlue>0</crs:SaturationAdjustmentBlue><br />
<crs:SaturationAdjustmentPurple>0</crs:SaturationAdjustmentPurple><br />
<crs:SaturationAdjustmentMagenta>0</crs:SaturationAdjustmentMagenta><br />
<crs:LuminanceAdjustmentRed>0</crs:LuminanceAdjustmentRed><br />
<crs:LuminanceAdjustmentOrange>0</crs:LuminanceAdjustmentOrange><br />
<crs:LuminanceAdjustmentYellow>0</crs:LuminanceAdjustmentYellow><br />
<crs:LuminanceAdjustmentGreen>0</crs:LuminanceAdjustmentGreen><br />
<crs:LuminanceAdjustmentAqua>0</crs:LuminanceAdjustmentAqua><br />
<crs:LuminanceAdjustmentBlue>0</crs:LuminanceAdjustmentBlue><br />
<crs:LuminanceAdjustmentPurple>0</crs:LuminanceAdjustmentPurple><br />
<crs:LuminanceAdjustmentMagenta>0</crs:LuminanceAdjustmentMagenta><br />
<crs:SplitToningShadowHue>0</crs:SplitToningShadowHue><br />
<crs:SplitToningShadowSaturation>0</crs:SplitToningShadowSaturation><br />
<crs:SplitToningHighlightHue>0</crs:SplitToningHighlightHue><br />
<crs:SplitToningHighlightSaturation>0</crs:SplitToningHighlightSaturation><br />
<crs:SplitToningBalance>0</crs:SplitToningBalance><br />
<crs:ParametricShadows>0</crs:ParametricShadows><br />
<crs:ParametricDarks>0</crs:ParametricDarks><br />
<crs:ParametricLights>0</crs:ParametricLights><br />
<crs:ParametricHighlights>0</crs:ParametricHighlights><br />
<crs:ParametricShadowSplit>25</crs:ParametricShadowSplit><br />
<crs:ParametricMidtoneSplit>50</crs:ParametricMidtoneSplit><br />
<crs:ParametricHighlightSplit>75</crs:ParametricHighlightSplit><br />
<crs:SharpenRadius>+1.0</crs:SharpenRadius><br />
<crs:SharpenDetail>25</crs:SharpenDetail><br />
<crs:SharpenEdgeMasking>0</crs:SharpenEdgeMasking><br />
<crs:PostCropVignetteAmount>0</crs:PostCropVignetteAmount><br />
<crs:ConvertToGrayscale>False</crs:ConvertToGrayscale><br />
<crs:ToneCurveName>Medium Contrast</crs:ToneCurveName><br />
<crs:ToneCurve><br />
<rdf:Seq><br />
<rdf:li>0, 0</rdf:li><br />
<rdf:li>32, 22</rdf:li><br />
<rdf:li>64, 56</rdf:li><br />
<rdf:li>128, 128</rdf:li><br />
<rdf:li>192, 196</rdf:li><br />
<rdf:li>255, 255</rdf:li><br />
</rdf:Seq><br />
</crs:ToneCurve><br />
<crs:CameraProfile>Embedded</crs:CameraProfile><br />
<crs:CameraProfileDigest>1241CA94FDB2D3E6D897CD3E2908F5A3</crs:CameraProfileDigest><br />
<crs:HasSettings>True</crs:HasSettings></strong><br />
<crs:HasCrop>False</crs:HasCrop><br />
<crs:AlreadyApplied>True</crs:AlreadyApplied><br />
</rdf:Description><br />
</rdf:RDF><br />
</x:xmpmeta> <br />
<?xpacket end="w"?> </p>
<p>THIS SECOND METADATA EXAMPLE IS SO LONG THAT I COULDN'T MAKE A SCREEN SHOT OF IT AND
HAD TO COPY AND PASTE , INSTEAD.<br />
</p>
<p>So the point that I am trying to make is that when Utmost Image Quality matters , linear processing is the way
to go. Lineal Image Converters , like dcRAW-X and others , not only remove Gamma but also , Compression ,
Sharpening ,De noising , Anti aliasing and Interpolation. What you want is that your color channels are made from
data that has been touched the least . Ideally ,not touched at all.</p>
<p>All this , Compression , Sharpening ,De noising , Anti aliasing and Interpolation, can be best done tailored to the
image type, under the control of the Artist and not by invisible factory presets that only work for Generic ,Average
Scenes.</p>
<p>If you want to download the 7 MB IMG30989.X3F Zip file, to try all this by yourself , please <a href="http://
www.sigmacumlaude.com/LINEAL ROOT/IMG30989.X3F.zip">click here</a> , but please remember that all this
document is copyrighted.
-
<p>Thanks Tim .</p>
<p><strong><em>What versions of ACR can you get this linear output through its preferences?</em></strong></p>
<p>I am not sure when was the first time that ACR included Lineal Output , but I have been using it at least for the last
Versions that started with Photoshop CS2.</p>
<p>Lightroom , as far as I know included the option since V1. But I dont generally use them , like I said I use a program
called dcRAW-X , that I know exactly what it does , being a Programmer myself ,while Adobe products are shielded in
Commercial Secrecy.<br />
<br /></p>
<p><strong><em> Was it the custom 1.0 gamma ProPhoto RGB which can be made using Photoshop's CustomRGB
within Color Settings?</em></strong></p>
<p>Yes . You go Color Settings , select your desired profile , in this case Prophoto, and then go down to the Gamma
settings , that by default would be 2.2 and type in 1.0. Now Save this alongside all the other profiles with a convenient
name . Foe example I use "Linear Prophoto"</p>
<p><strong><em>How was color temp/white balance applied?</em></strong></p>
<p>The Header portion of every RAW image file, contains non user readable Metadata that includes a Sub-section
called "Exif " where all the camera settings in force at the time of the capture are stored . The RAW
converter reads this info and uses it to color balance the image. This particular Image was shot in the shade under a
Blue sky , illuminated by reflected light from the sky , so I had , correspondently set the camera Color Balance to
"Shadow" . As you can see the Non Lineal version shows the Yellow Bias imposed by the
"Shadow" setting , to counteract the Bluish illuminant.</p>
<p>The Lineal RAW image ,instead, does not have the Yellow color bias imposed on it , and therefore contains more
Blue , Truer to the Scene.</p>
<p><em><strong>Did you apply further tweaks to contrast after assigning the 1.0 gamma profile to the bottom image
before posting it here?</strong></em></p>
<p>Yes , of course . When you open a Lineal image and assign a Custom profile of Gamma 1.0 three things happen
:</p>
<p>1-You prevent Photoshop preferences settings for Untagged Images from taking effect ( This means assigning the
Users Workspace preference ,if exist , or P.S. default's , sRGB) </p>
<p>2-The colors of the Lineal Image now have a <strong>Context</strong> that defines the meaning of its color
values.</p>
<p>3-The Most Important Part. No Gamma transformations are applied to the tonal distribution , in essence passing it
right through , as it is , with its original Gamma 1.0<br />
</p>
<p>Because of this last part ( Which is at the heart of the reasons why you choose to do a Lineal Processing ) the
image will have a visual aspect that is Lineal , but with the uncompensated Monitor Gamma of 2.2 Riding on it skewing the
Midtones to the Left . (Remember Gamma is the slope of the Levels Curve at its Midpoint ). So Yes , you have to either
<strong>Reinstate the Gamma Encoding </strong>that you removed early in the Game ,where it hurt the most , or do a Manual
Tone Mapping ( This is better ) Either way you are doing it after the image have already been built from the maximum
data available , which is the point where any Tweaks will hurt the least.( All Tone Manipulations produce data Loss, so you want to
delay them until after the Image has already been created from the RAW Data into 3 RGB channels , on which the Color Balance will be
based upon ) </p>
<p>This last part ,Tone Mapping , is something that every good artist would always do to every image , regardless of it
being Linear or Not , to account for each image needs, that are , obviously , different all the time.</p>
<p>The great benefit of this Lineal Processing is that it enables you to use <strong>all the Data captured</strong> ( Applying
Gamma different than 1.0 ,always shrinks the Tonal Range ) and because the High tones are up to this point ,untouched
, they can deliver a lot more detail ( Shrinking the upper tones means the tonal differences are minimized between
adjacent tones , therefore detail suffers) . This is a good thing because <strong>our eyes are less sensitive to detail in
bright lights .</strong></p>
<p>At the end , when your are satisfied with your image , save it as a Master Image in PSD format , then convert it to
<strong>Adobe sRGB</strong> color space , change image to 8 Bit mode and save it again as JPEG with a
compression of 6 , for web display.</p>
<p>The end result is , like you said "A much better and more accurate looking rendering"</p>
<p>P.S. Roger I am creating a small tutorial using another , similar ,image of the same Scene , that will include a link to
download the RAW file .The other image is already part of <a href="http://www.photo.net/photos/Luis-A-Guevara">my Fine Art Gallery</a>
right here at photo.net . My RAW files are X3f files from a Sigma SD9 camera and Leica lenses , so you will have to
use either Lightroom or Photoshop to do the conversion.</p>
<p>More on this will follow soon.Luis</p>
-
<p>Thanks Tim .</p>
<p><strong><em>What versions of ACR can you get this linear output through its preferences?</em></strong></p>
<p>I am not sure when was the first time that ACR included Lineal Output , but I have been using it at least for the last
Versions that started with Photoshop CS2.</p>
<p>Lightroom , as far as I know included the option since V1. But I dont generally use them , like I said I use a program
called dcRAW-X , that I know exactly what it does , being a Programmer myself ,while Adobe products are shielded in
Commercial Secrecy.<br />
<br /></p>
<p><strong><em> Was it the custom 1.0 gamma ProPhoto RGB which can be made using Photoshop's CustomRGB
within Color Settings?</em></strong></p>
<p>Yes . You go Color Settings , select your desired profile , in this case Prophoto, and then go down to the Gamma
settings , that by default would be 2.2 and type in 1.0. Now Save this alongside all the other profiles with a convenient
name . Foe example I use "Linear Prophoto"</p>
<p><strong><em>How was color temp/white balance applied?</em></strong></p>
<p>The Header portion of every RAW image file, contains non user readable Metadata that includes a Sub-section
called "Exif " where all the camera settings in force at the time of the capture are stored . The RAW
converter reads this info and uses it to color balance the image. This particular Image was shot in the shade under a
Blue sky , illuminated by reflected light from the sky , so I had , correspondently set the camera Color Balance to
"Shadow" . As you can see the Non Lineal version shows the Yellow Bias imposed by the
"Shadow" setting , to counteract the Bluish illuminant.</p>
<p>The Lineal RAW image ,instead, does not have the Yellow color bias imposed on it , and therefore contains more
Blue , Truer to the Scene.</p>
<p><em><strong>Did you apply further tweaks to contrast after assigning the 1.0 gamma profile to the bottom image
before posting it here?</strong></em></p>
<p>Yes , of course . When you open a Lineal image and assign a Custom profile of Gamma 1.0 three things happen
:</p>
<p>1-You prevent Photoshop preferences settings for Untagged Images from taking effect ( This means assigning the
Users Workspace preference ,if exist , or P.S. default's , sRGB) </p>
<p>2-The colors of the Lineal Image now have a <strong>Context</strong> that defines the meaning of its color
values.</p>
<p>3-The Most Important Part. No Gamma transformations are applied to the tonal distribution , in essence passing it
right through , as it is , with its original Gamma 1.0<br />
</p>
<p>Because of this last part ( Which is at the heart of the reasons why you choose to do a Lineal Processing ) the
image will have a visual aspect that is Lineal , but with the uncompensated Monitor Gamma of 2.2 Riding on it skewing the
Midtones to the Left . (Remember Gamma is the slope of the Levels Curve at its Midpoint ). So Yes , you have to either
<strong>Reinstate the Gamma Encoding </strong>that you removed early in the Game ,where it hurt the most , or do a Manual
Tone Mapping ( This is better ) Either way you are doing it after the image have already been built from the maximum
data available , which is the point where any Tweaks will hurt the least.( All Tone Manipulations produce data Loss, so you want to
delay them until after the Image has already been created from the RAW Data into 3 RGB channels , on which the Color Balance will be
based upon ) </p>
<p>This last part ,Tone Mapping , is something that every good artist would always do to every image , regardless of it
being Linear or Not , to account for each image needs, that are , obviously , different all the time.</p>
<p>The great benefit of this Lineal Processing is that it enables you to use <strong>all the Data captured</strong> ( Applying
Gamma different than 1.0 ,always shrinks the Tonal Range ) and because the High tones are up to this point ,untouched
, they can deliver a lot more detail ( Shrinking the upper tones means the tonal differences are minimized between
adjacent tones , therefore detail suffers) . This is a good thing because <strong>our eyes are less sensitive to detail in
bright lights .</strong></p>
<p>At the end , when your are satisfied with your image , save it as a Master Image in PSD format , then convert it to
<strong>Adobe sRGB</strong> color space , change image to 8 Bit mode and save it again as JPEG with a
compression of 6 , for web display.</p>
<p>The end result is , like you said "A much better and more accurate looking rendering"</p>
<p>P.S. Roger I am creating a small tutorial using another , similar ,image of the same Scene , that will include a link to
download the RAW file .The other image is already part of <a href="http://www.photo.net/photos/Luis-A-Guevara">my Fine Art Gallery</a>
right here at photo.net . My RAW files are X3f files from a Sigma SD9 camera and Leica lenses , so you will have to
use either Lightroom or Photoshop to do the conversion.</p>
<p>More on this will follow soon.Luis</p><div>
</div> -
<P>Good Idea . Here you have it one NON LINEAR RAW and the best one , at the end ,the LINEAR RAW:</P>
<P>IN THIS ONE THE TONES HAVE BEEN SPREAD EVENLY ACROSS THE HISTOGRAM BY THE GAMMA
FUNCTION</P>
<image src="http://www.sigmacumlaude.com/for%20forum/NON-LINEAR-RAW.jpg">
<P> IN THIS OTHER ONE THE LINEAL RENDERING PUTS THE TONES AS THEY WHERE ON THE ORIGINAL
SCENE:</P>
<image src="http://www.sigmacumlaude.com/for%20forum/LINEAR-RAW.jpg">
<BR><P> You tell me which one you like best, bost have the same "tweaking" except for the different Gammas</
P><BR><P> Luis</P>
-
<P>Hi Frans . Those curves that you are refering to are really just describing the behavior of the Midtones of the
image, in fact the end points are fixed and your options are limited to defining the Slope of the curve at the Mid
Point , which as you described , by default is lineal , meaning no transformation takes place. However the Data that
you are trying to work on is already non lineal , since as soon as you open it in a RAW Converter , before it is even
separated into our familiar 3 RGB chanels , a Gamma of 0.45 is imposed on it, to counteract the Display Gamma of
2.2 , a very necessary step , since we expect the image to be ,overall ,a lineal representation of the Scene, in spite
that the Display is highly unlineal. If you choose a Midtone Curve of Lineal value , then all the intrinsic non linearity
of the converted RAW file is passed along untouched</P><BR>
<P>What this means is that our RAW Data that was Linearly captured ,thanks to the painstaking efforts of the
Sensors Designers ,is artificially DISTORTED when it hurts the most , right before the Color Channels and the Color
Balance are created from it. The RAW file is just a Matrix of Data with no Color Channels , Color Spaces or even
Color , for that matter.</P><BR>
<P>So what is LINEAR PROCESSING AGAIN? </P><BR>
<P>Simple. I am sure that you will agree that is simple. Linear processing is removing the introduction of this
Inverse Gamma at the point where it hurts the most ,and reintroduce it as one of the last steps , where it hurts the
least. </P><BR>
<P>You can do this in the Adobe products Lightroom and ACR , but only if you go deep into the advanced
preferences for conversion ,and choose LINEAL , instead of the default embed Original RAW file.</P>
<P>This is very different than the tweakings that you are talking about , since by removing the compression of
tones
introduced so early in the process you will have more tones to TWEAK . </P><BR>
<P>So the point that I am trying to make is that when Utmost Image Quality matters , linear processing is the way
to go. Lineal Image Converters , like dcRAW-X and others , not only remove Gamma but also , Compression ,
Sharpening ,Denoising , Antialiasing and Interpolation. What you want is that your chanels are made from data that
has been touched the least . Ideally ,not touched at all.</P><BR>All this , Compression ,
Sharpening ,Denoising , Antialiasing and Interpolation, can be best done taylored to the
image type, under the control of the Artist and not by invisible factory presets that only work for Generic ,Average
Scenes.</
P><BR>
<P>Luis</P>
-
<P>Hi everybody . The SD15 is certainly attractive , since it promises to address the SD14 shortcomings, namely
some color bias and small Buffer , and in general , Slow Performance . But what Performance! .
<img src="http://d6d2h4gfvy8t8.cloudfront.net/8079820-md.jpg"><BR>
Today there are choices of better lenses for it ,as you can see in the following images:<P>
<img src="http://i9.ebayimg.com/08/i/000/e8/90/2f03_1.JPG">
<img src="http://www.virtualcameraboutique.com/ebayads/SD14-F/IMG27733.jpg">
<img src="http://www.sigmacumlaude.com/ZYselections/IMG00019.jpg">
<img src="http://www.sigmacumlaude.com/ZYselections/IMG00011.jpg">
<img src="http://www.sigmacumlaude.com/ZYselections/IMG28547.jpg"><BR>
<P>You just have to look around for it . A first place to start is <a href= "http:/www.sigmacumlaude.com"
rel="nofollow">http:/
www.sigmacumlaude.com</a> and also on
<a href= "http://shop.ebay.com/merchant/virtualcameraboutique_W0QQ_nkwZQQ_armrsZ1QQ_fromZQQ_mdoZ"
rel="nofollow">
ebay :</a></
P>


Linear Processing of RAW Image Files .
in The Digital Darkroom: Process, Technique & Printing
Posted
Maybe If you do that I will be able to choose one of yours that can be improved by linear processing , if you care to make the RAW
file available to us . Maybe somebody else would like to do the same . There is no other way .